Warehouses
The warehouse is an essential component of TiDB Cloud Lake. A warehouse represents a set of compute resources including CPU, memory, and local caches. You must run a warehouse to perform SQL tasks such as:
- Querying data with the SELECT statement
- Modifying data with the INSERT, UPDATE, or DELETE statement
- Loading data into a table with the COPY INTO command
Running a warehouse incurs expenses. For more information, see Warehouse Pricing.
Warehouse Sizes
In TiDB Cloud Lake, warehouses are available in various sizes, each defined by the maximum number of concurrent queries it can handle. When creating a warehouse, you can choose from the following sizes:
To choose the appropriate warehouse size, TiDB Cloud Lake recommends starting with a smaller size. Smaller warehouses may take longer to execute SQL tasks compared to medium or large ones. If you find that query execution is taking too long (for example, several minutes), consider scaling up to a medium or large warehouse for faster results.
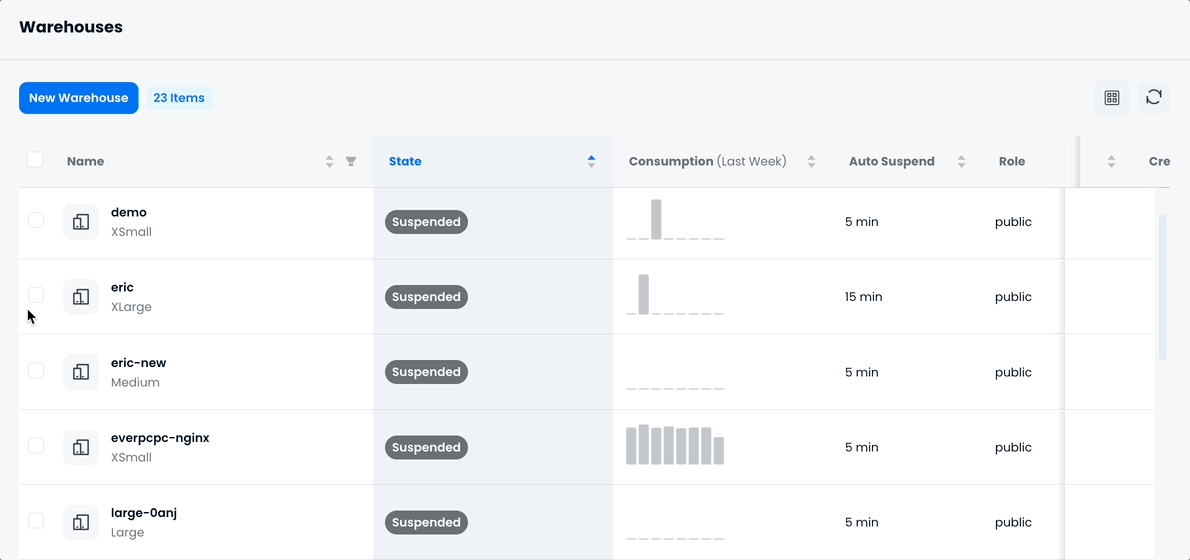
Managing Warehouses
An organization can have as many warehouses as needed. The Warehouses page displays all the warehouses in your organization and allows you to manage them. Please note that only account_admin can create or delete a warehouse.
Suspending / Resuming Warehouses
A suspended warehouse does not consume any credits. You can manually suspend or resume a warehouse by clicking the or button on the warehouse. However, a warehouse can automatically suspend or resume in the following scenarios:
- A warehouse can automatically suspend if there is no activity, based on its auto-suspend setting.
- When you select a suspended warehouse to perform a SQL task, the warehouse will automatically resume.
Performing Bulk Operations
You can perform bulk operations on warehouses, including bulk restart, bulk suspend, bulk resume, and bulk delete. To do so, select the warehouses for bulk operations by checking the checkboxes in the warehouse list, and then click the ellipse button for the desired operation.
Tagging Warehouses
You can attach tags to warehouses to organize and categorize them — for example, by environment, team, or cost center. Tags are key-value pairs and are visible in the warehouse list, where you can filter and sort by them.
Constraints:
- Maximum 10 tags per warehouse
- Key: up to 128 characters
- Value: up to 256 characters
To add tags, expand the Tags section when creating or editing a warehouse and enter your key-value pairs.
Tags are displayed as key: value in the warehouse list and can be used to filter warehouses by key or value.
Best Practices
To effectively manage your warehouses and ensure optimal performance and cost-efficiency, consider the following best practices. These guidelines will help you size, organize, and fine-tune your warehouses for various workloads and environments:
Choose the Right Size
- For development & testing, use smaller warehouses (XSmall, Small).
- For production, opt for larger warehouses (Medium, Large, XLarge).
Separate Warehouses
- Use separate warehouses for data loading and query execution.
- Create distinct warehouses for development, testing, and production environments.
Data Loading Tips
- Smaller warehouses (Small, Medium) are suitable for data loading.
- Optimize file size and the number of files to enhance performance.
Optimize for Cost & Performance
- Avoid running simple queries like
SELECT 1to minimize credit usage. - Use bulk loading (
COPY) rather than individualINSERTstatements. - Monitor long-running queries and optimize them to improve performance.
- Avoid running simple queries like
Auto-Suspend
- Enable auto-suspend to save credits when the warehouse is idle.
Disable Auto-Suspend for Frequent Queries
- Keep warehouses active for frequent or repetitive queries to maintain cache and avoid delays.
Use Auto-Scaling (Business & Dedicated Plans Only)
- Multi-cluster scaling automatically adjusts resources based on workload demand.
Monitor & Adjust Usage
- Regularly review warehouse usage and resize as needed to balance cost and performance.
Warehouse Access Control
TiDB Cloud Lake allows you to manage warehouse access with role-based controls by assigning a specific role to a warehouse, so only users with that role can access the warehouse.
To assign a role to a warehouse, select the desired role in the Advanced Options during the warehouse creation or modification process:
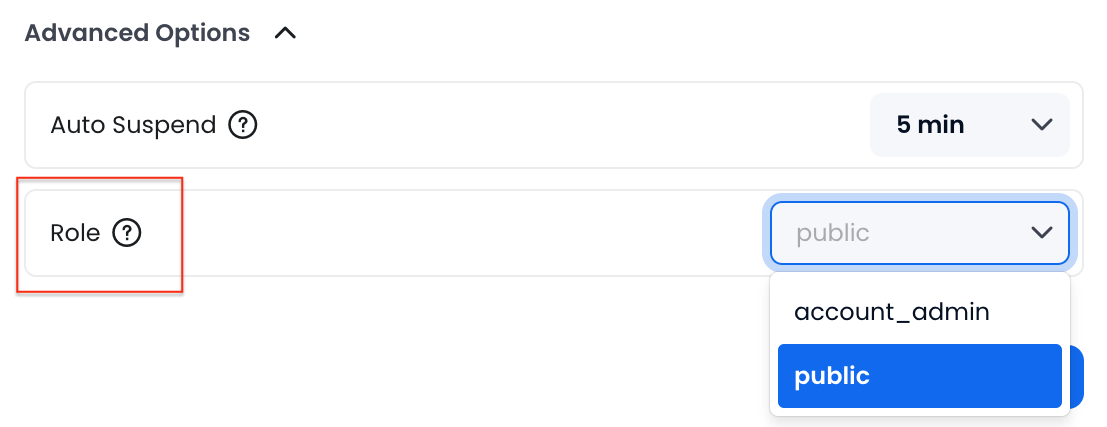
The two Built-in Roles are available for selection, and you can also create additional roles using the CREATE ROLE command. For more information about TiDB Cloud Lake roles, see Roles.
Warehouses without an assigned role default to the
publicrole, allowing access to all users.You can grant a role to a user (TiDB Cloud Lake login email or SQL user) using the GRANT command. This example grants the role
managerto the user with the emailname@example.com, allowing access to any warehouse assigned to themanagerrole:GRANT ROLE manager to 'name@example.com';
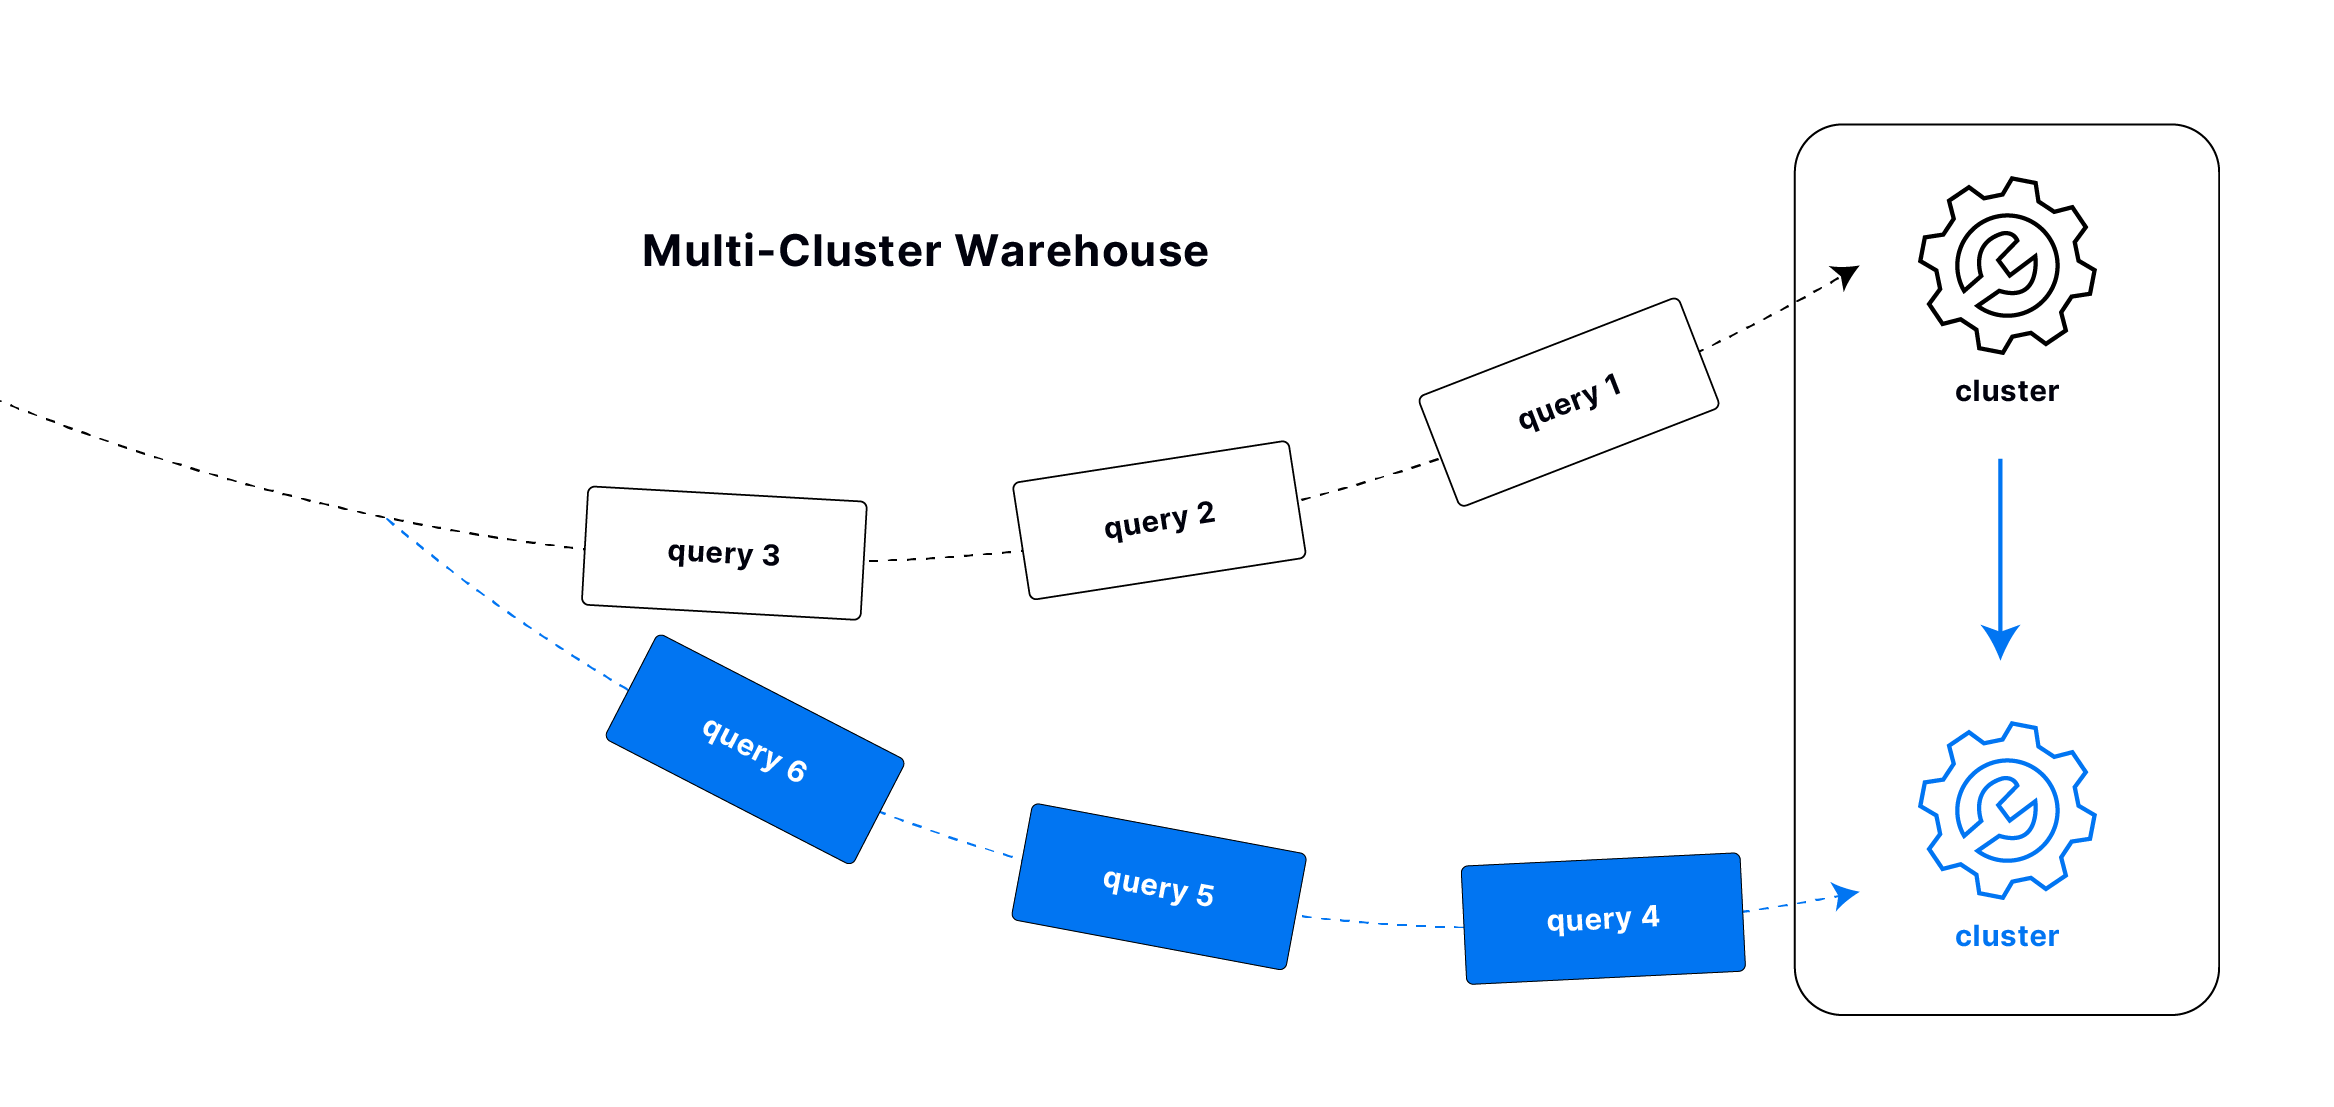
Multi-Cluster Warehouses
A multi-cluster warehouse automatically adjusts compute resources by adding or removing clusters based on workload demand. It ensures high concurrency and performance while optimizing cost by scaling up or down as needed.
How it Works
By default, a warehouse consists of a single cluster of compute resources, which can handle a maximum number of concurrent queries depending on its size. When Multi-Cluster is enabled for a warehouse, it allows multiple clusters (as defined by the Max Clusters setting) to be dynamically added to handle workloads that exceed the capacity of a single cluster.
When the number of concurrent queries exceeds the capacity of your warehouse, an additional cluster is added to handle the extra load. If the demand continues to grow, more clusters are added one by one. As query demand decreases, clusters with no activity for longer than the Auto Suspend duration are automatically shut down.
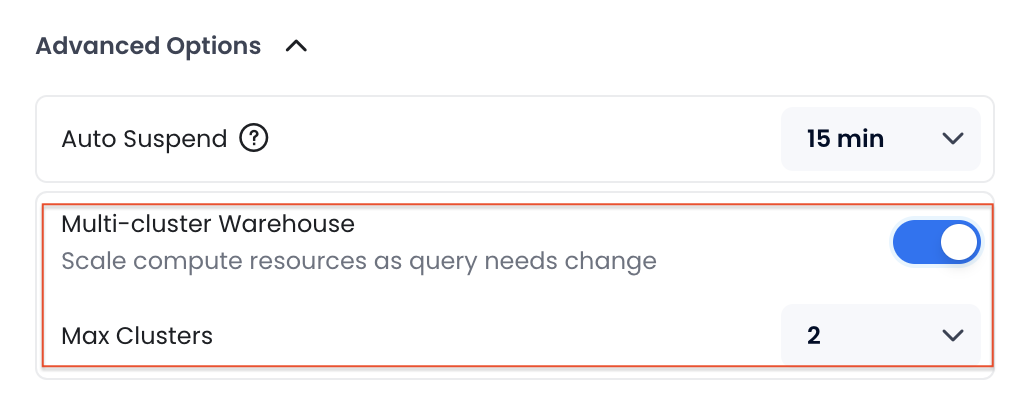
Enabling Multi-Cluster
You can enable Multi-Cluster for a warehouse when you create it and set the maximum number of clusters that the warehouse can scale up to. Please note that if Multi-Cluster is enabled for a warehouse, the Auto Suspend duration must be set to at least 15 minutes.
Cost Calculation
Multi-Cluster Warehouses are billed based on the number of active clusters used during specific time intervals.
For example, for an XSmall Warehouse priced at $1.6 per hour, if one cluster is actively used from 13:00 to 14:00 and two clusters are actively used from 14:00 to 15:00, the total cost incurred from 13:00 to 15:00 is $4.8 ((1 cluster × 1 hour × $1.6) + (2 clusters × 1 hour × $1.6)).
MySQL Endpoint
The MySQL Endpoint feature enables a warehouse to accept connections from BI tools and applications that only support the MySQL protocol, such as Tableau, Grafana, or other MySQL-compatible clients.
Enabling MySQL Endpoint
You can enable the MySQL Endpoint for a warehouse when you create it or modify it later. The option is available in the Advanced Options section as a toggle switch.
Connecting via MySQL Protocol
Once enabled, you can connect to the warehouse using any MySQL-compatible client with the standard MySQL connection details shown in the Connect dialog. This is useful for integrating with tools that do not natively support the TiDB Cloud Lake protocol.
Connecting to a Warehouse
Connecting to a warehouse provides the compute resources required to run queries and analyze data within TiDB Cloud Lake. This connection is necessary when accessing TiDB Cloud Lake from your applications or SQL clients.
Connection Methods
TiDB Cloud Lake supports multiple connection methods to meet your specific needs.
SQL Clients & Tools
Developer Drivers
Obtaining Connection Information
To obtain the connection information for a warehouse:
- Click Overview > Connect.
- Select the Database and Warehouse you wish to connect to. The connection information will update based on your selection.
- The connection details include a SQL user named
cloudappwith a randomly generated password. TiDB Cloud Lake does not store this password. Be sure to copy and save it securely. If you forget the password, click Reset to generate a new one (It requires an Admin to reset it).
Connection String Format
TiDB Cloud Lake automatically generates your connection string when you click Connect:
lake://<username>:<password>@<tenant>.gw.<region>.default.tidbcloud.com:443/<database>?warehouse=<warehouse_name>
Where:
<username>: Default iscloudapp<password>: Click Reset to view or change<tenant>,<region>: Your account information (shown in the connection details)<database>: Selected database (shown in the connection details)<warehouse_name>: Selected warehouse (shown in the connection details)
Creating SQL Users for Warehouse Access
Besides the default cloudapp user, you can create additional SQL users for better security and access control.
Example 1: Full access across all databases
Grant a user read/write access to all databases — useful for admin accounts or automation pipelines that need cross-database operations:
-- Create a role with global access
CREATE ROLE full_access_role;
GRANT ALL ON *.* TO ROLE full_access_role;

-- Create the user and assign the role
CREATE USER admin_user IDENTIFIED BY 'SecurePass456!' WITH DEFAULT_ROLE = 'full_access_role';
GRANT ROLE full_access_role TO admin_user;
Example 2: Single-database access
Grant a user access to one specific database only:
-- Create a role scoped to one database
CREATE ROLE warehouse_user1_role;
GRANT ALL ON my_database.* TO ROLE warehouse_user1_role;

-- Create a new SQL user and assign the role
CREATE USER warehouse_user1 IDENTIFIED BY 'StrongPassword123' WITH DEFAULT_ROLE = 'warehouse_user1_role';
GRANT ROLE warehouse_user1_role TO warehouse_user1;
Example 3: Read-only access across all databases
For scenarios where the user should only query data (dashboards, BI tools, AI agents in safe mode):
-- Create a read-only role
CREATE ROLE readonly_role;
GRANT SELECT ON *.* TO ROLE readonly_role;

-- Create the user
CREATE USER readonly_user IDENTIFIED BY 'ReadOnly789!' WITH DEFAULT_ROLE = 'readonly_role';
GRANT ROLE readonly_role TO readonly_user;
For more details, see CREATE USER and GRANT documentation.
Connection Security
All connections to TiDB Cloud Lake warehouses use TLS encryption by default. For enterprise users requiring additional security, AWS PrivateLink is available to establish private connections between your VPC and TiDB Cloud Lake.