Integrate TiDB Cloud with Vercel
Vercel is a platform for frontend developers, providing the speed and reliability innovators need to create at the moment of inspiration.
Using TiDB Cloud with Vercel enables you to build new frontend applications faster with a MySQL-compatible relational model and grow your app with confidence with a platform built for resilience, scale, and the highest levels of data privacy and security.
This guide describes how to connect your TiDB Cloud resources to Vercel projects using one of the following methods:
For both of the preceding methods, TiDB Cloud provides the following options for programmatically connecting to your database:
- Cluster: connect your TiDB Cloud cluster to your Vercel project with direct connections or serverless driver.
- Data App: access data of your TiDB Cloud cluster through a collection of HTTP endpoints.
Prerequisites
Before connection, make sure the following prerequisites are met.
A Vercel account and a Vercel project
You are expected to have an account and a project in Vercel. If you do not have any, refer to the following Vercel documents to create one:
- Creating a new personal account or Creating a new team.
- Creating a project in Vercel, or if you do not have an application to deploy, you can use the TiDB Cloud Starter Template to have a try.
One Vercel project can only connect to one TiDB Cloud cluster. To change the integration, you need to first disconnect the current cluster and then connect to a new cluster.
A TiDB Cloud account and a TiDB cluster
You are expected to have an account and a cluster in TiDB Cloud. If you do not have any, refer to the following to create one:
To integrate with Vercel via the TiDB Cloud Vercel Integration, you are expected to be in the Organization Owner role of your organization or the Project Owner role of the target project in TiDB Cloud. For more information, see User roles.
One TiDB Cloud cluster can connect to multiple Vercel projects.
A Data App and endpoints
If you want to connect to your TiDB Cloud cluster via a Data App, you are expected to have the target Data App and endpoints in TiDB Cloud in advance. If you do not have any, refer to the following to create one:
- In the TiDB Cloud console, go to the Data Service page of your project.
- Create a Data App for your project.
- Link the Data App to the target TiDB Cloud cluster.
- Manage endpoints so that you can customize them to execute SQL statements.
One Vercel project can only connect to one TiDB Cloud Data App. To change the Data App for your Vercel project, you need to first disconnect the current App and then connect to a new App.
Connect via the TiDB Cloud Vercel integration
To connect via the TiDB Cloud Vercel integration, go to the TiDB Cloud integration page from the Vercel's Integrations Marketplace. Using this method, you can choose which cluster to connect to, and TiDB Cloud will automatically generate all the necessary environment variables for your Vercel projects.
Integration workflow
The detailed steps are as follows:
Click Add Integration in the upper-right area of the TiDB Cloud Vercel integration page. The Add TiDB Cloud dialog is displayed.
Select the scope of your integration in the drop-down list and click Continue.
Select the Vercel projects to which the integration will be added and click Continue.
Confirm the required permissions for integration and click Add Integration. Then you are directed to an integration page of the TiDB Cloud console.
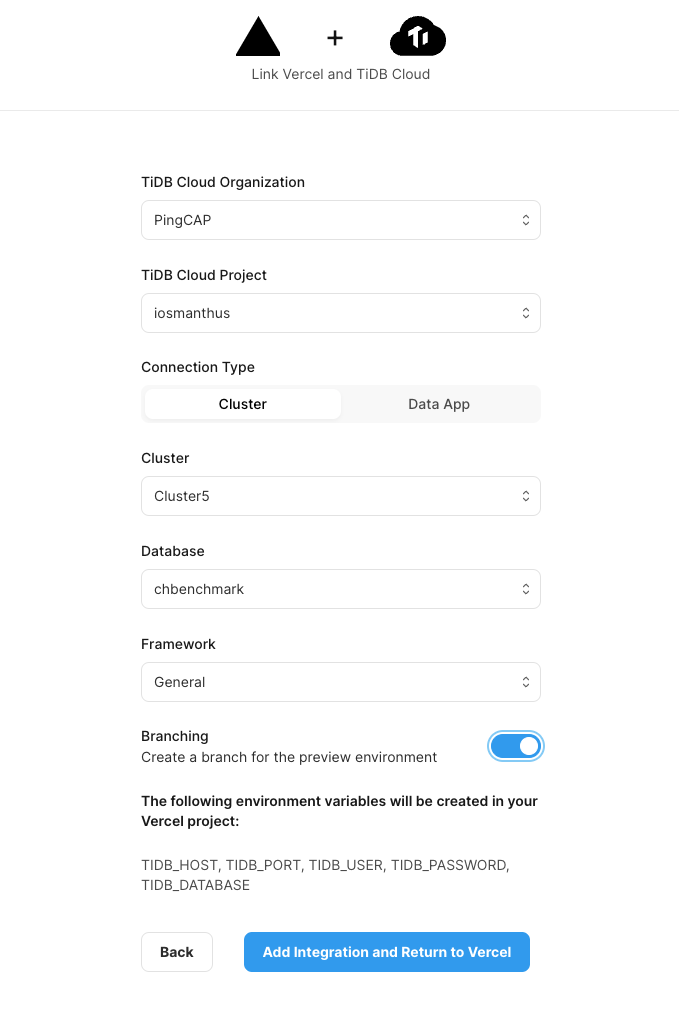
On the integration page, do the following:
- Select your target Vercel projects and click Next.
- Select your target TiDB Cloud organization and project.
- Select Cluster as your connection type.
- Select your target TiDB Cloud resource. If the Cluster drop-down list is empty or you want to select a new TiDB Cloud Starter or TiDB Cloud Essential instance, click + Create Cluster in the list to create one.
- Select the database that you want to connect to. If the Database drop-down list is empty or you want to select a new Database, click + Create Database in the list to create one.
- Select the framework that your Vercel projects are using. If the target framework is not listed, select General. Different frameworks determine different environment variables.
- Choose whether to enable Branching to create new branches for preview environments.
- Click Add Integration and Return to Vercel.
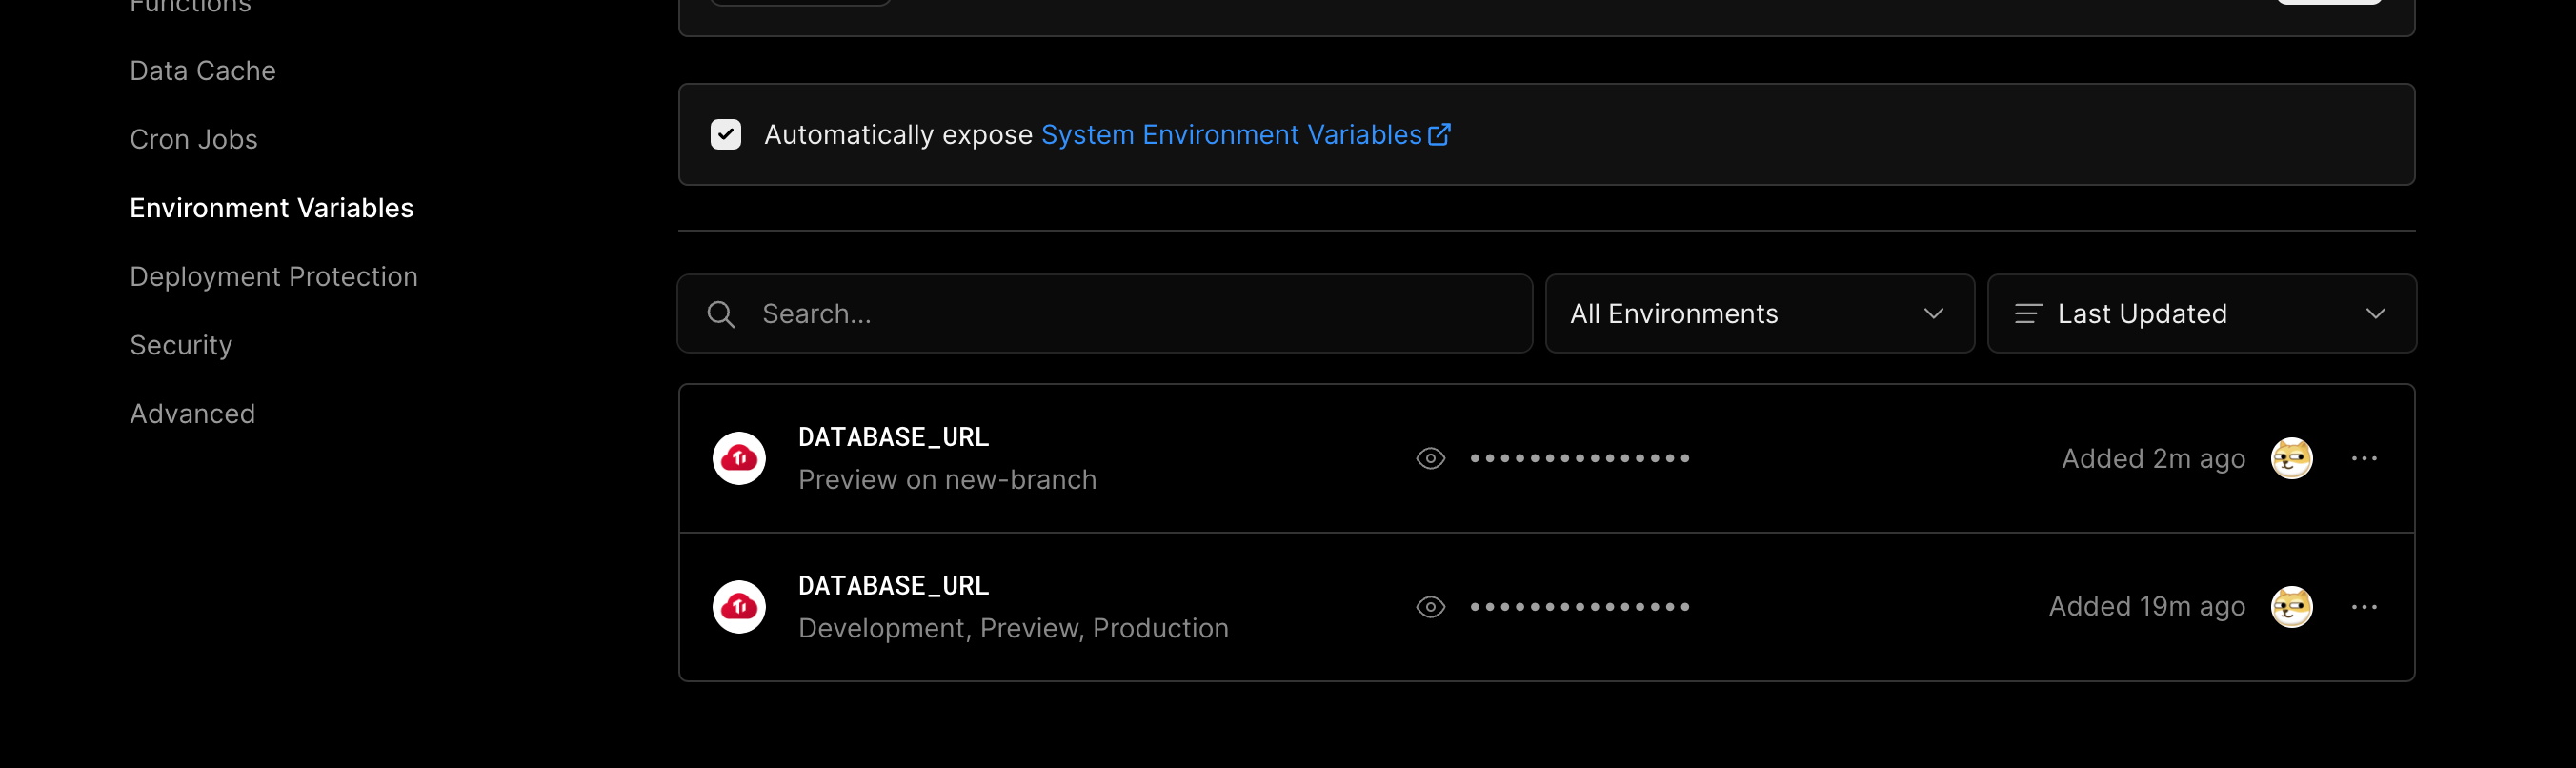
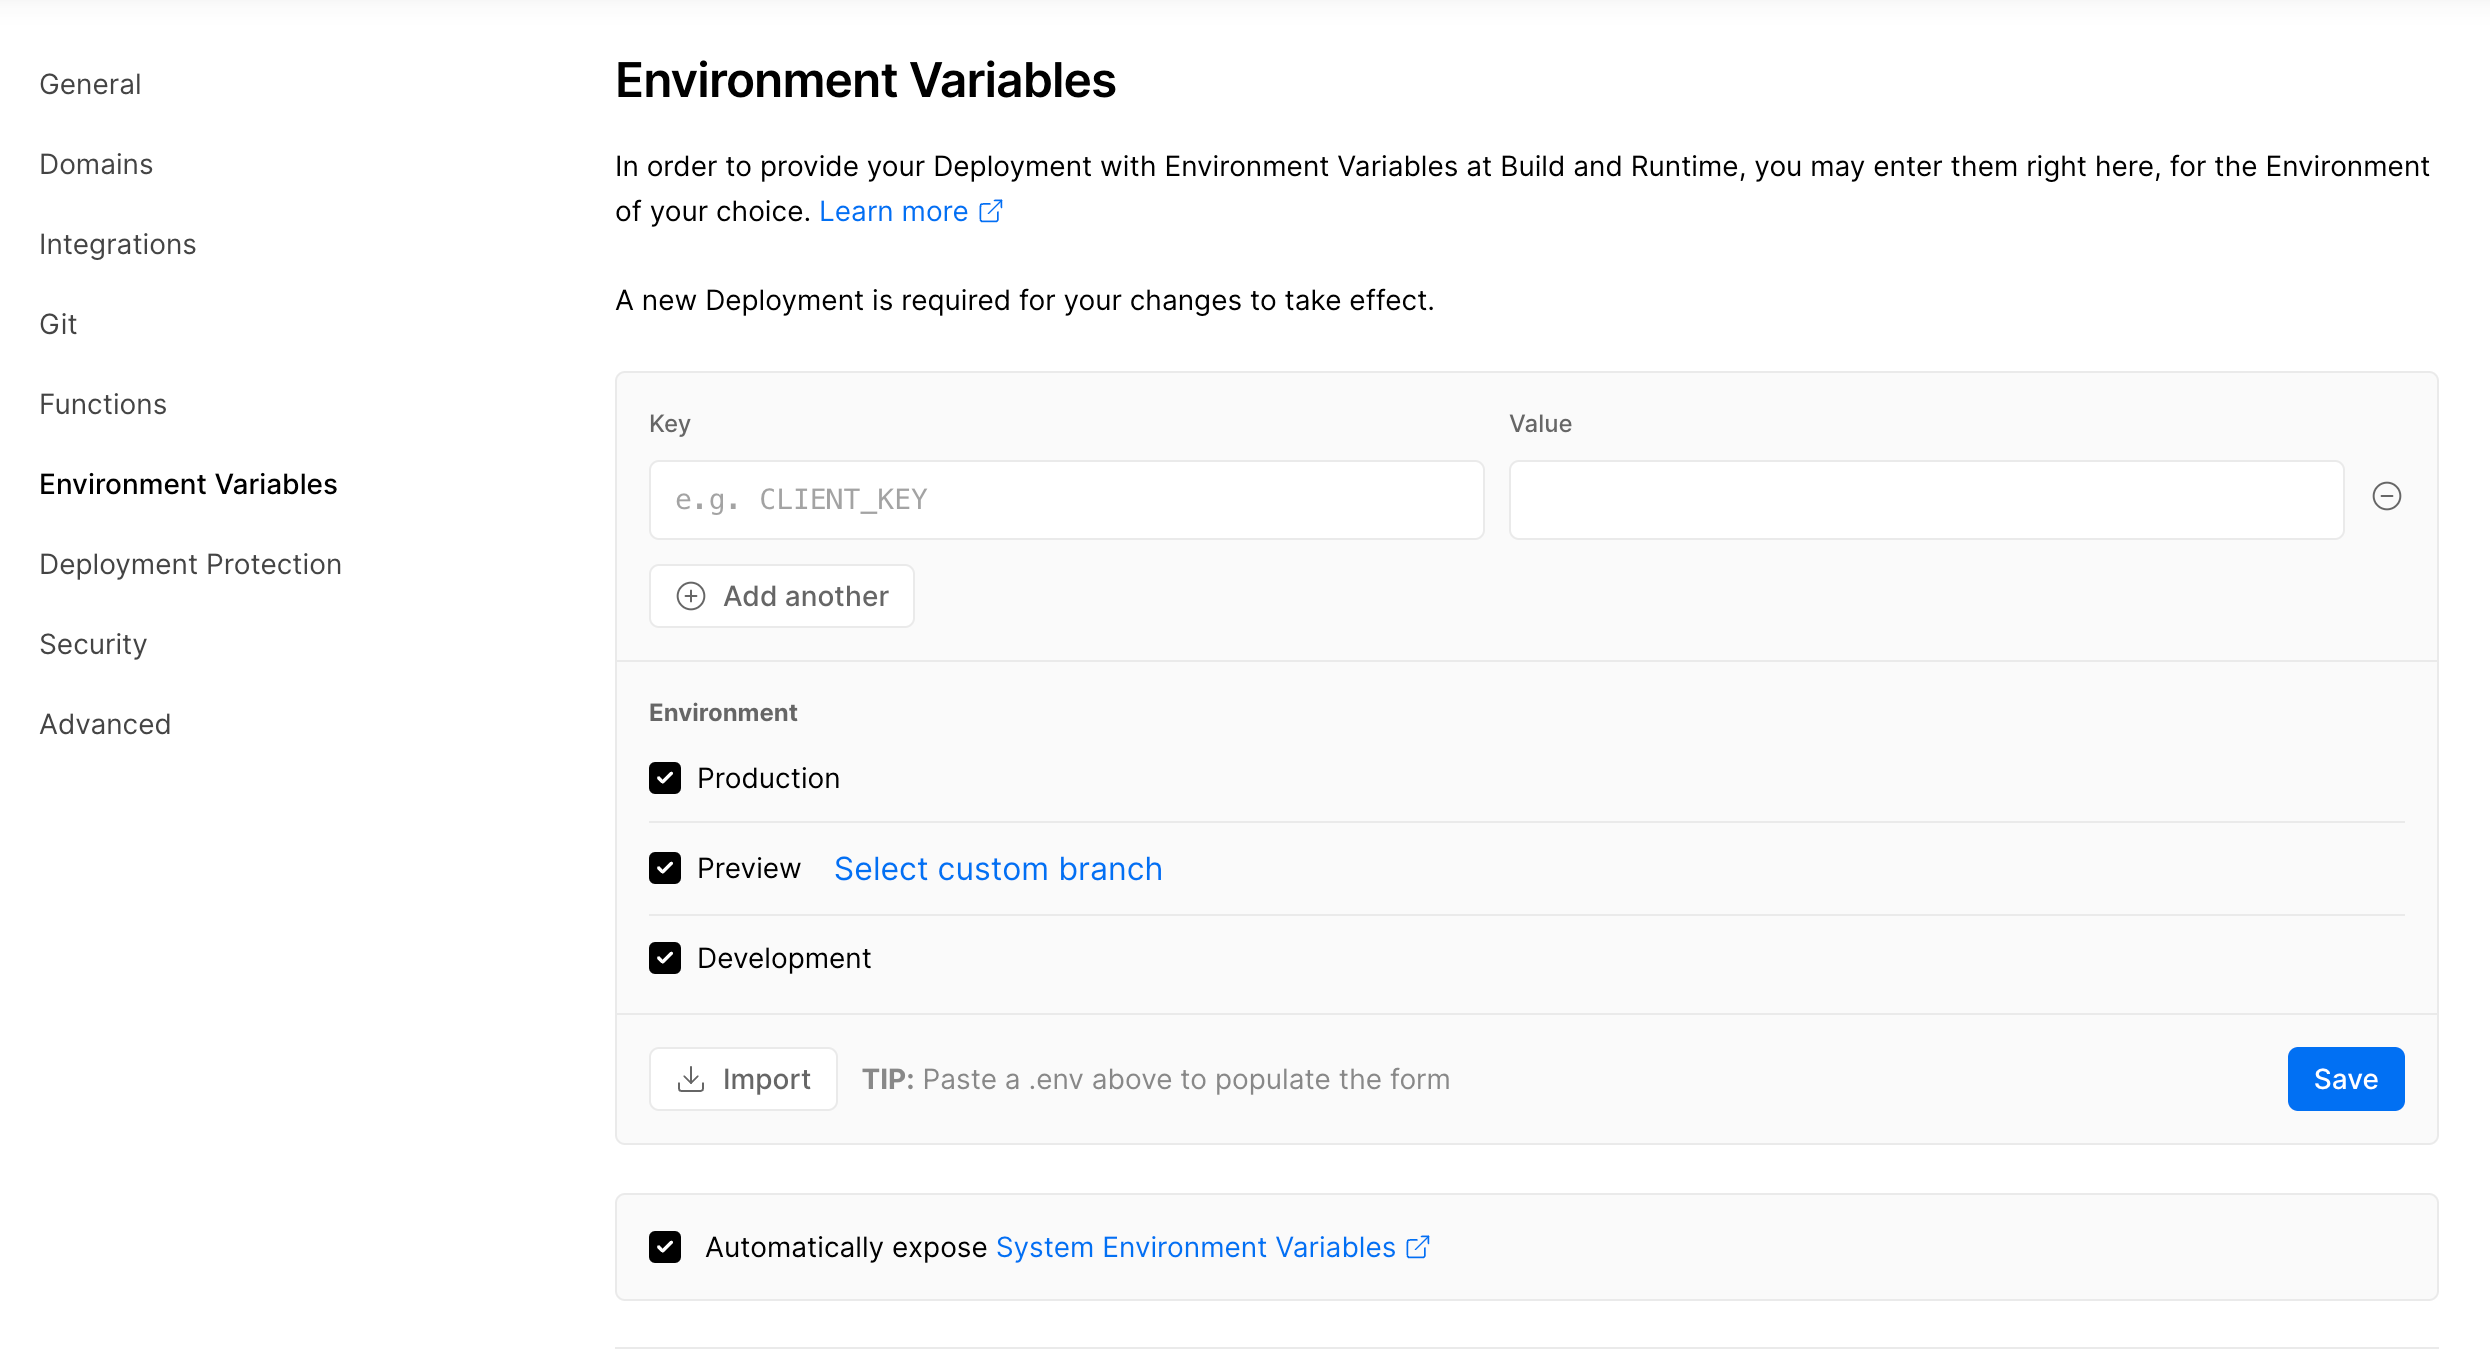
Get back to your Vercel dashboard, go to your Vercel project, click Settings > Environment Variables, and check whether the environment variables for your target TiDB cluster have been automatically added.
If the following variables have been added, the integration is completed.
General
TIDB_HOST
TIDB_PORT
TIDB_USER
TIDB_PASSWORD
TIDB_DATABASE
Prisma
DATABASE_URLTiDB Cloud Serverless Driver
DATABASE_URL
Click Add Integration in the upper-right area of the TiDB Cloud Vercel integration page. The Add TiDB Cloud dialog is displayed.
Select the scope of your integration in the drop-down list and click Continue.
Select the Vercel projects to which the integration will be added and click Continue.
Confirm the required permissions for integration and click Add Integration. Then you are directed to an integration page of the TiDB Cloud console.
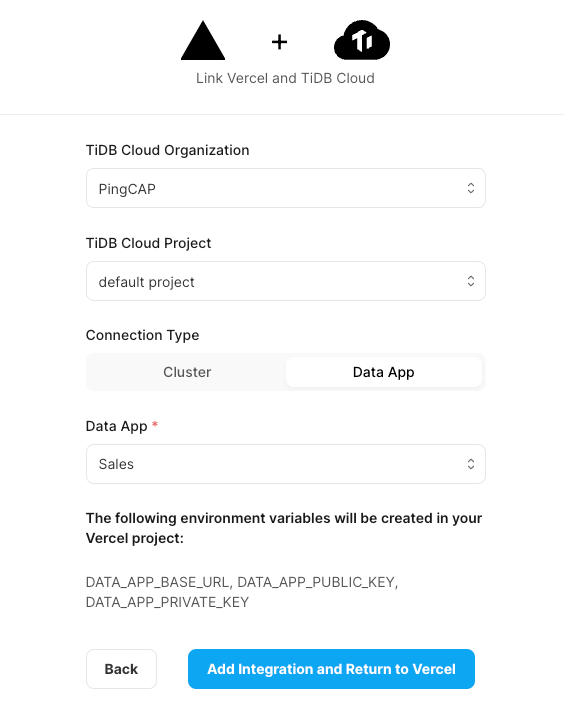
On the integration page, do the following:
- Select your target Vercel projects and click Next.
- Select your target TiDB Cloud organization and project.
- Select Data App as your connection type.
- Select your target TiDB Data App.
- Click Add Integration and Return to Vercel.
Get back to your Vercel dashboard, go to your Vercel project, click Settings > Environment Variables, and check whether the environment variables for your target Data App have been automatically added.
If the following variables have been added, the integration is completed.
DATA_APP_BASE_URL
DATA_APP_PUBLIC_KEY
DATA_APP_PRIVATE_KEY
Configure connections
If you have installed TiDB Cloud Vercel integration, you can add or remove connections inside the integration.
In your Vercel dashboard, click Integrations.
Click Manage in the TiDB Cloud entry.
Click Configure.
Click Add Link or Remove to add or remove connections.
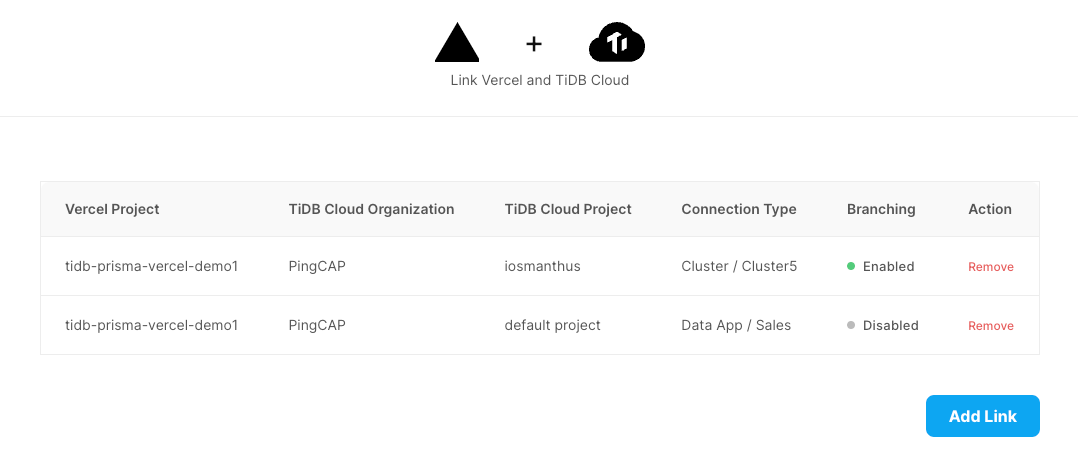
When you remove a connection, the environment variables set by the integration workflow are removed from the Vercel project, too. However, this action does not affect the data of your TiDB Cloud cluster.
Connect with TiDB Cloud branching
Vercel's Preview Deployments feature allows you to preview changes to your app in a live deployment without merging those changes to your Git project's production branch. With TiDB Cloud Branching, you can create a new instance for each branch of your Vercel project. This allows you to preview app changes in a live deployment without affecting your production data.
To enable TiDB Cloud Branching, you need to ensure the following in the TiDB Cloud Vercel integration workflow:
- Select Cluster as your connection type.
- Enable Branching to create new branches for preview environments.
After you push changes to the Git repository, Vercel will trigger a preview deployment. TiDB Cloud integration will automatically create a branch of your TiDB Cloud cluster for the Git branch and set environment variables. The detailed steps are as follows:
Create a new branch in your Git repository.
cd tidb-prisma-vercel-demo1
git checkout -b new-branch
Add some changes and push the changes to the remote repository.
Vercel will trigger a preview deployment for the new branch.

During the deployment, TiDB Cloud integration will automatically create a branch for your cluster with the same name as the Git branch. If the branch already exists, TiDB Cloud integration will skip this step.
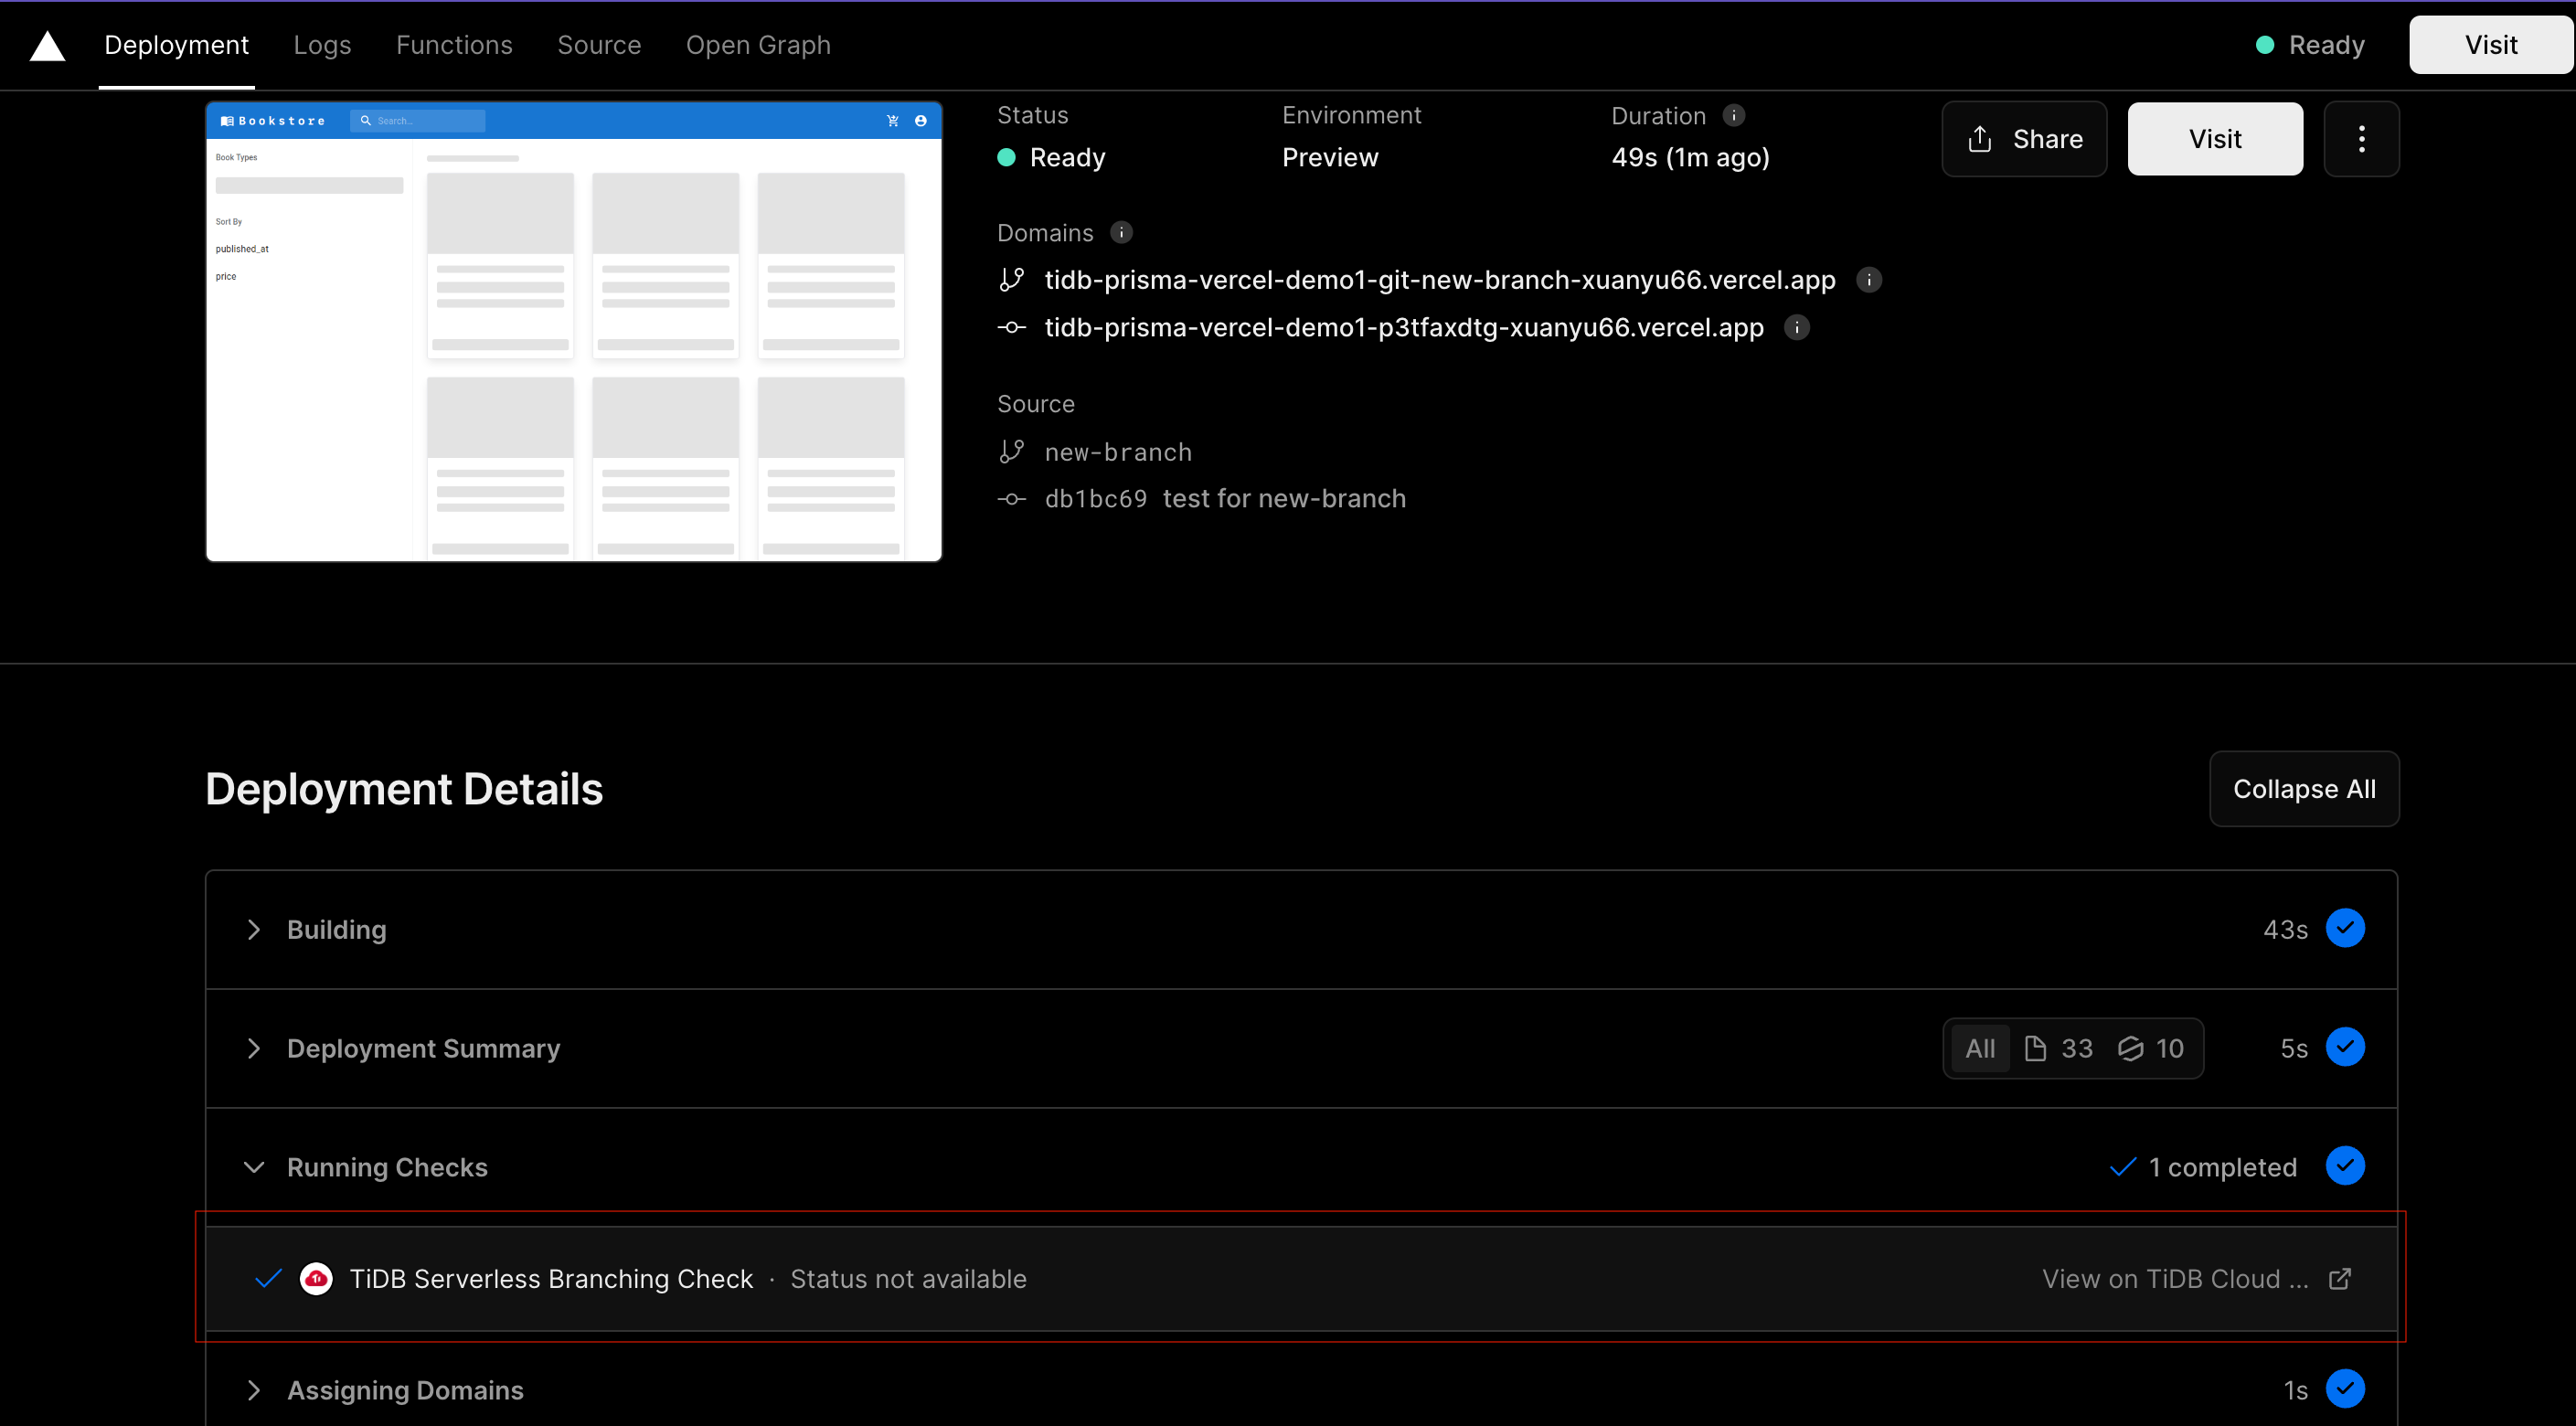
After the branch is ready, TiDB Cloud integration will set environment variables in the preview deployment for the Vercel project.
TiDB Cloud integration will also register a blocking check to wait for the branch to be ready. You can rerun the check manually.
After the check is passed, you can visit the preview deployment to see the changes.
Connect via manually setting environment variables
Get the connection information of your TiDB cluster.
You can get the connection information from the connection dialog of your cluster. To open the dialog, go to the My TiDB page, click the name of your target resource to go to its overview page, and then click Connect in the upper-right corner.
Go to your Vercel dashboard > Vercel project > Settings > Environment Variables, and then declare each environment variable value according to the connection information of your TiDB cluster.
Here we use a Prisma application and a TiDB Cloud Starter instance as an example. The following is a datasource setting in the Prisma schema file for a TiDB Cloud Starter instance:
datasource db {
    provider = "mysql"
    url      = env("DATABASE_URL")
}
In Vercel, you can declare the environment variables as follows:
- Key =
DATABASE_URL - Value =
mysql://<User>:<Password>@<Endpoint>:<Port>/<Database>?sslaccept=strict
You can get the information of <User>, <Password>, <Endpoint>, <Port>, and <Database> in the TiDB Cloud console.
Follow the steps in Manage a Data APP and Manage an Endpoint to create a Data App and its endpoints if you have not done that.
Go to your Vercel dashboard > Vercel project > Settings > Environment Variables, and then declare each environment variable value according to the connection information of your Data App.
In Vercel, you can declare the environment variables as follows.
- Key =
DATA_APP_BASE_URL - Value =
<DATA_APP_BASE_URL> - Key =
DATA_APP_PUBLIC_KEY - Value =
<DATA_APP_PUBLIC_KEY> - Key =
DATA_APP_PRIVATE_KEY - Value =
<DATA_APP_PRIVATE_KEY>
You can get the information of
<DATA_APP_BASE_URL>,<DATA_APP_PUBLIC_KEY>,<DATA_APP_PRIVATE_KEY>from your Data Service page of the TiDB Cloud console.- Key =