Manage TiDB Node Groups
This document describes how to manage TiDB node groups and their endpoints to isolate your business workload using the TiDB Cloud console.
Terms
TiDB Node Group: A TiDB node group manages the grouping of TiDB nodes and maintains the mapping between endpoints and TiDB nodes.
- Each TiDB node group has a unique endpoint.
- When you delete a TiDB node group, the related network setting (such as private link and IP access list) will be deleted too.
Default Group: When a cluster is created, a default TiDB node group is created. Therefore, each cluster has a default group. The default group cannot be deleted.
Prerequisites
- You have a TiDB Cloud Dedicated cluster deployed on AWS or Google Cloud.
- You are in the Organization Owner or Project Owner role of your organization. For more information, see User roles.
Create a TiDB node group
To create a TiDB node group, perform the following steps:
In the TiDB Cloud console, navigate to the Clusters page of your project, and then click the name of your target cluster to go to its overview page.
In the left navigation pane, click Nodes.
Click Modify in the upper-right corner. The Modify Cluster page is displayed.
On the Modify Cluster page, click + to add a new TiDB node group as follows. You can also use the default group directly.
TiDB
- vCPU + RAM: choose the TiDB size you need. Only TiDB nodes with 8 vCPU and 16 GiB memory or higher specifications are supported.
- Node Groups: click + to create a new TiDB node group. You can also use the default group and enter the number of TiDB nodes in the DefaultGroup field.
TiKV
- vCPU + RAM: choose the TiKV size you need.
- Storage x Nodes: choose the storage size and the number of TiKV nodes.
TiFlash (optional)
- vCPU + RAM: choose the TiFlash size you need.
- Storage x Nodes: choose the storage size and the number of TiFlash nodes.
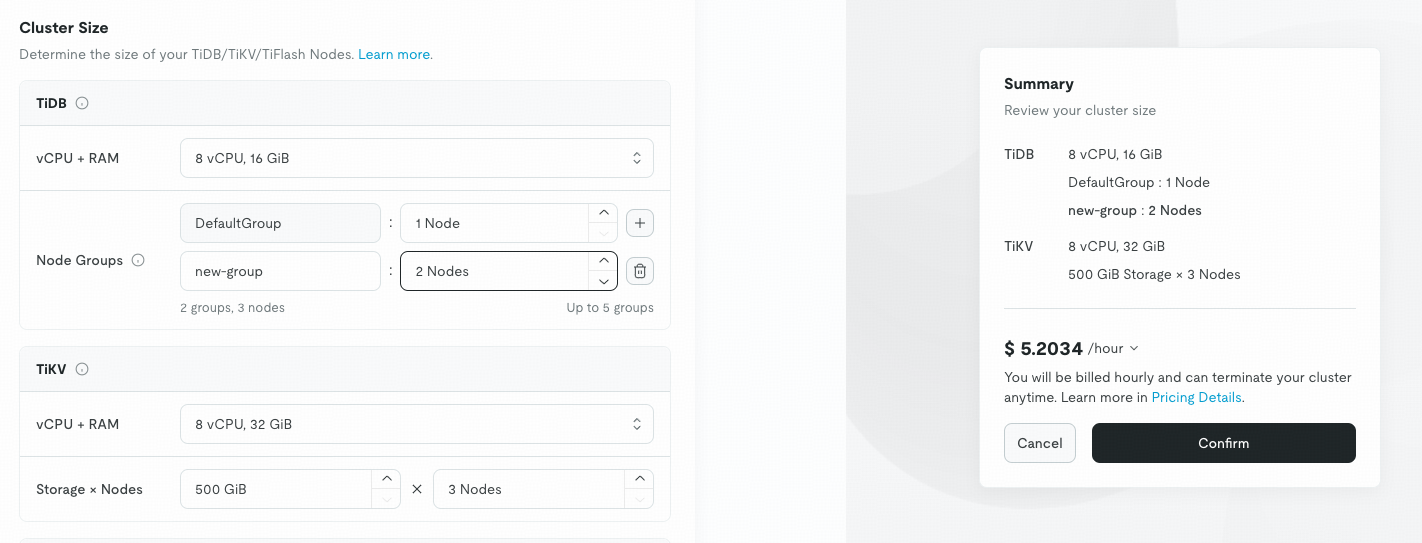
New TiDB nodes are added along with the new TiDB node group, which affects the cluster's billing. Review the cluster size in the right pane, then click Confirm.
By default, you can create up to five TiDB node groups for a TiDB Cloud Dedicated cluster. If you need more groups, contact TiDB Cloud Support.
If you create a TiDB node group but still use the endpoint of the default group to connect to the cluster, the TiDB nodes in the TiDB node group will not take any workload, which is a waste of the resource. You need to create new connection to the TiDB nodes in the new TiDB node group. See Connect to a TiDB node group.
Connect to a TiDB node group
Connect via public connection
Public connection for the new TiDB node group is disabled by default. You need to enable it first.
To enable public connection, do the following:
Navigate to the Clusters page, and then click the name of your target cluster to go to its overview page.
In the upper-right corner, click Connect. A connection dialog is displayed.
Select your TiDB node group from the TiDB Node Group list and Public from the Connection Type list.
If you have not configured the IP access list, click Configure IP Access List or follow the steps in Configure an IP Access List to configure it before your first connection.
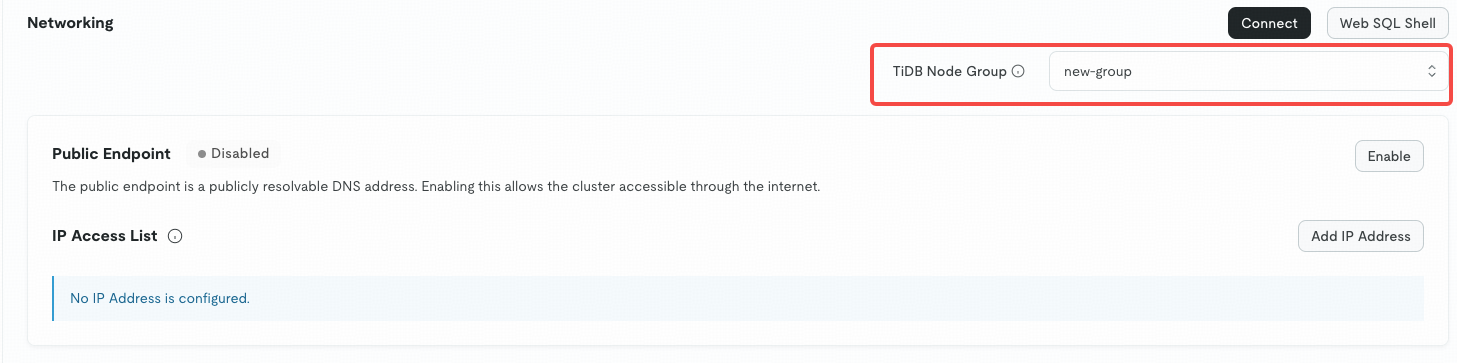
In the left navigation pane, click Settings > Networking.
On the Networking page, select your TiDB node group from the TiDB Node Group list in the upper-right corner.
Click Enable in the Public Endpoint section, then click Add IP Address in the IP Access List section.
In the upper-right corner of the Networking page, click Connect to get the connection string.
For more information, see Connect to TiDB Cloud Dedicated via Public Connection.
Connect via private endpoint
Navigate to the Clusters page, and then click the name of your target cluster to go to its overview page.
In the upper-right corner, click Connect. A connection dialog is displayed.
Select your TiDB node group from the TiDB Node Group list and Private Endpoint from the Connection Type list.
In the left navigation pane, click Settings > Networking.
On the Networking page, select your TiDB node group from the TiDB Node Group list in the upper-right corner.
Click Create Private Endpoint Connection to create a new connection for this node group.
- For clusters deployed on AWS, refer to Connect to a TiDB Cloud Dedicated Cluster via AWS PrivateLink.
- For clusters deployed on Google Cloud, refer to Connect to a TiDB Cloud Dedicated Cluster via Google Cloud Private Service Connect.
After creating the private endpoint connection, click Connect in the upper-right corner of the page to get the connection string.
Connect via VPC peering
Because all TiDB node groups share the same VPC as the cluster, you only need to create one VPC peering connection to enable access for all groups.
- Follow the instructions in Connect to TiDB Cloud Dedicated via VPC Peering to create a VPC peering for this cluster.
- Navigate to the Clusters page, and then click the name of your target cluster to go to its overview page.
- In the left navigation pane, click Settings > Networking.
- In the upper-right corner of the Networking page, click Connect to get the connection string.
View TiDB node groups
To view the details of TiDB node groups, perform the following steps:
Navigate to the Clusters page, and then click the name of your target cluster to go to its overview page.
In the left navigation pane, click Nodes to view the list of TiDB node groups.
To switch to the table view, click .
Modify a TiDB node group
You can modify the group name and node configurations in the group.
Change the group name
To change the group name, perform the following steps:
- Navigate to the Clusters page, and then click the name of your target cluster to go to its overview page.
- In the left navigation pane, click Nodes.
- Click and enter a new name for the TiDB node group.
Update the node configuration
To update TiDB, TiKV, or TiFlash node configurations in the group, perform the following steps:
Navigate to the Clusters page, and then click the name of your target cluster to go to its overview page.
In the left navigation pane, click Nodes.
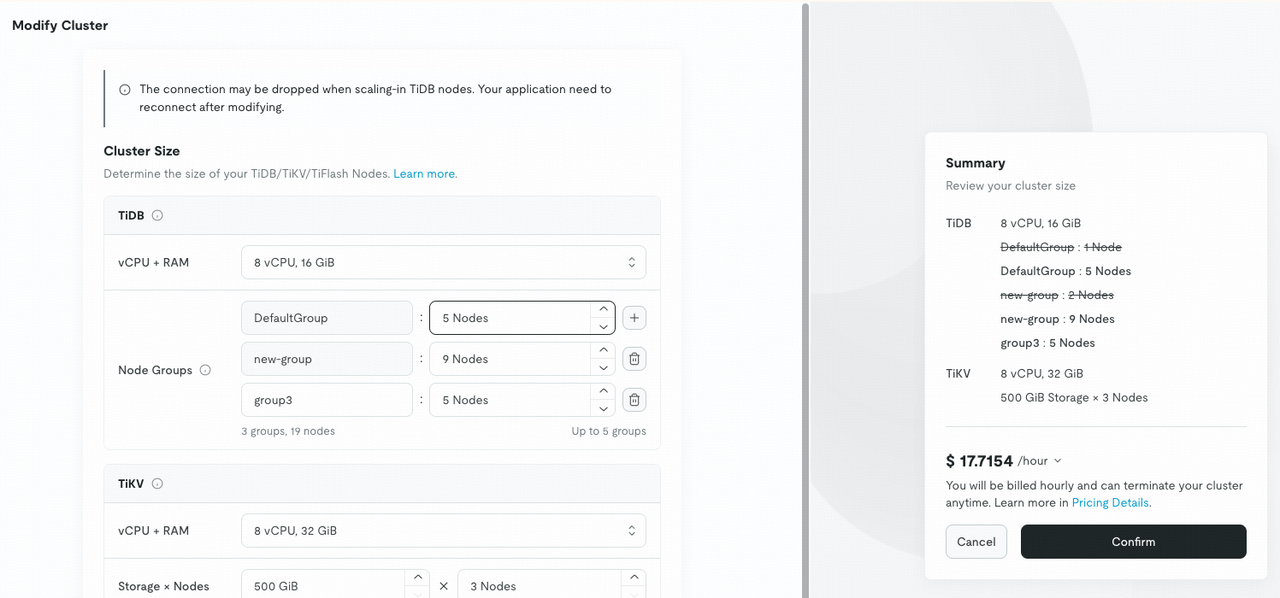
On the Node Map page, click Modify in the upper-right corner. The Modify Cluster page is displayed.
On the Modify Cluster page, you can:
- Change the number of TiDB nodes.
- Add new node groups.
- Update the size and Storage x Nodes configuration for TiKV and TiFlash nodes.
Delete a TiDB node group
To delete a TiDB node group, perform the following steps:
- Navigate to the Clusters page, and then click the name of your target cluster to go to its overview page.
- In the left navigation pane, click Nodes.
- On the Node Map page, click Modify in the upper-right corner. The Modify Cluster page is displayed.
- On the Modify Cluster page, click to delete the TiDB node group.
