Integrate TiDB Cloud with n8n
n8n is an extendable workflow automation tool. With a fair-code distribution model, n8n will always have visible source code, be available to self-host, and allow you to add your custom functions, logic, and apps.
This document introduces how to build an auto-workflow: create a TiDB Cloud Starter instance, gather Hacker News RSS, store it to TiDB and send a briefing email.
Prerequisites: Get TiDB Cloud API key
- In the TiDB Cloud console, switch to your target organization using the combo box in the upper-left corner.
- In the left navigation pane, click Organization Settings > API Keys.
- On the API Keys page, click Create API Key.
- Enter a description for the API key, and then click Next.
- Copy the created API key for later use in n8n, and then click Done.
For more information, see TiDB Cloud API Overview.
Step 1: Install n8n
There are two ways to install your self-hosting n8n. Choose whichever works for you.
Install node.js on your workspace.
Download and start n8n by
npx.npx n8n
Install Docker on your workspace.
Download and start n8n by
docker.docker run -it --rm --name n8n -p 5678:5678 -v ~/.n8n:/home/node/.n8n n8nio/n8n
After starting n8n, you can visit localhost:5678 to try out n8n.
Step 2: Install TiDB Cloud node in n8n
TiDB Cloud node is named n8n-nodes-tidb-cloud in the npm repository. You need to install this node manually to control TiDB Cloud with n8n.
- In the localhost:5678 page, create an owner account for self-hosting n8n.
- Go to Settings > Community nodes.
- Click Install a community node.
- In the npm Package Name field, enter
n8n-nodes-tidb-cloud. - Click Install.
Then you can search the TiDB Cloud node in Workflow > search bar and use the TiDB Cloud node by dragging it to a workspace.
Step 3: Build your workflow
In this step, you will create a new workflow to insert some data to TiDB when you click Execute button.
This example usage workflow would use the following nodes:
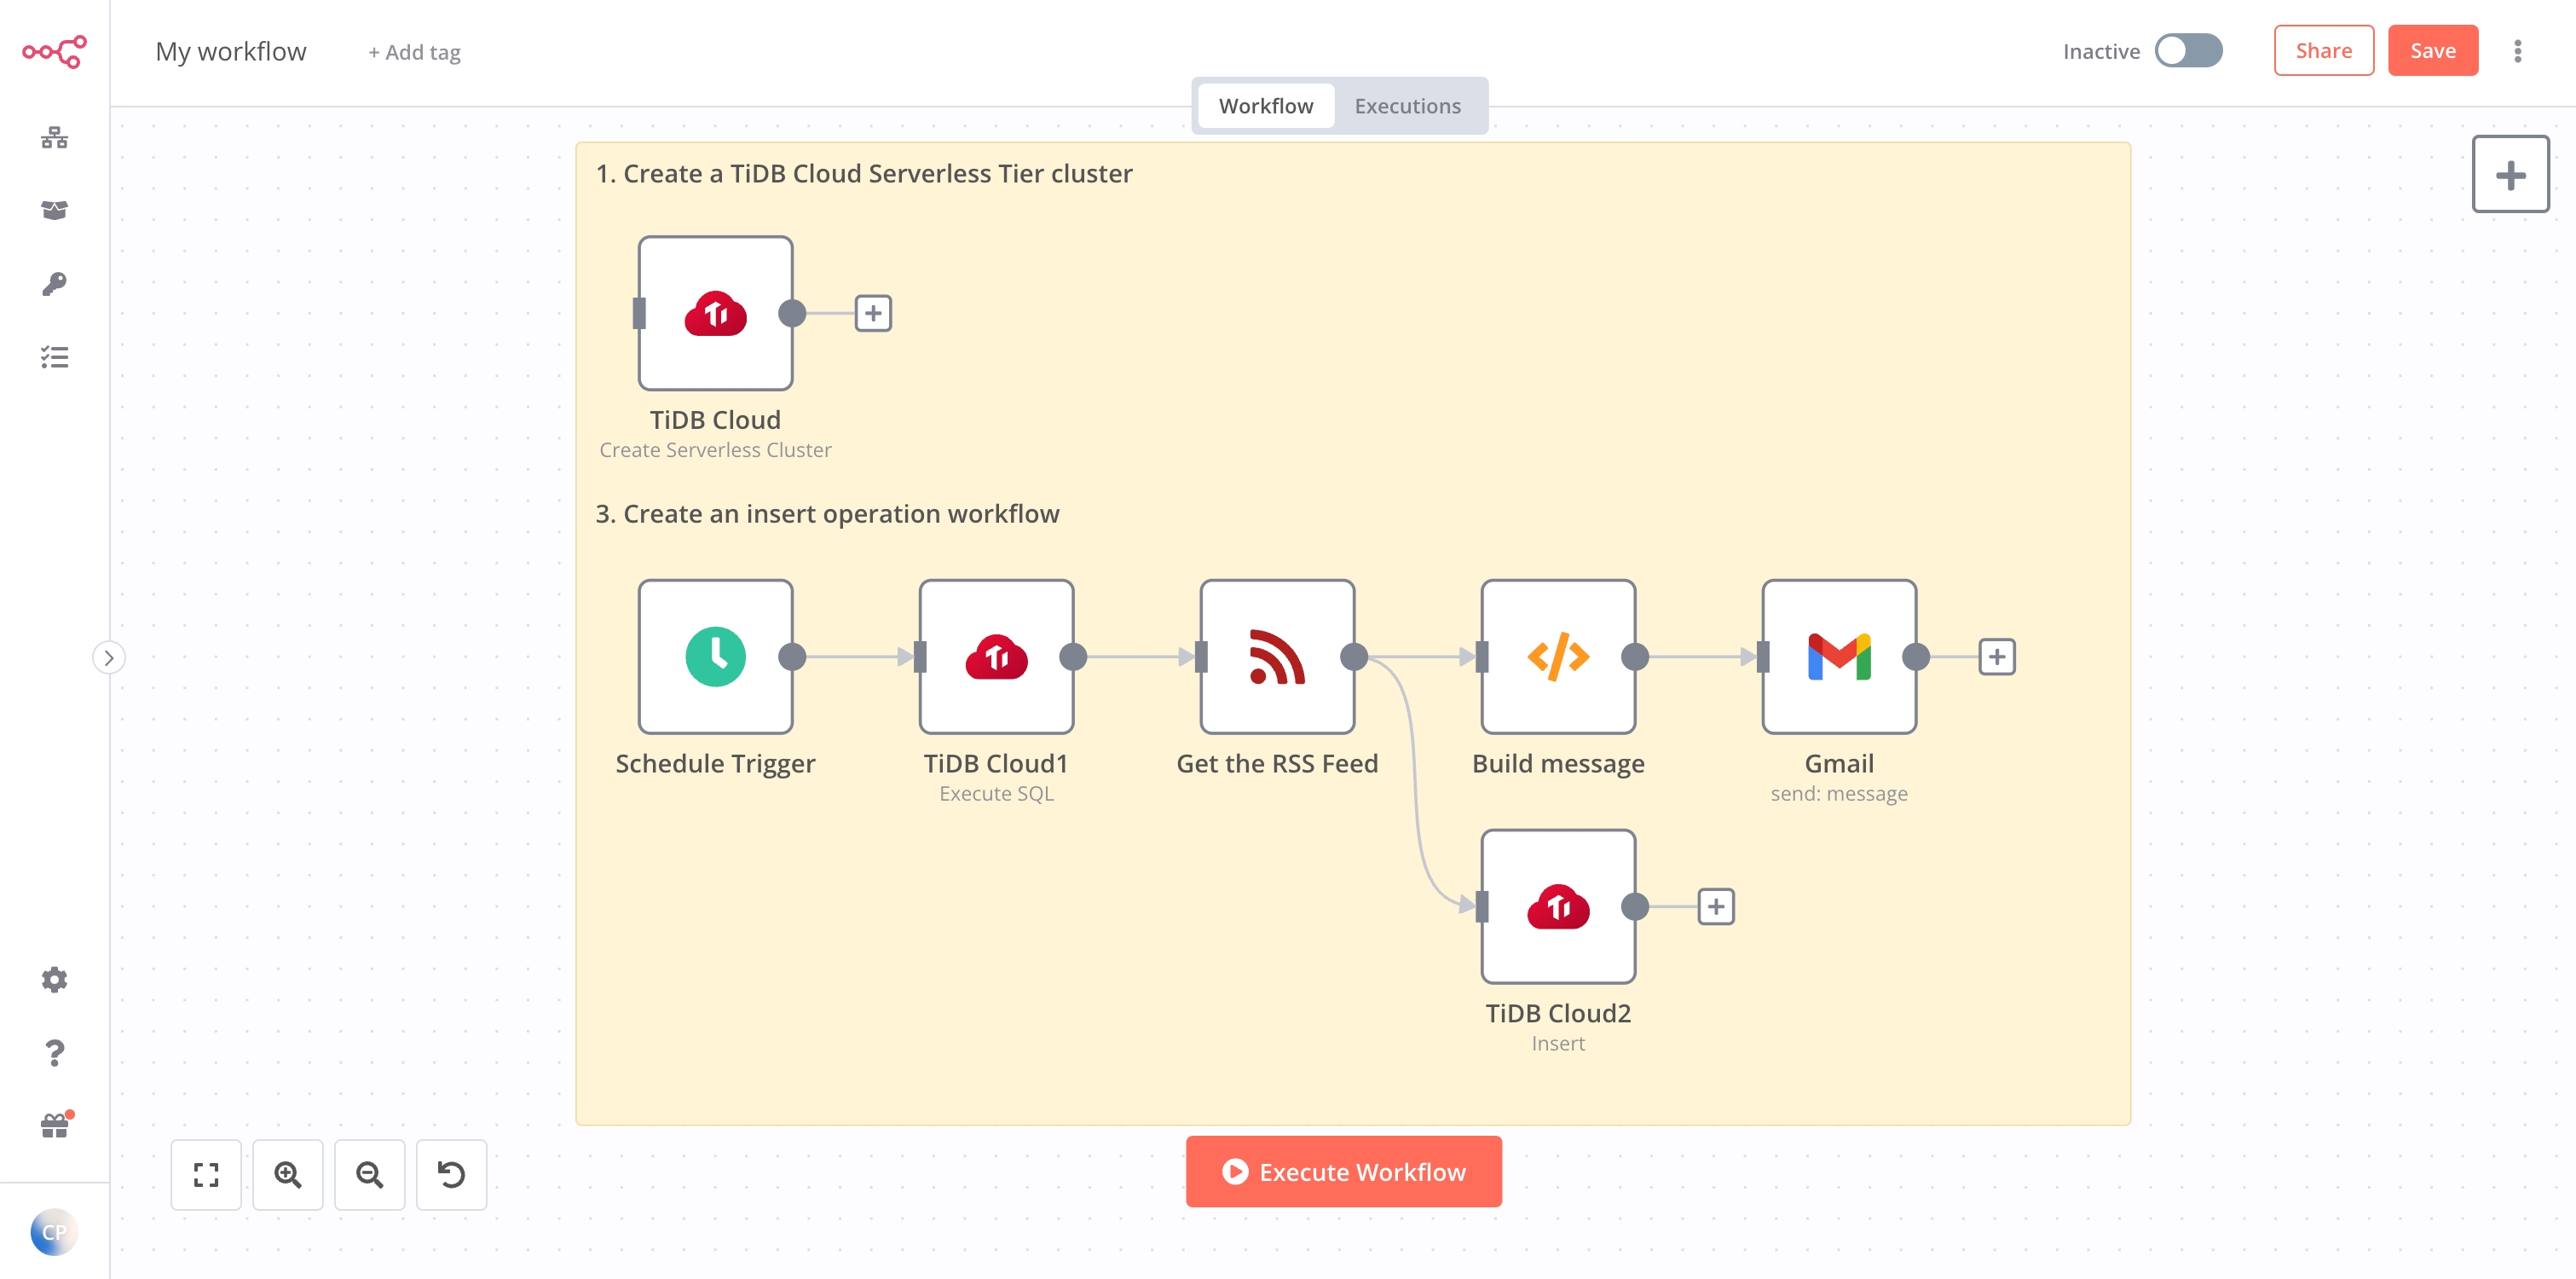
The final workflow should look like the following image.
(Optional) Create a TiDB Cloud Starter instance
If you don't have a TiDB Cloud Starter instance, you can use this node to create one. Otherwise, feel free to skip this operation.
- Navigate to Workflows panel, and click Add workflow.
- In new workflow workspace, click + in the top right corner and choose All field.
- Search
TiDB Cloudand drag it to the workspace. - Enter credentials, which is the TiDB Cloud API key, for the TiDB Cloud node.
- In the Project list, select your project.
- In the Operation list, select
Create Serverless Cluster. - In the Cluster Name box, enter a name for the TiDB Cloud Starter instance.
- In the Region list, select a region.
- In the Password box, enter a password used to log in to your TiDB Cloud Starter instances.
- Click Execute Node to run the node.
Create a workflow
Use a manual trigger as the workflow's starter
If you don't have a workflow yet, navigate to the Workflows panel, and click Start from scratch. Otherwise, skip this step.
Click + in the top right corner and search
schedule trigger.Drag the manual trigger node to your workspace, and double-click the node. The Parameters dialog is displayed.
Configure the rule as follows:
- Trigger Interval:
Days - Days Between Triggers:
1 - Trigger at Hour:
8am - Trigger at Minute:
0
- Trigger Interval:
This trigger will execute your workflow every morning at 8 AM.
Create a table used to insert data
Click + to the right of the manual trigger node.
Search
TiDB Cloudand add it to the workspace.In the Parameters dialog, enter the credential for the TiDB Cloud node. The credential is your TiDB Cloud API key.
In the Project list, select your project.
In the Operation list, select
Execute SQL.Select the TiDB Cloud Starter instance. If you have not seen your new instance in the list, you need to wait a few minutes until the instance creation is completed.
In the User list, select a user. TiDB Cloud always creates a default user, so you don't have to manually create one.
In the Database box, enter
test.Enter your database password.
In the SQL box, enter the following SQL:
CREATE TABLE IF NOT EXISTS hacker_news_briefing (creator VARCHAR (200), title TEXT, link VARCHAR(200), pubdate VARCHAR(200), comments VARCHAR(200), content TEXT, guid VARCHAR (200), isodate VARCHAR(200));Click Execute node to create the table.
Get the Hacker News RSS
- Click + to the right of the TiDB Cloud node.
- Search
RSS Readand add it to the workspace. - In the URL box, enter
https://hnrss.org/frontpage.
Insert data to TiDB
- Click + to the right of the RSS Read node.
- Search
TiDB Cloudand add it to the workspace. - Select the credentials that you entered the previous TiDB Cloud node.
- In the Project list, select your project.
- In the Operation list, select
Insert. - In Cluster, User, Database and Password boxes, enter the corresponding values.
- In the Table box, enter the
hacker_news_briefingtable. - In the Columns box, enter
creator, title, link, pubdate, comments, content, guid, isodate.
Build message
Click + to the right of the RSS Feed Read node.
Search
codeand add it to the workspace.Select the
Run Once for All Itemsmode.In the JavaScript box, copy and paste the following code.
let message = "";

// Loop the input items
for (item of items) {
  message += `
      <h3>${item.json.title}</h3>
      <br>
      ${item.json.content}
      <br>
      `
}

let response =
    `
      <!DOCTYPE html>
      <html>
      <head>
      <title>Hacker News Briefing</title>
    </head>
    <body>
        ${message}
    </body>
    </html>
    `
// Return our message
return [{json: {response}}];
Send message by Gmail
Click + to the right of the code node.
Search
gmailand add it to the workspace.Enter the credential for the Gmail node. For detailed instructions, refer to n8n documentation.
In the Resource list, select
Message.In the Operation list, select
Send.In the To box, enter your email.
In the Subject box, enter
Hacker News Briefing.In the Email Type box, select
HTML.In the Message box, click
Expressionand enter{{ $json["response"] }}.
Step 4: Run your workflow
After building up the workflow, you can click Execute Workflow to test run it.
If the workflow runs as expected, you'll get Hacker News briefing emails. These news contents will be logged to your TiDB Cloud Starter instance, so you don't have to worry about losing them.
Now you can activate this workflow in the Workflows panel. This workflow will help you get the front-page articles on Hacker News every day.
TiDB Cloud node core
Supported operations
TiDB Cloud node acts as a regular node and only supports the following five operations:
- Create Serverless Cluster: creates a TiDB Cloud Starter instance.
- Execute SQL: executes an SQL statement in TiDB.
- Delete: deletes rows in TiDB.
- Insert: inserts rows in TiDB.
- Update: updates rows in TiDB.
Fields
To use different operations, you need to fill in the different required fields. The following shows the respective field descriptions for the corresponding operation.
- Credential for TiDB Cloud API: only supports TiDB Cloud API key. For how to create an API key, refer to Get TiDB Cloud API Key.
- Project: the TiDB Cloud project name.
- Operation: the operation of this node. For all supported operations, refer to Supported operations.
- Cluster: enter the name of your TiDB Cloud Starter instance.
- Region: the region name. Choose a region where your TiDB Cloud Starter instance will be deployed. Usually, choose the region closest to your application deployment.
- Password: the root password. Set a password for your new TiDB Cloud Starter instance.
- Credential for TiDB Cloud API: only supports TiDB Cloud API key. For how to create an API key, refer to Get TiDB Cloud API Key.
- Project: the TiDB Cloud project name.
- Operation: the operation of this node. For all supported operations, refer to Supported operations.
- Cluster: the name of your TiDB Cloud Starter instance. You should choose one existing instance.
- Password: the password of your TiDB Cloud Starter instance.
- User: the username of your TiDB Cloud Starter instance.
- Database: the database name.
- SQL: the SQL statement to be executed.
- Credential for TiDB Cloud API: only supports TiDB Cloud API key. For how to create an API key, refer to Get TiDB Cloud API Key.
- Project: the TiDB Cloud project name.
- Operation: the operation of this node. For all supported operations, refer to Support Operation.
- Cluster: the name of your TiDB Cloud Starter instance. You should choose one existing instance.
- Password: the password of your TiDB Cloud Starter instance.
- User: the username of your TiDB Cloud Starter instance.
- Database: the database name.
- Table: the table name. You can use the
From listmode to choose one or use theNamemode to type the table name manually. - Delete Key: the name of the item's property that decides which rows in the database are deleted. An item is the data sent from one node to another. A node performs its action on each item of the incoming data. For more information about items in n8n, see n8n documentation.
- Credential for TiDB Cloud API: only supports TiDB Cloud API key. For how to create an API key, refer to Get TiDB Cloud API Key.
- Project: the TiDB Cloud project name.
- Operation: the operation of this node. For all supported operations, refer to Support Operation.
- Cluster: the name of your TiDB Cloud Starter instance. You should choose one existing instance.
- Password: the password of your TiDB Cloud Starter instance.
- User: the username of your TiDB Cloud Starter instance.
- Database: the database name.
- Table: the table name. You can use the
From listmode to choose one or use theNamemode to type the table name manually. - Columns: The comma-separated list of the input item's properties, which are used as columns for the new rows. An item is the data sent from one node to another. A node performs its action on each item of the incoming data. For more information about items in n8n, see n8n documentation.
- Credential for TiDB Cloud API: only supports TiDB Cloud API key. For how to create an API key, refer to Get TiDB Cloud API Key.
- Project: the TiDB Cloud project name.
- Operation: the operation of this node. For all supported operations, refer to Support Operation.
- Cluster: the TiDB Cloud Starter instance name. You should choose one existing instance.
- Password: the password of your TiDB Cloud Starter instance.
- User: the username of your TiDB Cloud Starter instance.
- Database: the database name.
- Table: the table name. You can use the
From listmode to choose one or use theNamemode to type the table name manually. - Update Key: the name of the item's property that decides which rows in the database are updated. An item is the data sent from one node to another. A node performs its action on each item of the incoming data. For more information about items in n8n, see n8n documentation.
- Columns: The comma-separated list of the input item's properties, which are used as columns for the rows to be updated.
Limitations
- Normally only one SQL statement is allowed in the Execute SQL operation. If you want to execute more than one statement in a single operation, you need to manually enable
tidb_multi_statement_mode. - For the Delete and Update operations, you need to specify one field as a key. For example, the
Delete Keyis set toid, which is equivalent to executingDELETE FROM table WHERE id = ${item.id}. Currently, the Delete and Update operations only support specifying one key. - For the Insert and Update operations, you need to specify the comma-separated list in the Columns field, and the field name must be the same as the input item's property.