Migrate from TiDB Self-Managed to TiDB Cloud Premium
This document describes how to migrate data from your TiDB Self-Managed clusters to TiDB Cloud Premium (on AWS) instances using Dumpling and TiCDC.
The overall procedure is as follows:
- Build the environment and prepare the tools.
- Migrate full data. The process is as follows:
- Export data from TiDB Self-Managed to Amazon S3 using Dumpling.
- Import data from Amazon S3 to TiDB Cloud Premium.
- Replicate incremental data using TiCDC.
- Verify the migrated data.
Prerequisites
It is recommended that you put the S3 bucket and the TiDB Cloud Premium instance in the same region. Cross-region migration might incur additional cost for data conversion.
Before migration, you need to prepare the following:
- An AWS account with administrator access
- An AWS S3 bucket
- A TiDB Cloud account with at least the
Project Data Access Read-Writeaccess to your target TiDB Cloud Premium instance hosted on AWS
Prepare tools
You need to prepare the following tools:
- Dumpling: a data export tool
- TiCDC: a data replication tool
Dumpling
Dumpling is a tool that exports data from TiDB or MySQL into SQL or CSV files. You can use Dumpling to export full data from TiDB Self-Managed.
Before you deploy Dumpling, note the following:
- It is recommended to deploy Dumpling on a new EC2 instance in the same VPC as your target TiDB Cloud Premium instance.
- The recommended EC2 instance type is c6g.4xlarge (16 vCPU and 32 GiB memory). You can choose other EC2 instance types based on your needs. The Amazon Machine Image (AMI) can be Amazon Linux, Ubuntu, or Red Hat.
You can deploy Dumpling by using TiUP or using the installation package.
Deploy Dumpling using TiUP
Use TiUP to deploy Dumpling:
## Deploy TiUP
curl --proto '=https' --tlsv1.2 -sSf https://tiup-mirrors.pingcap.com/install.sh | sh
source /root/.bash_profile
## Deploy Dumpling and update to the latest version
tiup install dumpling
tiup update --self && tiup update dumpling
Deploy Dumpling using the installation package
To deploy Dumpling using the installation package:
Download the toolkit package.
Extract it to the target machine. You can get Dumpling using TiUP by running
tiup install dumpling. Then, you can usetiup dumpling ...to run Dumpling. For more information, see Dumpling introduction.
Configure privileges for Dumpling
You need the following privileges to export data from the upstream database:
- SELECT
- RELOAD
- LOCK TABLES
- REPLICATION CLIENT
- PROCESS
Deploy TiCDC
You need to deploy TiCDC to replicate incremental data from the upstream TiDB Self-Managed cluster to TiDB Cloud Premium.
Confirm whether the current TiDB version supports TiCDC. TiDB v4.0.8.rc.1 and later versions support TiCDC. You can check the TiDB version by executing
select tidb_version();in the TiDB Self-Managed cluster. If you need to upgrade it, see Upgrade TiDB Using TiUP.Add the TiCDC component to the TiDB Self-Managed cluster. See Add or scale out TiCDC to an existing TiDB cluster using TiUP. Edit the
scale-out.ymlfile to add TiCDC:cdc_servers: - host: 10.0.1.3 gc-ttl: 86400 data_dir: /tidb-data/cdc-8300 - host: 10.0.1.4 gc-ttl: 86400 data_dir: /tidb-data/cdc-8300Add the TiCDC component and check the status.
tiup cluster scale-out <cluster-name> scale-out.yml
tiup cluster display <cluster-name>
Migrate full data
To migrate data from the TiDB Self-Managed cluster to TiDB Cloud Premium, perform a full data migration as follows:
- Migrate data from the TiDB Self-Managed cluster to Amazon S3.
- Migrate data from Amazon S3 to TiDB Cloud Premium.
Migrate data from the TiDB Self-Managed cluster to Amazon S3
You need to migrate data from the TiDB Self-Managed cluster to Amazon S3 using Dumpling.
If your TiDB Self-Managed cluster is in a local IDC, or the network between the Dumpling server and Amazon S3 is not connected, you can export the files to the local storage first, and then upload them to Amazon S3 later.
Step 1. Disable the GC mechanism of the upstream TiDB Self-Managed cluster temporarily
To ensure that newly written data is not lost during incremental migration, you need to disable the upstream cluster's garbage collection (GC) mechanism before starting the migration to prevent the system from cleaning up historical data.
Run the following command to verify whether the setting is successful.
SET GLOBAL tidb_gc_enable = FALSE;
The following is an example output, in which 0 indicates that it is disabled.
SELECT @@global.tidb_gc_enable;
+-------------------------+
| @@global.tidb_gc_enable |
+-------------------------+
|                       0 |
+-------------------------+
1 row in set (0.01 sec)
Step 2. Configure access permissions to the Amazon S3 bucket for Dumpling
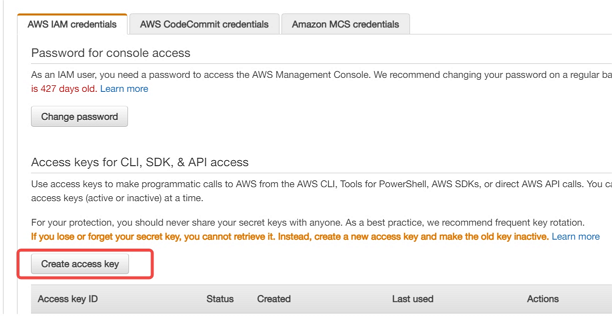
Create an access key in the AWS console. See Create an access key for details.
Use your AWS account ID or account alias, your IAM user name, and your password to sign in to the IAM console.
In the navigation bar on the upper right, choose your user name, and then click My Security Credentials.
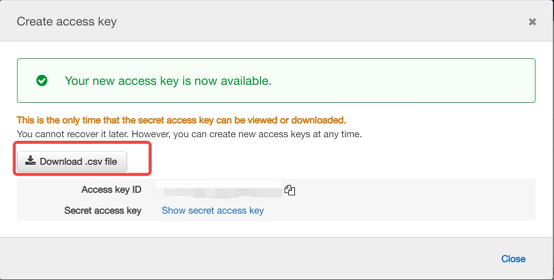
To create an access key, click Create access key. Then choose Download .csv file to save the access key ID and secret access key to a CSV file on your computer. Store the file in a secure location. You will not have access to the secret access key again after this dialog box closes. After you download the CSV file, choose Close. When you create an access key, the key pair is active by default, and you can use the pair right away.
Step 3. Export data from the upstream TiDB Self-Managed cluster to Amazon S3 using Dumpling
Do the following to export data from the upstream TiDB Self-Managed cluster to Amazon S3 using Dumpling:
Configure the environment variables for Dumpling.
export AWS_ACCESS_KEY_ID=${AccessKey}
export AWS_SECRET_ACCESS_KEY=${SecretKey}
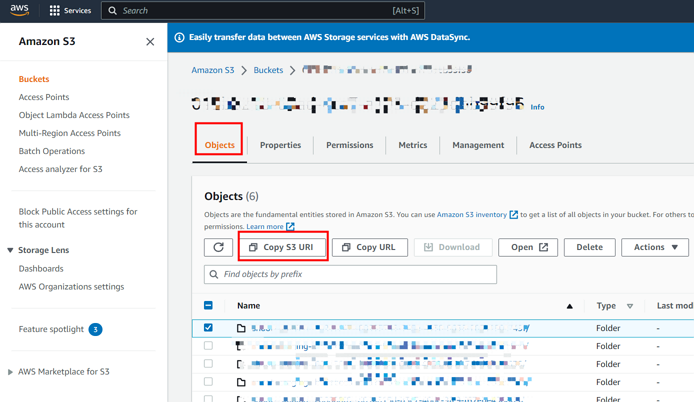
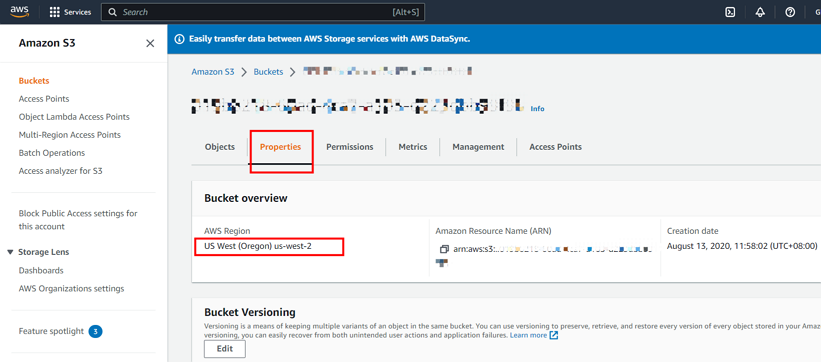
Get the S3 bucket URI and region information from the AWS console. See Create a bucket for details.
The following screenshot shows how to get the S3 bucket URI information:
The following screenshot shows how to get the region information:
Run Dumpling to export data to the Amazon S3 bucket.
dumpling \
-u root \
-P 4000 \
-h 127.0.0.1 \
-r 20000 \
--filetype sql  \
-F 256MiB  \
-t 8 \
-o "${S3 URI}" \
--s3.region "${s3.region}"
The
-toption specifies the number of threads for the export. Increasing the number of threads improves the concurrency of Dumpling and the export speed, and also increases the database's memory consumption. Therefore, do not set this parameter to a very large number.For more information, see Dumpling.
Check the export data. Usually the exported data includes the following:
metadata: this file contains the start time of the export, and the location of the master binary log.{schema}-schema-create.sql: the SQL file for creating the schema{schema}.{table}-schema.sql: the SQL file for creating the table{schema}.{table}.{0001}.{sql|csv}: data files*-schema-view.sql,*-schema-trigger.sql,*-schema-post.sql: other exported SQL files
Migrate data from Amazon S3 to TiDB Cloud Premium
After you export data from the TiDB Self-Managed cluster to Amazon S3, you need to migrate the data to TiDB Cloud Premium.
In the TiDB Cloud console, get the Account ID and External ID of your target TiDB Cloud Premium instance.
- Navigate to the My TiDB page, and click the name of your target instance.
- In the left navigation pane, click Data > Import.
- Choose Import data from Cloud Storage > Amazon S3.
- Note down the Account ID and External ID displayed in the wizard. These values are embedded in the CloudFormation template.
In the Source Connection dialog, select AWS Role ARN, then click Click here to create a new one with AWS CloudFormation, and follow the on-screen guidance. If your organization cannot launch CloudFormation stacks, see Manually create the IAM role.
- Open the pre-filled CloudFormation template in the AWS console.
- Provide a role name, review the permissions, and acknowledge the IAM warning.
- Create the stack and wait for the status to change to CREATE_COMPLETE.
- On the Outputs tab, copy the newly generated Role ARN.
- Return to TiDB Cloud Premium, paste the Role ARN, and click Confirm. The wizard stores the ARN for subsequent import jobs.
Continue with the remaining steps in the import wizard, and use the saved Role ARN when prompted.
Manually create the IAM role (optional)
If your organization cannot deploy CloudFormation stacks, create the access policy and IAM role manually:
In AWS IAM, create a policy that grants the following actions on your bucket (and KMS key, if applicable):
s3:GetObjects3:GetObjectVersions3:ListBuckets3:GetBucketLocationkms:Decrypt(only when SSE-KMS encryption is enabled)
The following JSON template shows the required structure. Replace the placeholders with your bucket path, bucket ARN, and KMS key ARN (if needed).
{
    "Version": "2012-10-17",
    "Statement": [
        {
            "Effect": "Allow",
            "Action": [
                "s3:GetObject",
                "s3:GetObjectVersion"
            ],
            "Resource": "arn:aws:s3:::<Your customized directory>"
        },
        {
            "Effect": "Allow",
            "Action": [
                "s3:ListBucket",
                "s3:GetBucketLocation"
            ],
            "Resource": "<Your S3 bucket ARN>"
        },
        {
            "Effect": "Allow",
            "Action": [
                "kms:Decrypt"
            ],
            "Resource": "<Your AWS KMS ARN>"
        }
    ]
}
Create an IAM role that trusts TiDB Cloud Premium by providing the Account ID and External ID you have noted down earlier. Then, attach the policy created in the previous step to this role.
Copy the resulting Role ARN and enter it in the TiDB Cloud Premium import wizard.
Import data to TiDB Cloud Premium by following Import data from Amazon S3 into TiDB Cloud Premium.
Replicate incremental data
To replicate incremental data, do the following:
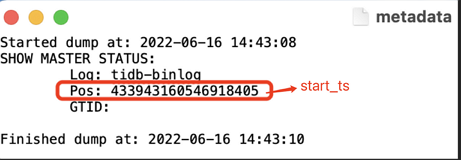
Get the start time of the incremental data migration. For example, you can get it from the metadata file of the full data migration.
Grant TiCDC to connect to TiDB Cloud Premium.
- In the TiDB Cloud console, navigate to the My TiDB page, and then click the name of your target TiDB Cloud Premium instance to go to its overview page.
- In the left navigation pane, click Settings > Networking.
- On the Networking page, click Add IP Address.
- In the displayed dialog, select Use IP addresses, click +, fill in the public IP address of the TiCDC component in the IP Address field, and then click Confirm. Now TiCDC can access TiDB Cloud Premium. For more information, see Configure an IP Access List.
Get the connection information of the downstream TiDB Cloud Premium instance.
- In the TiDB Cloud console, navigate to the My TiDB page, and then click the name of your target TiDB Cloud Premium instance to go to its overview page.
- Click Connect in the upper-right corner.
- In the connection dialog, select Public from the Connection Type drop-down list and select General from the Connect With drop-down list.
- From the connection information, you can get the host IP address and port of the instance. For more information, see Connect via public connection.
Create and run the incremental replication task. In the upstream cluster, run the following:
tiup cdc cli changefeed create \ --pd=http://172.16.6.122:2379 \ --sink-uri="tidb://root:123456@172.16.6.125:4000" \ --changefeed-id="upstream-to-downstream" \ --start-ts="431434047157698561"--pd: the PD address of the upstream cluster. The format is:[upstream_pd_ip]:[pd_port]--sink-uri: the downstream address of the replication task. Configure--sink-uriaccording to the following format. Currently, the scheme supportsmysql,tidb,kafka,s3, andlocal.[scheme]://[userinfo@][host]:[port][/path]?[query_parameters]--changefeed-id: the ID of the replication task. The format must match the ^[a-zA-Z0-9]+(-[a-zA-Z0-9]+)*$ regular expression. If this ID is not specified, TiCDC automatically generates a UUID (the version 4 format) as the ID.--start-ts: specifies the starting TSO of the changefeed. From this TSO, the TiCDC cluster starts pulling data. The default value is the current time.
For more information, see CLI and Configuration Parameters of TiCDC Changefeeds.
Enable the GC mechanism again in the upstream cluster. If no error or delay is found in incremental replication, enable the GC mechanism to resume garbage collection of the cluster.
Run the following command to verify whether the setting works.
SET GLOBAL tidb_gc_enable = TRUE;The following is an example output, in which
1indicates that GC is enabled.SELECT @@global.tidb_gc_enable; +-------------------------+ | @@global.tidb_gc_enable | +-------------------------+ | 1 | +-------------------------+ 1 row in set (0.01 sec)Verify the incremental replication task.
If the message "Create changefeed successfully!" is displayed in the output, the replication task is created successfully.
If the state is
normal, the replication task is normal.tiup cdc cli changefeed list --pd=http://172.16.6.122:2379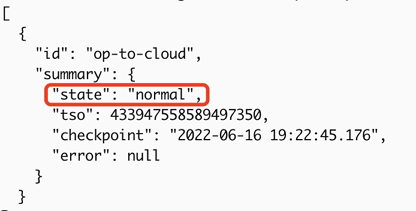
Verify the replication. Write a new record to the upstream cluster, and then check whether the record is replicated to the downstream TiDB Cloud Premium instance.
Set the same timezone for the upstream cluster and downstream instance. By default, TiDB Cloud Premium sets the timezone to UTC. If the timezone is different between the upstream cluster and downstream instance, you need to set the same timezone for both.
In the upstream cluster, run the following command to check the timezone:
SELECT @@global.time_zone;In the downstream instance, run the following command to set the timezone:
SET GLOBAL time_zone = '+08:00';Check the timezone again to verify the setting:
SELECT @@global.time_zone;
Back up the query bindings in the upstream cluster and restore them in the downstream instance. You can use the following query to back up the query bindings:
SELECT DISTINCT(CONCAT('CREATE GLOBAL BINDING FOR ', original_sql,' USING ', bind_sql,';')) FROM mysql.bind_info WHERE status='enabled';If you do not get any output, it means that no query bindings are used in the upstream cluster. In this case, you can skip this step.
After you get the query bindings, run them in the downstream instance to restore the query bindings.
Back up the user and privilege information in the upstream cluster and restore them in the downstream instance. You can use the following script to back up the user and privilege information. Note that you need to replace the placeholders with the actual values.
#!/bin/bash

export MYSQL_HOST={tidb_op_host}
export MYSQL_TCP_PORT={tidb_op_port}
export MYSQL_USER=root
export MYSQL_PWD={root_password}
export MYSQL="mysql -u${MYSQL_USER} --default-character-set=utf8mb4"

function backup_user_priv(){
    ret=0
    sql="SELECT CONCAT(user,':',host,':',authentication_string) FROM mysql.user WHERE user NOT IN ('root')"
    for usr in `$MYSQL -se "$sql"`;do
        u=`echo $usr | awk -F ":" '{print $1}'`
        h=`echo $usr | awk -F ":" '{print $2}'`
        p=`echo $usr | awk -F ":" '{print $3}'`
        echo "-- Grants for '${u}'@'${h}';"
        [[ ! -z "${p}" ]] && echo "CREATE USER IF NOT EXISTS '${u}'@'${h}' IDENTIFIED WITH 'mysql_native_password' AS '${p}' ;"
        $MYSQL -se "SHOW GRANTS FOR '${u}'@'${h}';" | sed 's/$/;/g'
        [ $? -ne 0 ] && ret=1 && break
    done
    return $ret
}

backup_user_priv
After you get the user and privilege information, run the generated SQL statements in the downstream TiDB Cloud Premium instance to restore the user and privilege information.