Configure External Storage Access for TiDB Cloud Dedicated
If your source data is stored in Amazon S3 buckets, Azure Blob Storage containers, or Google Cloud Storage (GCS) buckets, before importing or migrating the data to TiDB Cloud, you need to configure cross-account access to the buckets. This document describes how to do this for TiDB Cloud Dedicated clusters.
If you need to configure these external storages for TiDB Cloud Starter or TiDB Cloud Essential instances, see Configure External Storage Access for TiDB Cloud Starter or Essential.
Configure Amazon S3 access
To allow a TiDB Cloud Dedicated cluster to access the source data in your Amazon S3 bucket, configure the bucket access for the cluster using either of the following methods:
- Use a Role ARN (recommended): use a Role ARN to access your Amazon S3 bucket.
- Use an AWS access key: use the access key of an IAM user to access your Amazon S3 bucket.
Configure Amazon S3 access using a Role ARN
Configure the bucket access for TiDB Cloud and get the Role ARN as follows:
In the TiDB Cloud console, get the corresponding TiDB Cloud account ID and external ID of the target TiDB cluster.
Navigate to the My TiDB page.
Click the name of your target TiDB Cloud Dedicated cluster to go to its overview page, and then click Data > Import in the left navigation pane.
Click Import data from Cloud Storage.
On the Import Data from Cloud Storage page, set Storage Provider to Amazon S3, make sure AWS Role ARN is selected under Credentials, and then click Click here to create new one with AWS CloudFormation under the Role ARN field. The Add New Role ARN dialog is displayed.
Expand Having trouble? Create Role ARN manually to get the TiDB Cloud Account ID and TiDB Cloud External ID for this cluster. Take a note of these IDs for later use.
In the AWS Management Console, create a managed policy for your Amazon S3 bucket.
Sign in to the AWS Management Console and open the Amazon S3 console at https://console.aws.amazon.com/s3/.
In the Buckets list, choose the name of your bucket with the source data, and then click Copy ARN to get your S3 bucket ARN (for example,
arn:aws:s3:::tidb-cloud-source-data). Take a note of the bucket ARN for later use.
Open the IAM console at https://console.aws.amazon.com/iam/, click Policies in the navigation pane on the left, and then click Create Policy.
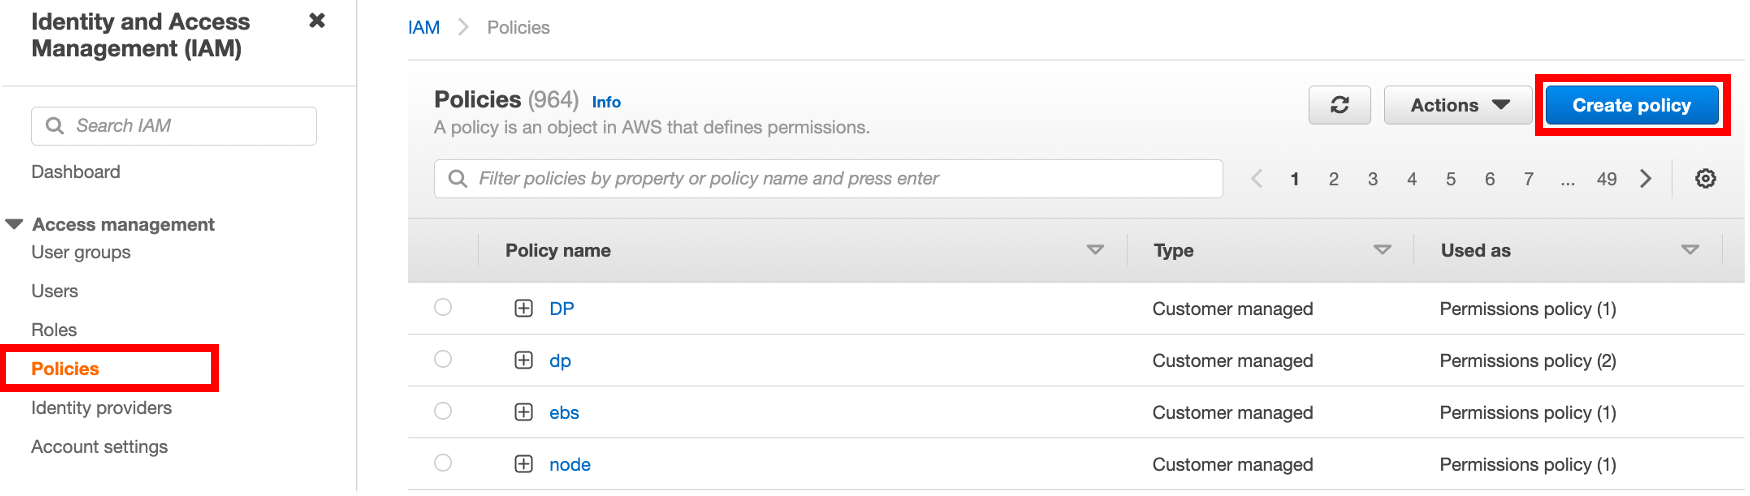
On the Create policy page, click the JSON tab.
Copy the following access policy template and paste it into the policy text field.
{
    "Version": "2012-10-17",
    "Statement": [
        {
            "Sid": "VisualEditor0",
            "Effect": "Allow",
            "Action": [
                "s3:GetObject",
                "s3:GetObjectVersion"
            ],
            "Resource": "<Your S3 bucket ARN>/<Directory of your source data>/*"
        },
        {
            "Sid": "VisualEditor1",
            "Effect": "Allow",
            "Action": [
                "s3:ListBucket"
            ],
            "Resource": "<Your S3 bucket ARN>"
        }
    ]
}
```

In the policy text field, update the following configurations to your own values.

- `"Resource": "<Your S3 bucket ARN>/<Directory of the source data>/*"`

    For example, if your source data is stored in the root directory of the `tidb-cloud-source-data` bucket, use `"Resource": "arn:aws:s3:::tidb-cloud-source-data/*"`. If your source data is stored in the `mydata` directory of the bucket, use `"Resource": "arn:aws:s3:::tidb-cloud-source-data/mydata/*"`. Make sure that `/*` is added to the end of the directory so TiDB Cloud can access all files in this directory.

- `"Resource": "<Your S3 bucket ARN>"`

    For example, `"Resource": "arn:aws:s3:::tidb-cloud-source-data"`.

- If you have enabled AWS Key Management Service key (SSE-KMS) with customer-managed key encryption, make sure the following configuration is included in the policy. `"arn:aws:kms:ap-northeast-1:105880447796:key/c3046e91-fdfc-4f3a-acff-00597dd3801f"` is a sample KMS key of the bucket.

    ```json
    {
        "Sid": "AllowKMSkey",
        "Effect": "Allow",
        "Action": [
            "kms:Decrypt"
        ],
        "Resource": "arn:aws:kms:ap-northeast-1:105880447796:key/c3046e91-fdfc-4f3a-acff-00597dd3801f"
    }
    ```

    If the objects in your bucket have been copied from another encrypted bucket, the KMS key value needs to include the keys of both buckets. For example, `"Resource": ["arn:aws:kms:ap-northeast-1:105880447796:key/c3046e91-fdfc-4f3a-acff-00597dd3801f","arn:aws:kms:ap-northeast-1:495580073302:key/0d7926a7-6ecc-4bf7-a9c1-a38f0faec0cd"]`.
Click Next.
Set a policy name, add a tag of the policy (optional), and then click Create policy.
In the AWS Management Console, create an access role for TiDB Cloud and get the role ARN.
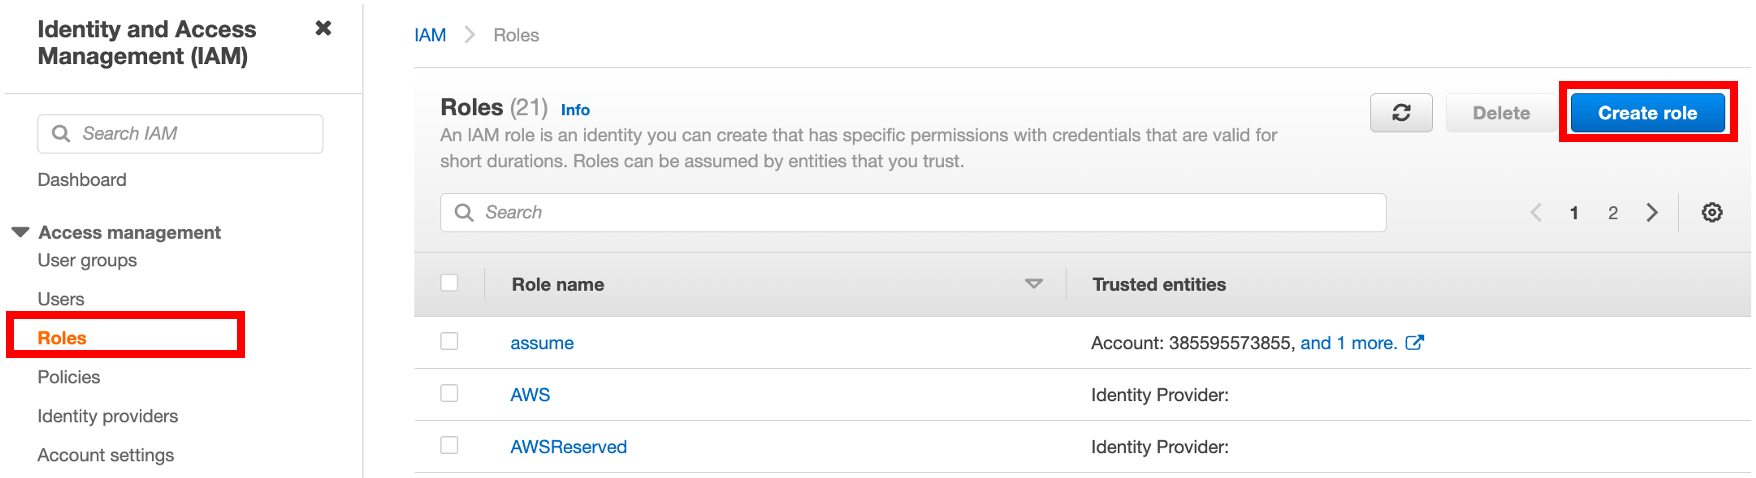
In the IAM console at https://console.aws.amazon.com/iam/, click Roles in the navigation pane on the left, and then click Create role.
To create a role, fill in the following information:
- Under Trusted entity type, select AWS account.
- Under An AWS account, select Another AWS account, and then paste the TiDB Cloud account ID to the Account ID field.
- Under Options, click Require external ID to avoid the confused deputy problem, and then paste the TiDB Cloud External ID to the External ID field. If the role is created without "Require external ID", anyone with your S3 bucket URI and IAM role ARN might be able to access your Amazon S3 bucket. If the role is created with both the account ID and external ID, only TiDB clusters running in the same project and the same region can access the bucket.
Click Next to open the policy list, choose the policy you just created, and then click Next.
Under Role details, set a name for the role, and then click Create role in the lower-right corner. After the role is created, the list of roles is displayed.
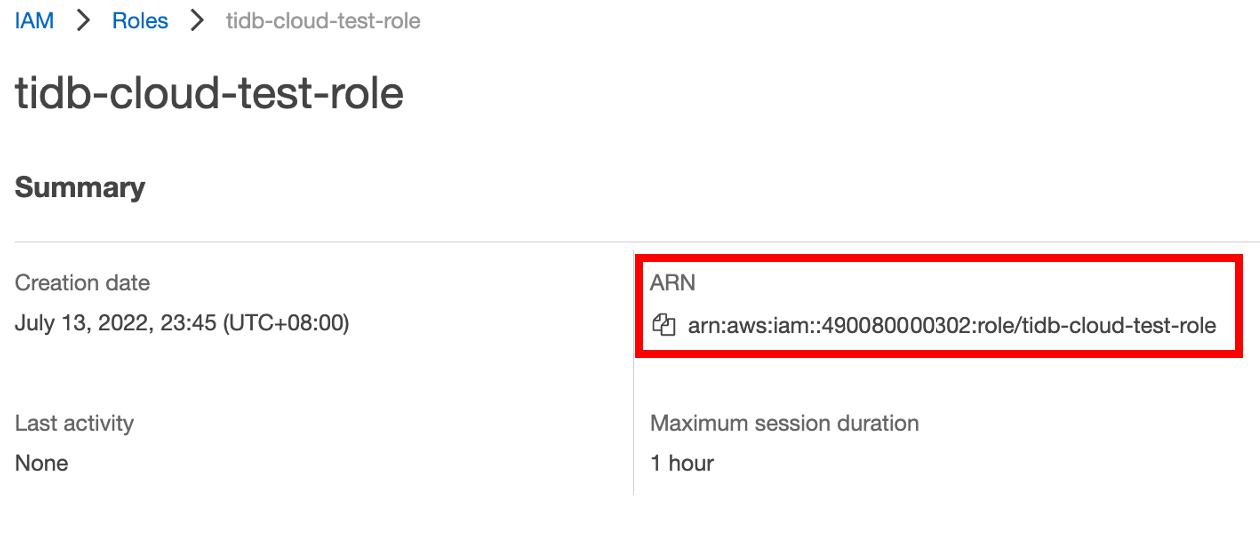
In the list of roles, click the name of the role that you just created to go to its summary page, and then copy the role ARN.
In the TiDB Cloud console, go to the Data Import page where you get the TiDB Cloud account ID and external ID, and then paste the role ARN to the Role ARN field.
Configure Amazon S3 access using an AWS access key
It is recommended that you use an IAM user (instead of the AWS account root user) to create an access key.
Take the following steps to configure an access key:
Create an IAM user with the following policies:
AmazonS3ReadOnlyAccessCreateOwnAccessKeys(required) andManageOwnAccessKeys(optional)
It is recommended that these policies only work for your bucket that stores the source data.
For more information, see Creating an IAM user.
Use your AWS account ID or account alias, and your IAM user name and password to sign in to the IAM console.
Create an access key. For more details, see Creating an access key for an IAM user.
Configure GCS access
To allow TiDB Cloud to access the source data in your GCS bucket, you need to configure the GCS access for the bucket. Once the configuration is done for one TiDB cluster in a project, all TiDB clusters in that project can access the GCS bucket.
In the TiDB Cloud console, get the Google Cloud Service Account ID of the target TiDB cluster.
Navigate to the My TiDB page.
Click the name of your target TiDB Cloud Dedicated cluster to go to its overview page, and then click Data > Import in the left navigation pane.
Click Import data from Cloud Storage.
On the Import Data from Cloud Storage page, set Storage Provider to Google Cloud Storage, and then copy the Google Cloud Service Account ID for later use.
In the Google Cloud console, create an IAM role for your GCS bucket.
Sign in to the Google Cloud console.
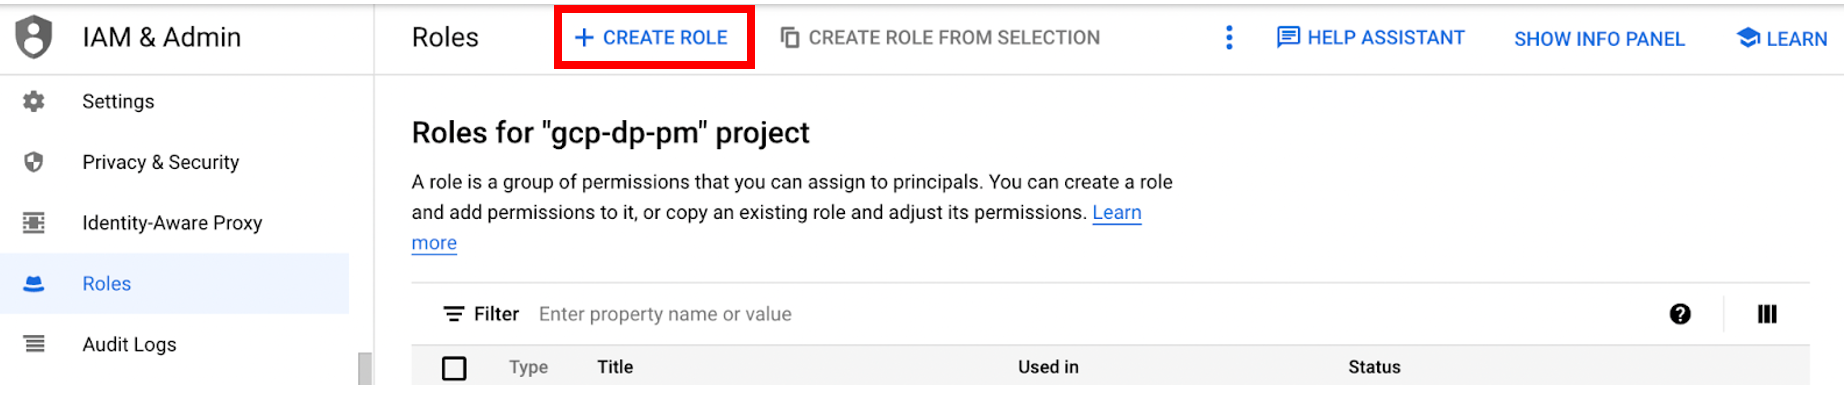
Go to the Roles page, and then click CREATE ROLE.
Enter a name, description, ID, and role launch stage for the role. The role name cannot be changed after the role is created.
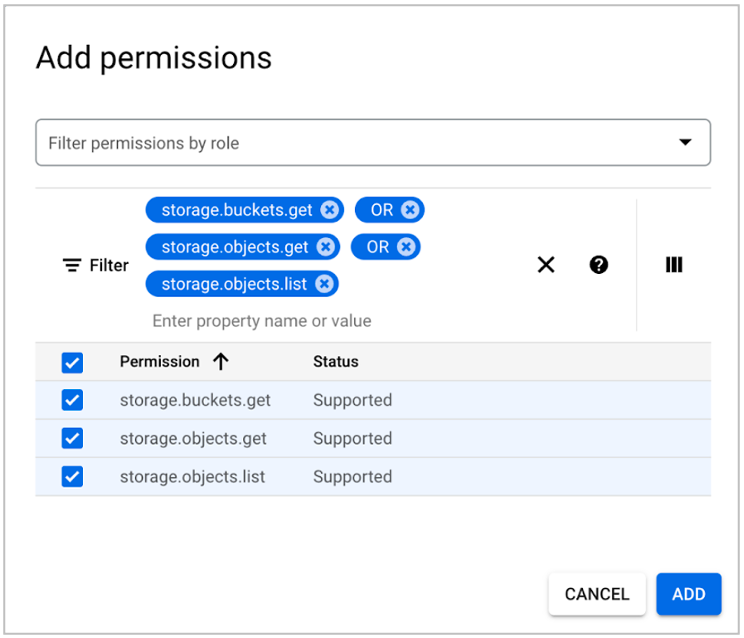
Click ADD PERMISSIONS.
Add the following read-only permissions to the role, and then click Add.
- storage.buckets.get
- storage.objects.get
- storage.objects.list
You can copy a permission name to the Enter property name or value field as a filter query, and choose the name in the filter result. To add the three permissions, you can use OR between the permission names.
Go to the Bucket page, and click the name of the GCS bucket you want TiDB Cloud to access.
On the Bucket details page, click the PERMISSIONS tab, and then click GRANT ACCESS.
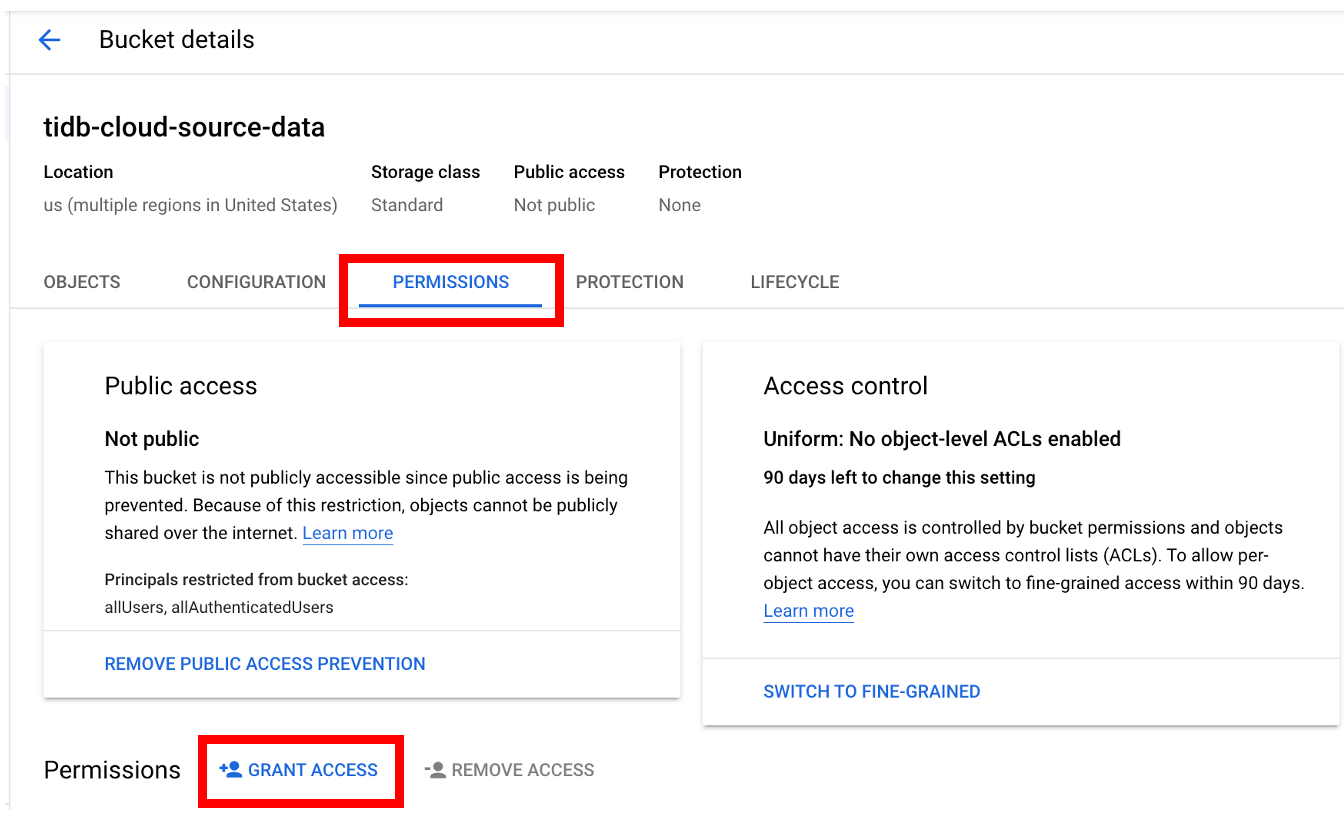
Fill in the following information to grant access to your bucket, and then click SAVE.
- In the New Principals field, paste the Google Cloud Service Account ID of the target TiDB cluster.
- In the Select a role drop-down list, type the name of the IAM role you just created, and then choose the name from the filter result.
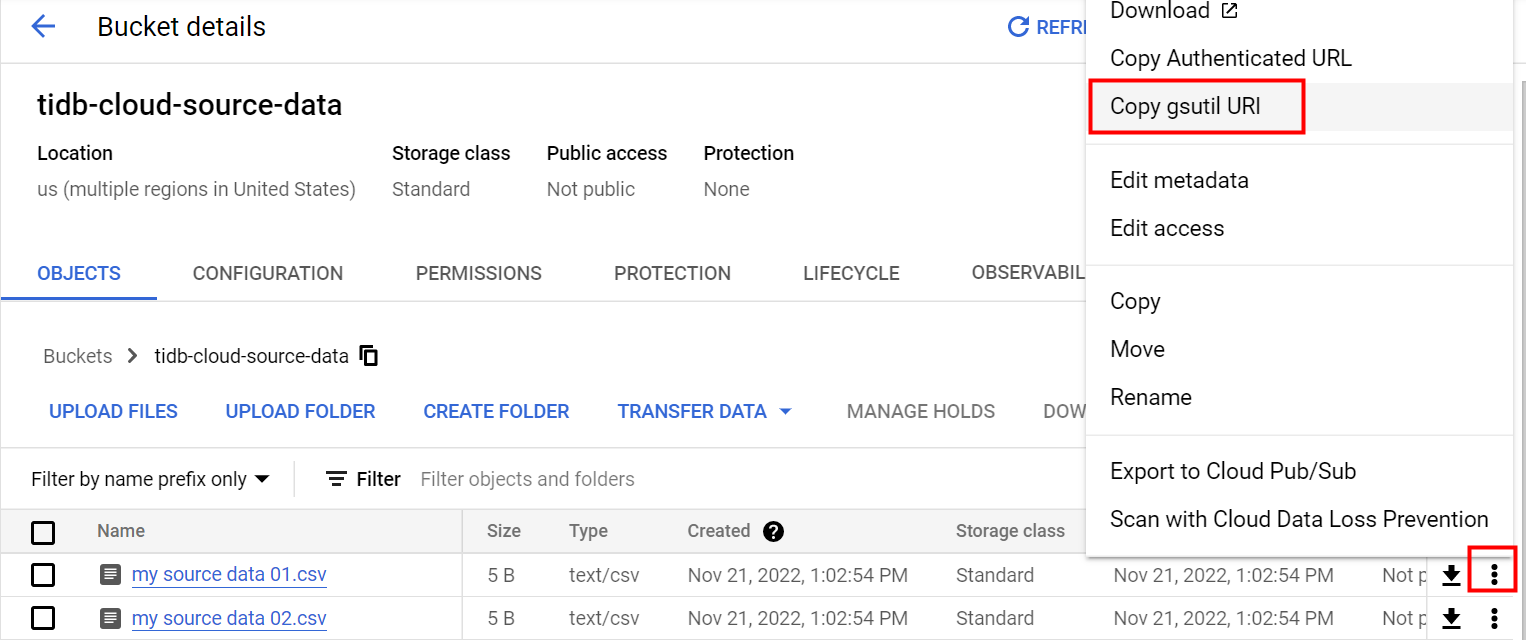
On the Bucket details page, click the OBJECTS tab.
If you want to copy a file's gsutil URI, select the file, click Open object overflow menu, and then click Copy gsutil URI.
If you want to use a folder's gsutil URI, open the folder, and then click the copy button following the folder name to copy the folder name. After that, you need to add
gs://to the beginning and/to the end of the name to get the correct URI for the folder.For example, if the folder name is
tidb-cloud-source-data, you need to usegs://tidb-cloud-source-data/as the URI.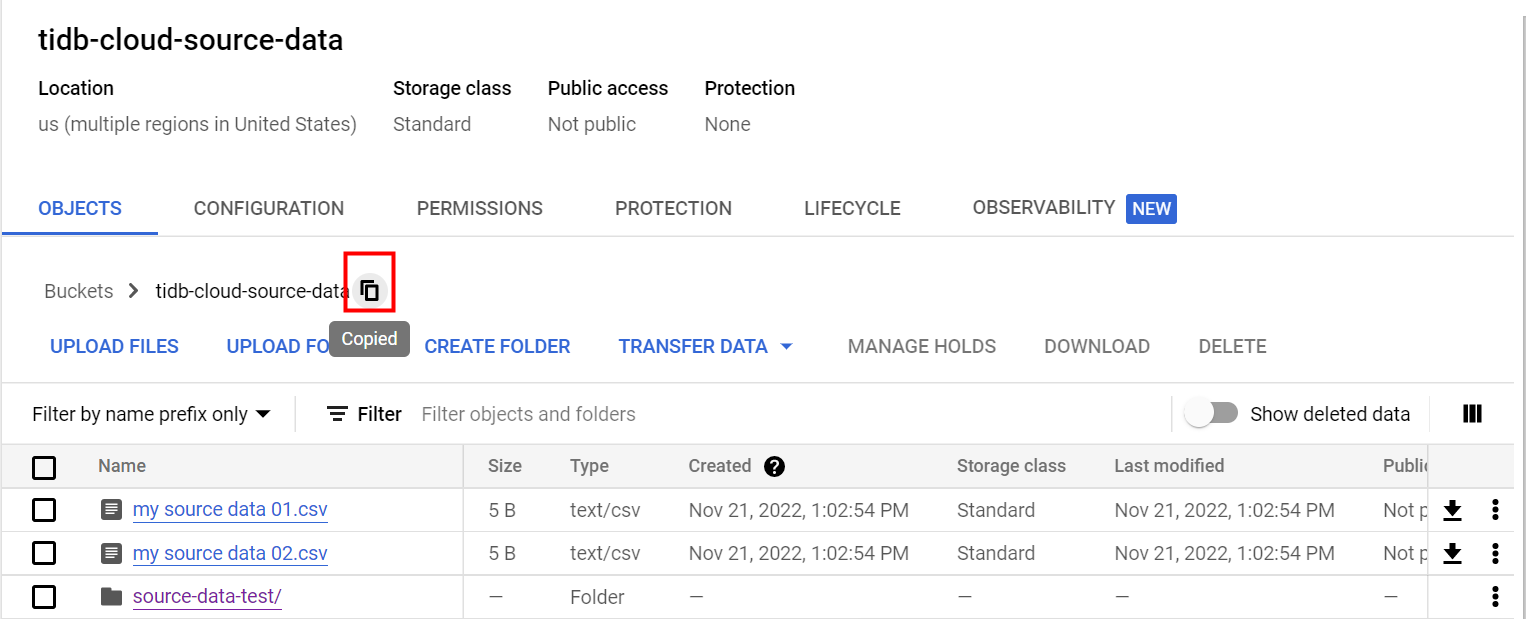
In the TiDB Cloud console, go to the Data Import page where you get the Google Cloud Service Account ID, and then paste the GCS bucket gsutil URI to the Bucket gsutil URI field. For example, paste
gs://tidb-cloud-source-data/.
Configure Azure Blob Storage access
To allow TiDB Cloud Dedicated to access your Azure Blob container, you need to configure the Azure Blob access for the container. You can use an account SAS token to configure the container access:
On the Azure Storage account page, click your storage account to which the container belongs.
In the navigation pane for your storage account, click Security + networking > Shared access signature.

On the Shared access signature page, create an account SAS token with the necessary permissions as follows:
- Under Allowed services, select Blob.
- Under Allowed resource types, select Container and Object.
- Under Allowed permissions, select the required permissions. For example, importing data to TiDB Cloud Dedicated requires Read and List.
- Adjust Start and expiry date/time as needed. For security reasons, it is recommended to set an expiration date that aligns with your data import timeline.
- Keep the default values for other settings.
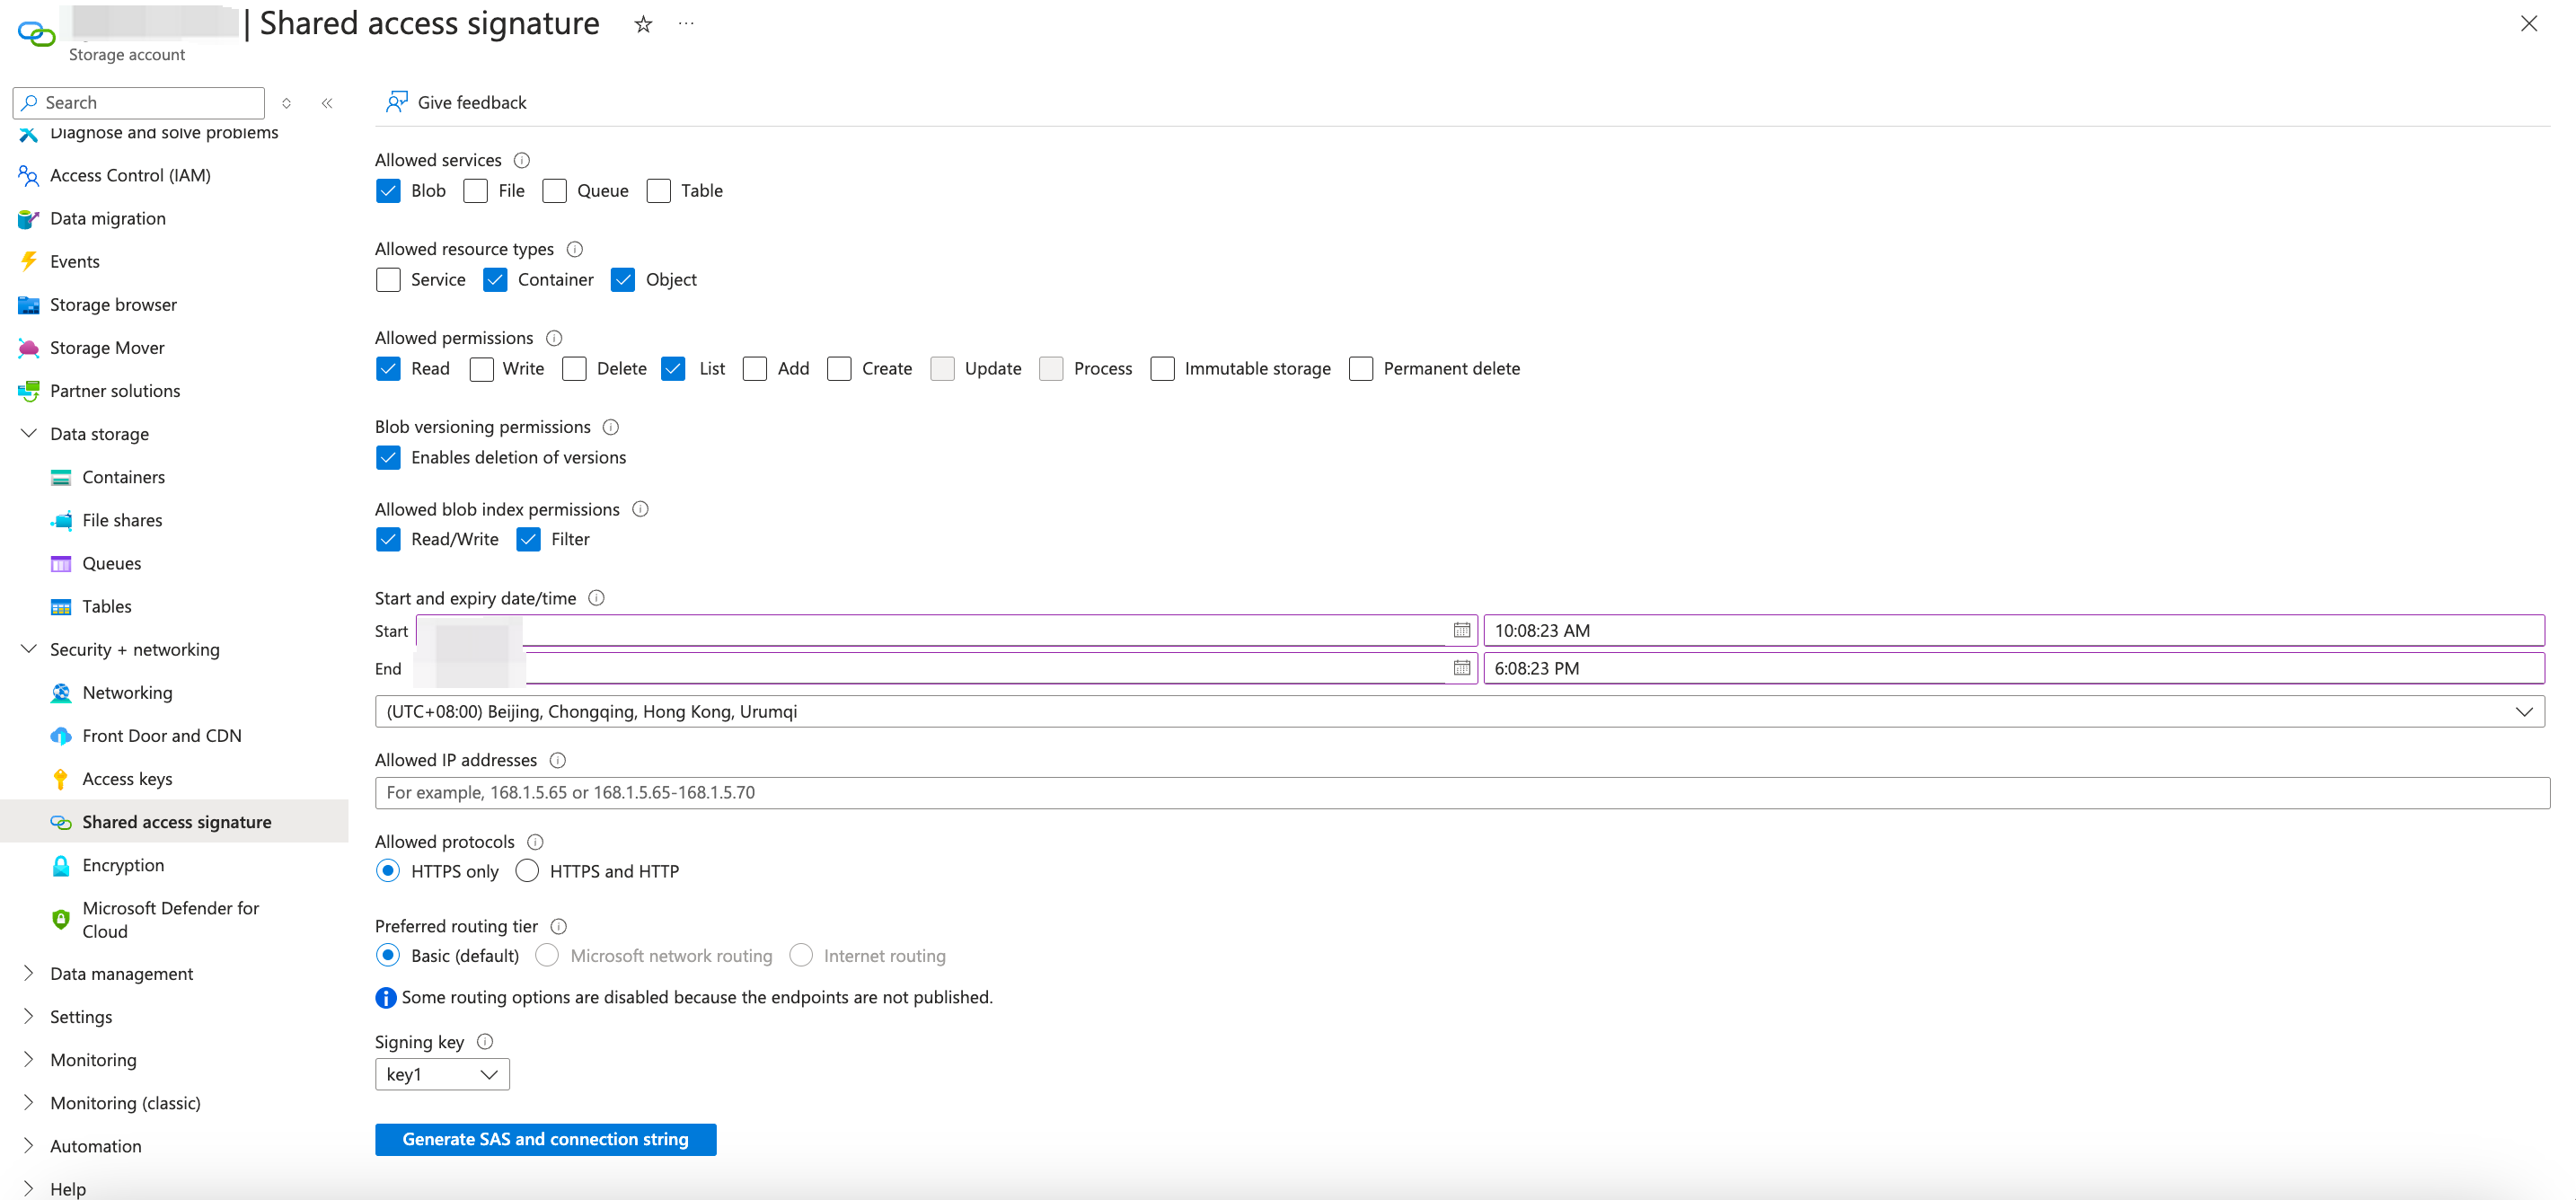
Click Generate SAS and connection string to generate the SAS token.
Copy the generated SAS Token. You will need this token string when configuring the data import in TiDB Cloud.