Sink to Cloud Storage
This document describes how to create a changefeed to stream data from TiDB Cloud to cloud storage. Currently, Amazon S3, Google Cloud Storage (GCS), and Azure Blob Storage are supported.
Restrictions
- For each TiDB Cloud cluster, you can create up to 100 changefeeds.
- Because TiDB Cloud uses TiCDC to establish changefeeds, it has the same restrictions as TiCDC.
- If the table to be replicated does not have a primary key or a non-null unique index, the absence of a unique constraint during replication could result in duplicated data being inserted downstream in some retry scenarios.
Step 1. Configure destination
Navigate to the cluster overview page of the target TiDB cluster. Click Data > Changefeed in the left navigation pane, click Create Changefeed to go to the Destination page, and then select Amazon S3, GCS, or Azure Blob Storage as the destination, depending on the cloud provider on which your cluster is hosted. The configuration process varies depending on the destination you choose.
For Amazon S3, you can use either AWS Role ARN or AWS access key for authentication. Using AWS Role ARN is recommended for stronger security and easier management.
Option 1: AWS Role ARN (recommended)
To use an IAM Role for authentication, follow these steps:
On the Destination page for Amazon S3, enter the S3 URI. Make sure that the S3 bucket is in the same AWS region as your TiDB cluster.
Under Bucket Access, select AWS Role ARN.
To create a new Role ARN, click Click here to create new one with AWS CloudFormation. This template automatically configures the required permissions.
If you prefer to create the role manually, click Create Role ARN manually to view the TiDB Cloud account information and the required policy.
Ensure your IAM role has at least the following permissions for the target bucket:
s3:ListBuckets3:PutObjects3:GetObjects3:DeleteObject
Paste the generated Role ARN into the corresponding field.
Option 2: AWS access key
To use an access key for authentication, follow these steps:
On the Destination page for Amazon S3, enter the S3 URI. Make sure that the S3 bucket is in the same AWS region as your TiDB cluster.
Under Bucket Access, select AWS Access Key.
Fill in the following fields:
- Access Key ID
- Secret Access Key
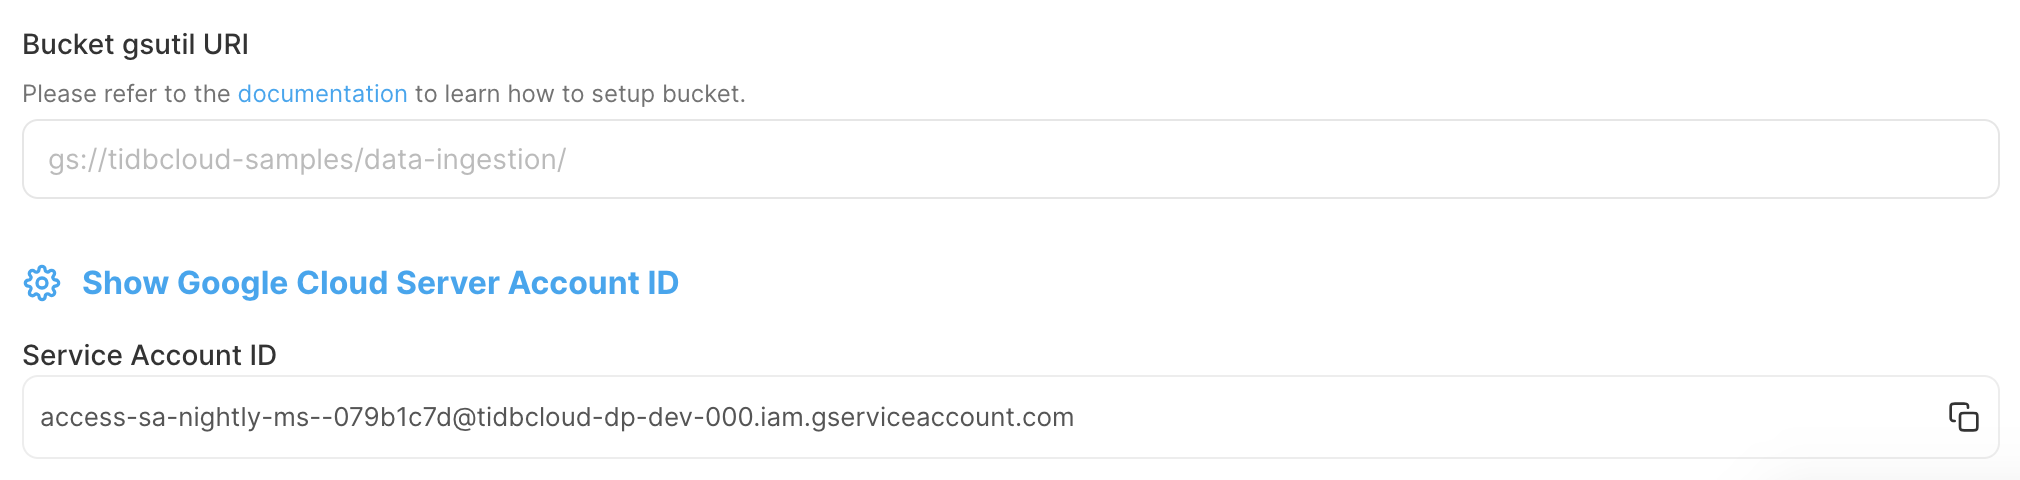
For GCS, before filling GCS Endpoint, you need to first grant the GCS bucket access. Take the following steps:
In the TiDB Cloud console, record the Service Account ID, which will be used to grant TiDB Cloud access to your GCS bucket.
In the Google Cloud console, create an IAM role for your GCS bucket.
Sign in to the Google Cloud console.
Go to the Roles page, and then click Create role.
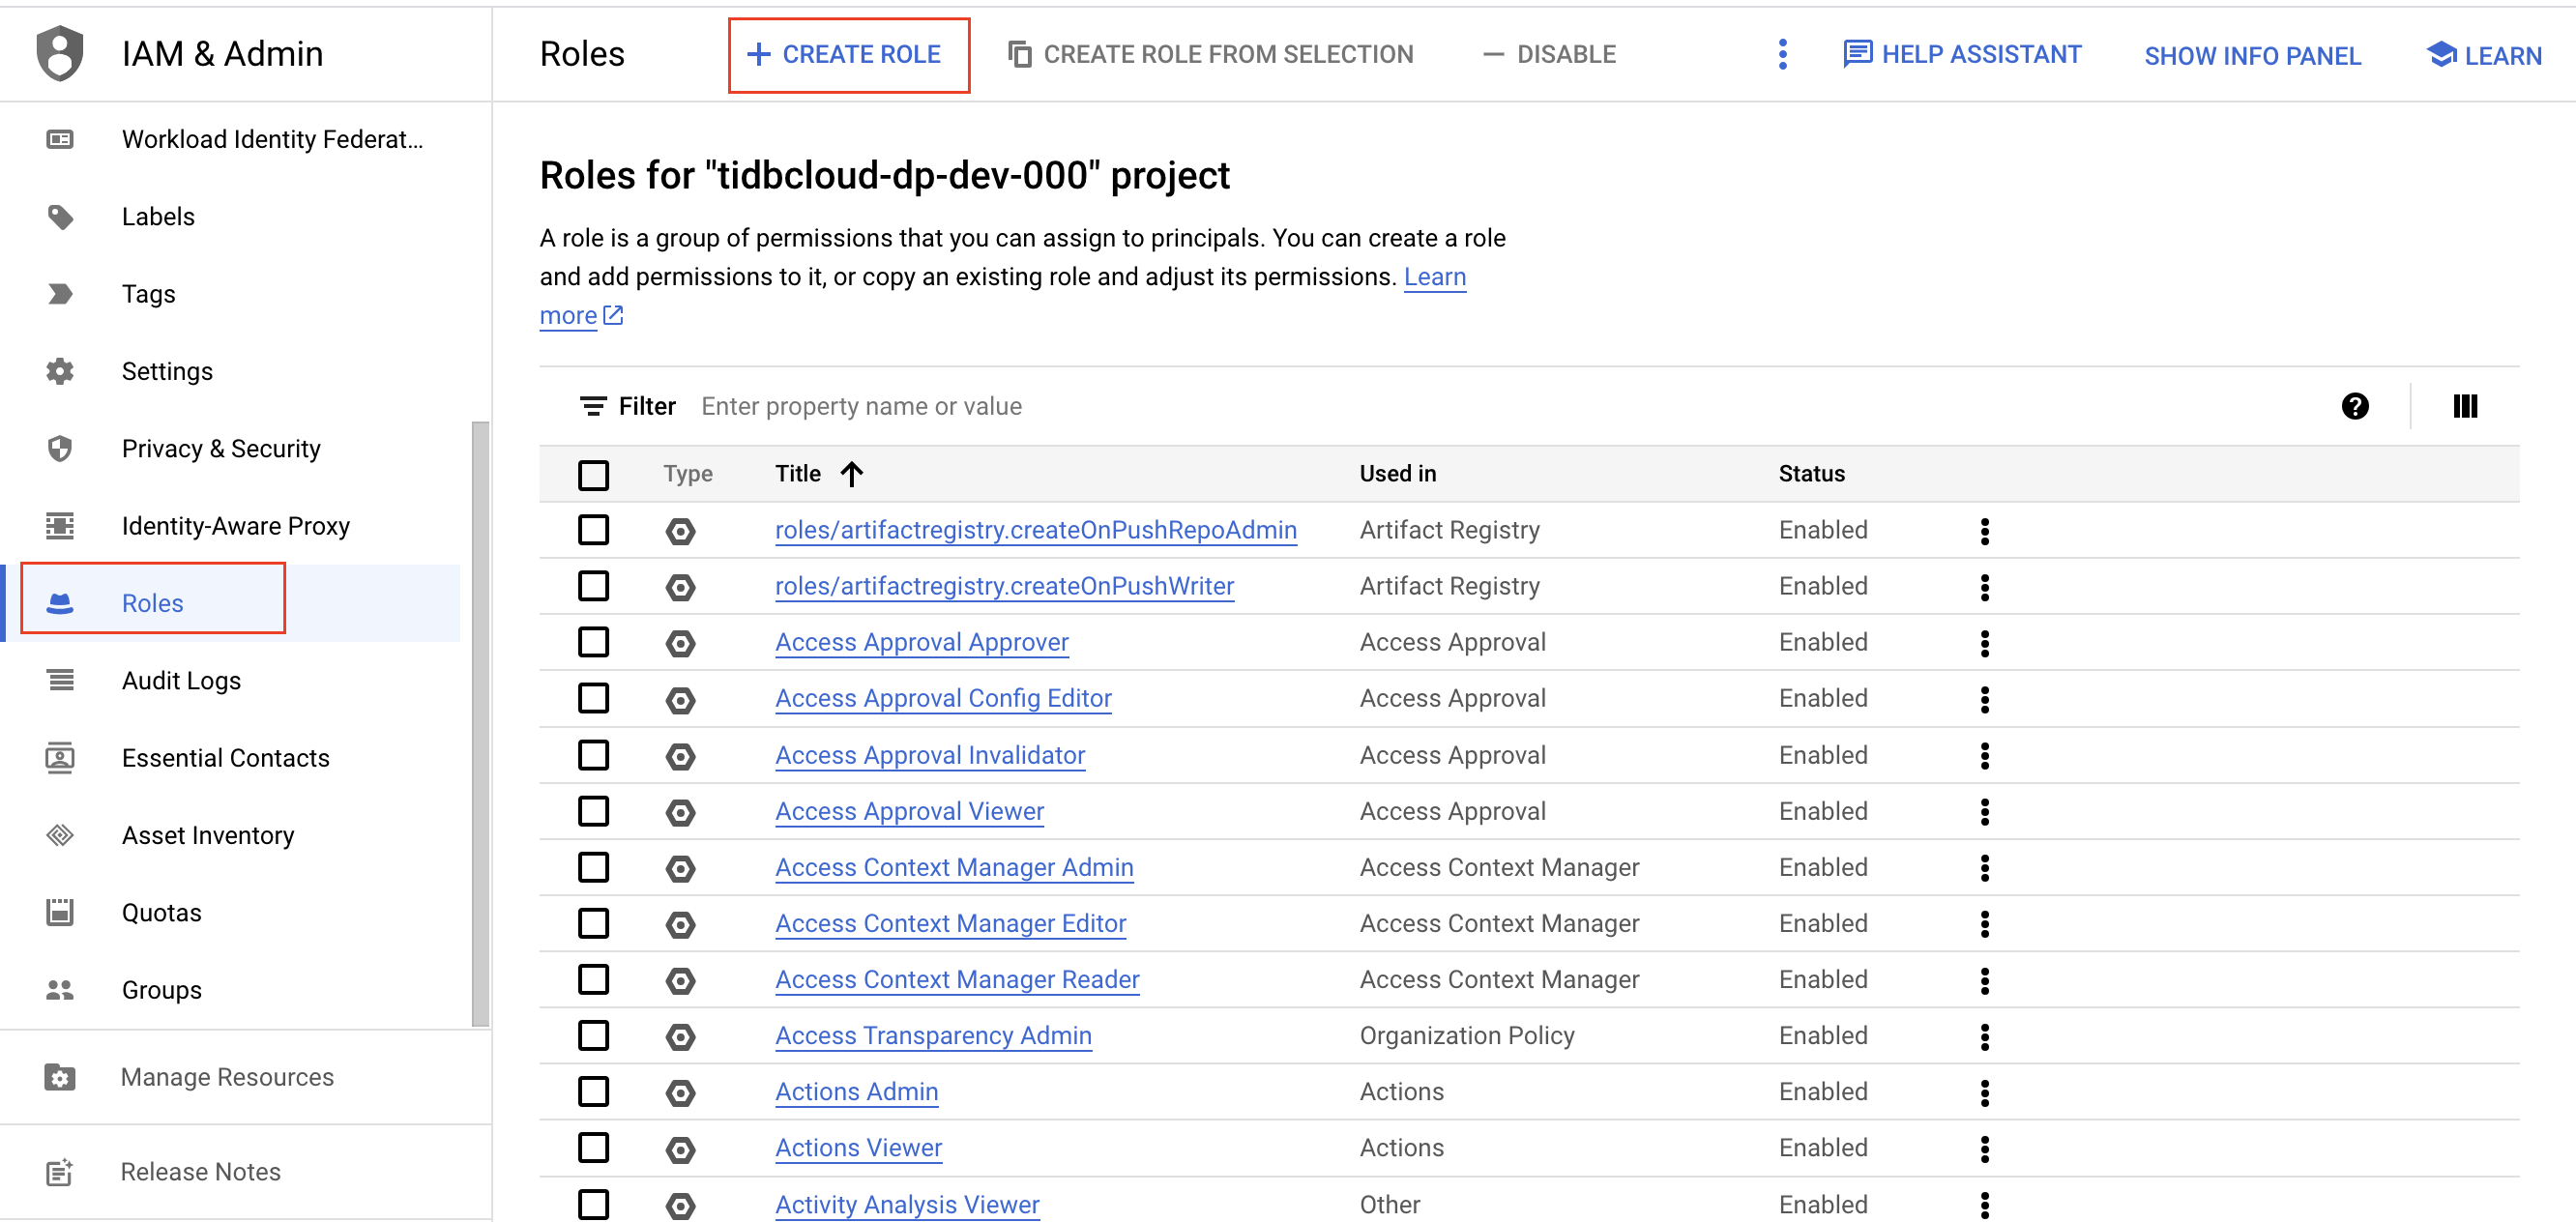
Enter a name, description, ID, and role launch stage for the role. The role name cannot be changed after the role is created.
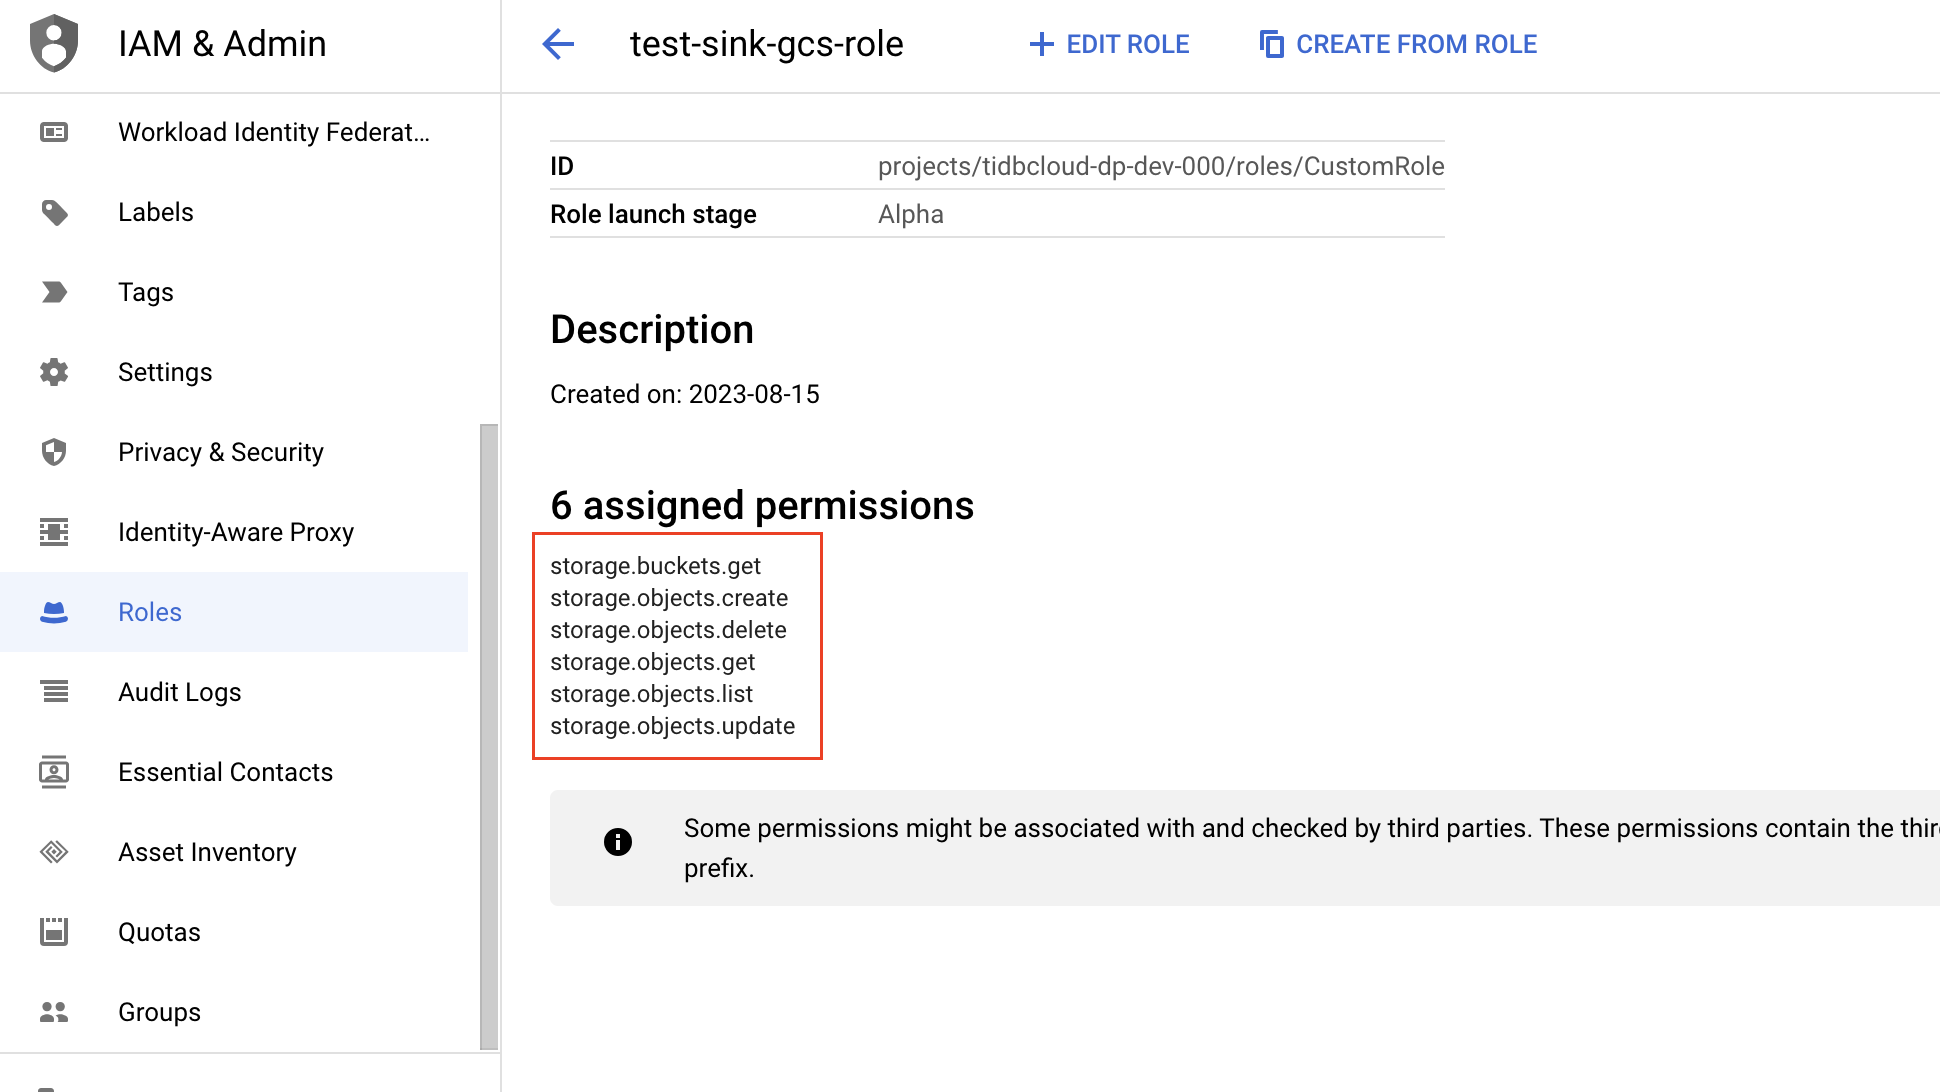
Click Add permissions. Add the following permissions to the role, and then click Add.
- storage.buckets.get
- storage.objects.create
- storage.objects.delete
- storage.objects.get
- storage.objects.list
- storage.objects.update
Go to the Bucket page, and choose a GCS bucket you want TiDB Cloud to access. Note that the GCS bucket must be in the same region as your TiDB cluster.
On the Bucket details page, click the Permissions tab, and then click Grant access.
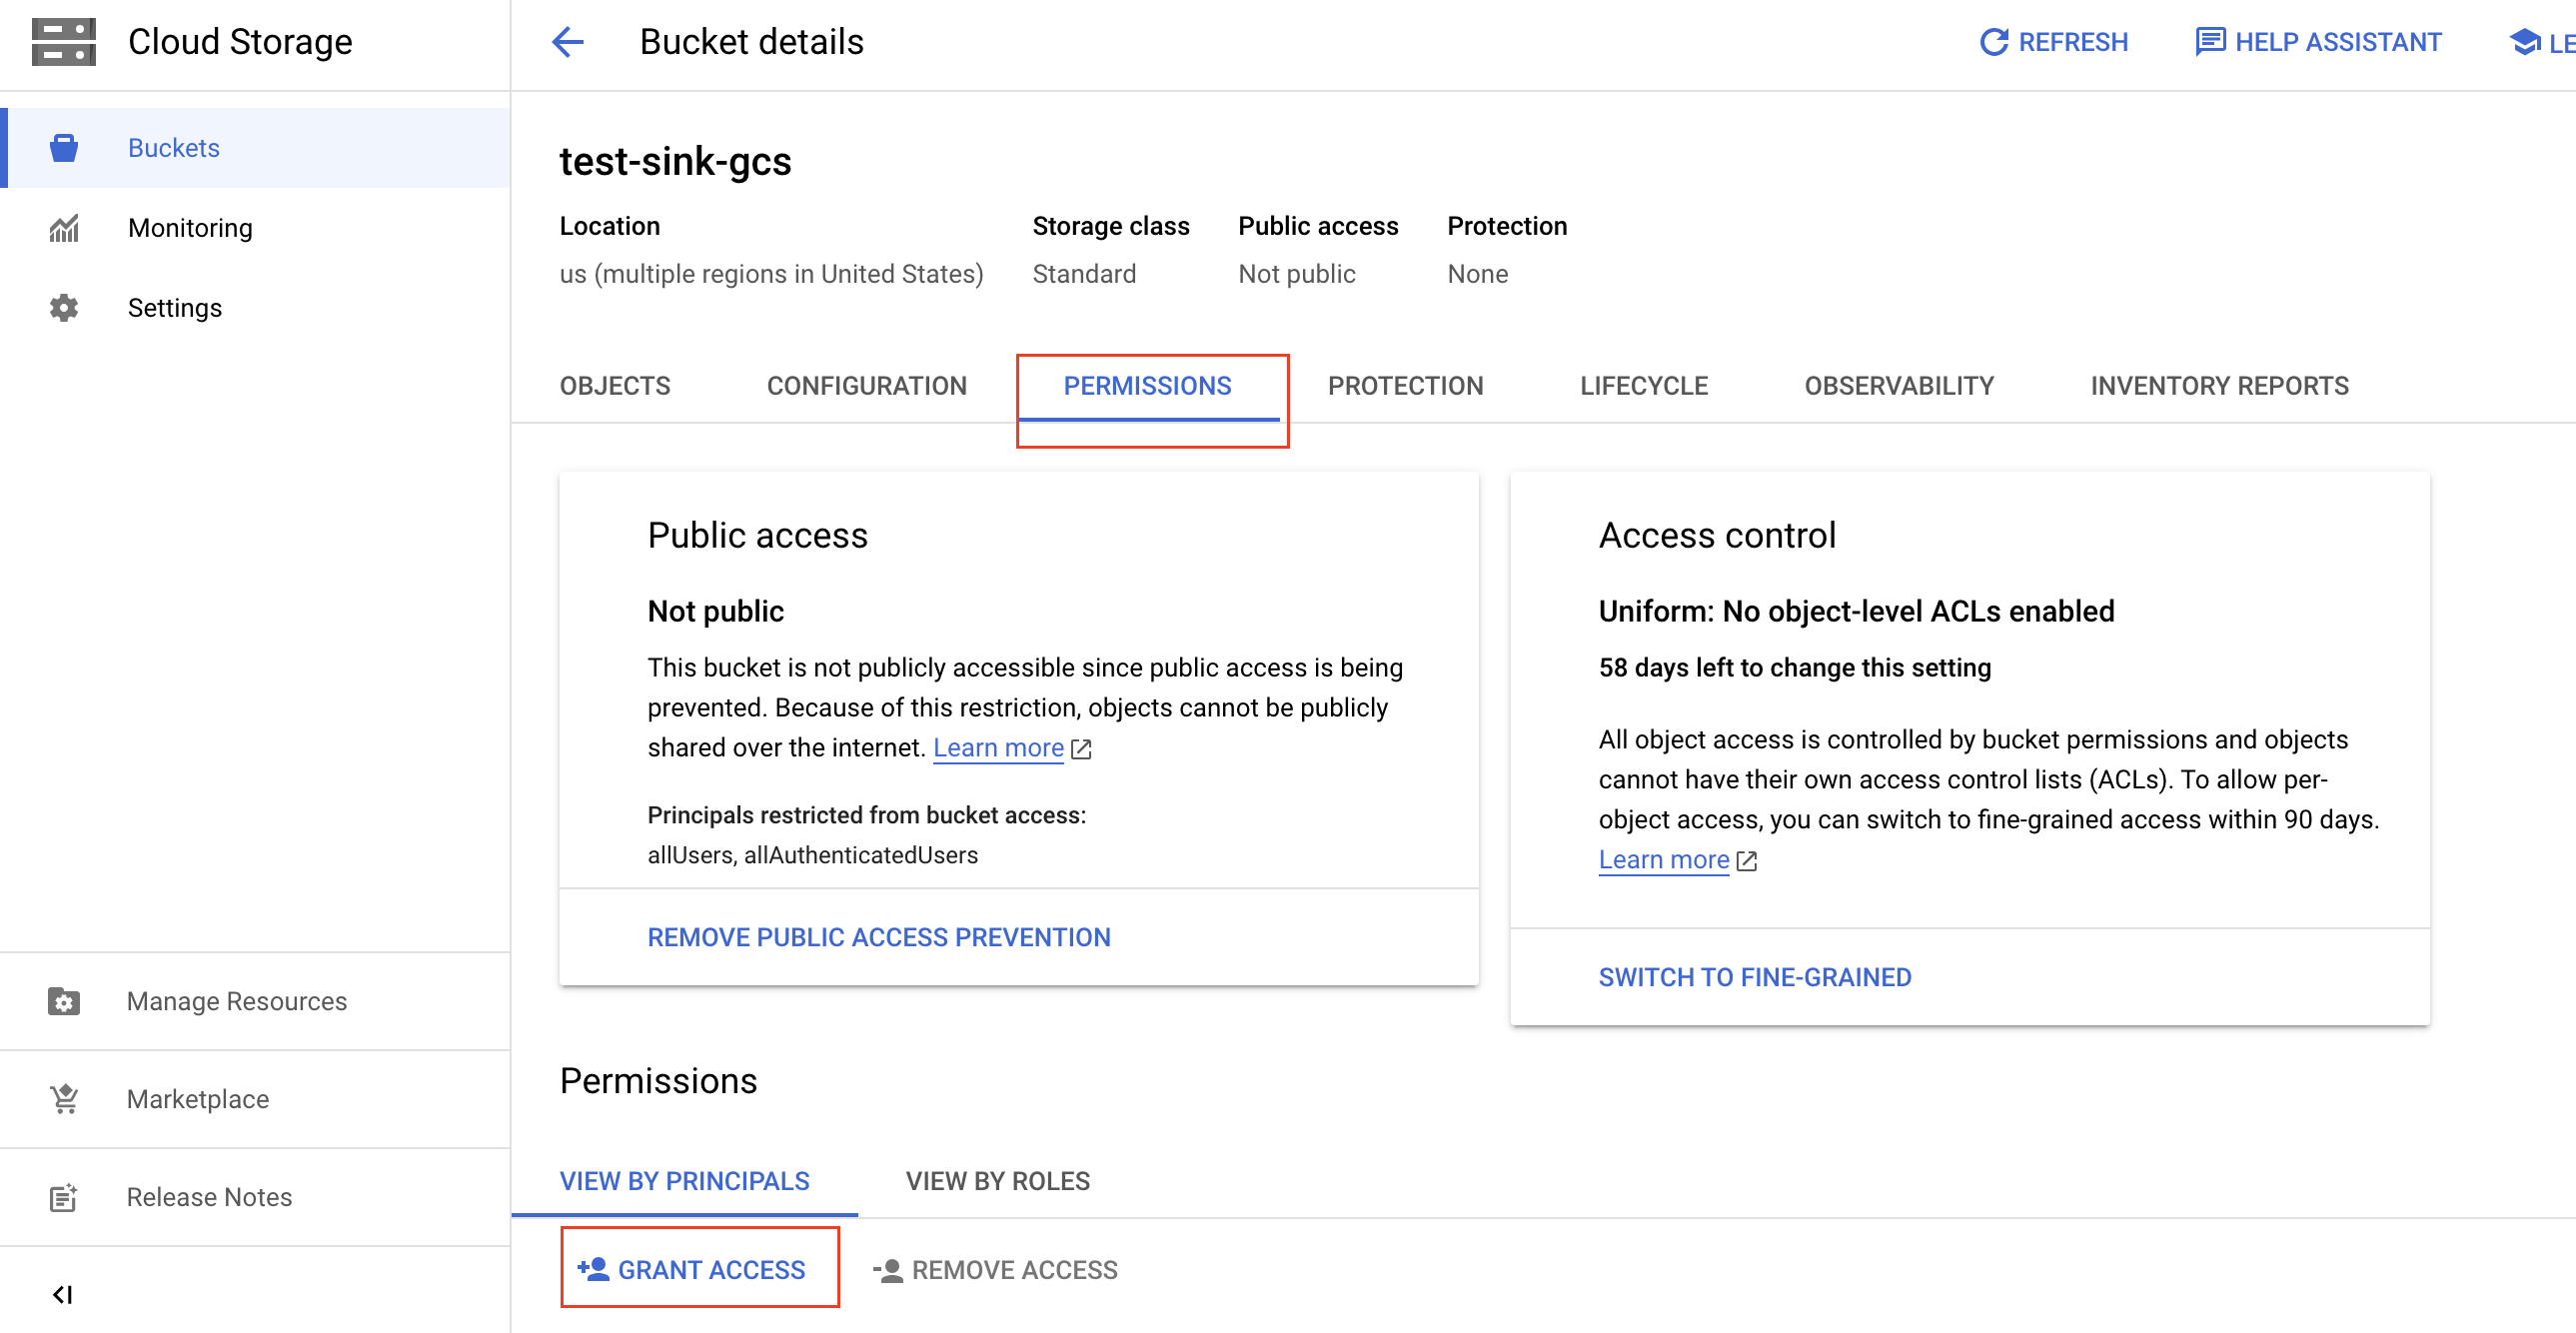
Fill in the following information to grant access to your bucket, and then click Save.
- In the New Principals field, paste the Service Account ID of the target TiDB cluster you recorded before.
- In the Select a role drop-down list, type the name of the IAM role you just created, and then choose the name from the filter result.
On the Bucket details page, click the Objects tab.
To get a bucket's gsutil URI, click the copy button and add
gs://as a prefix. For example, if the bucket name istest-sink-gcs, the URI would begs://test-sink-gcs/.
To get a folder's gsutil URI, open the folder, click the copy button, and add
gs://as a prefix. For example, if the bucket name istest-sink-gcsand the folder name ischangefeed-xxx, the URI would begs://test-sink-gcs/changefeed-xxx/.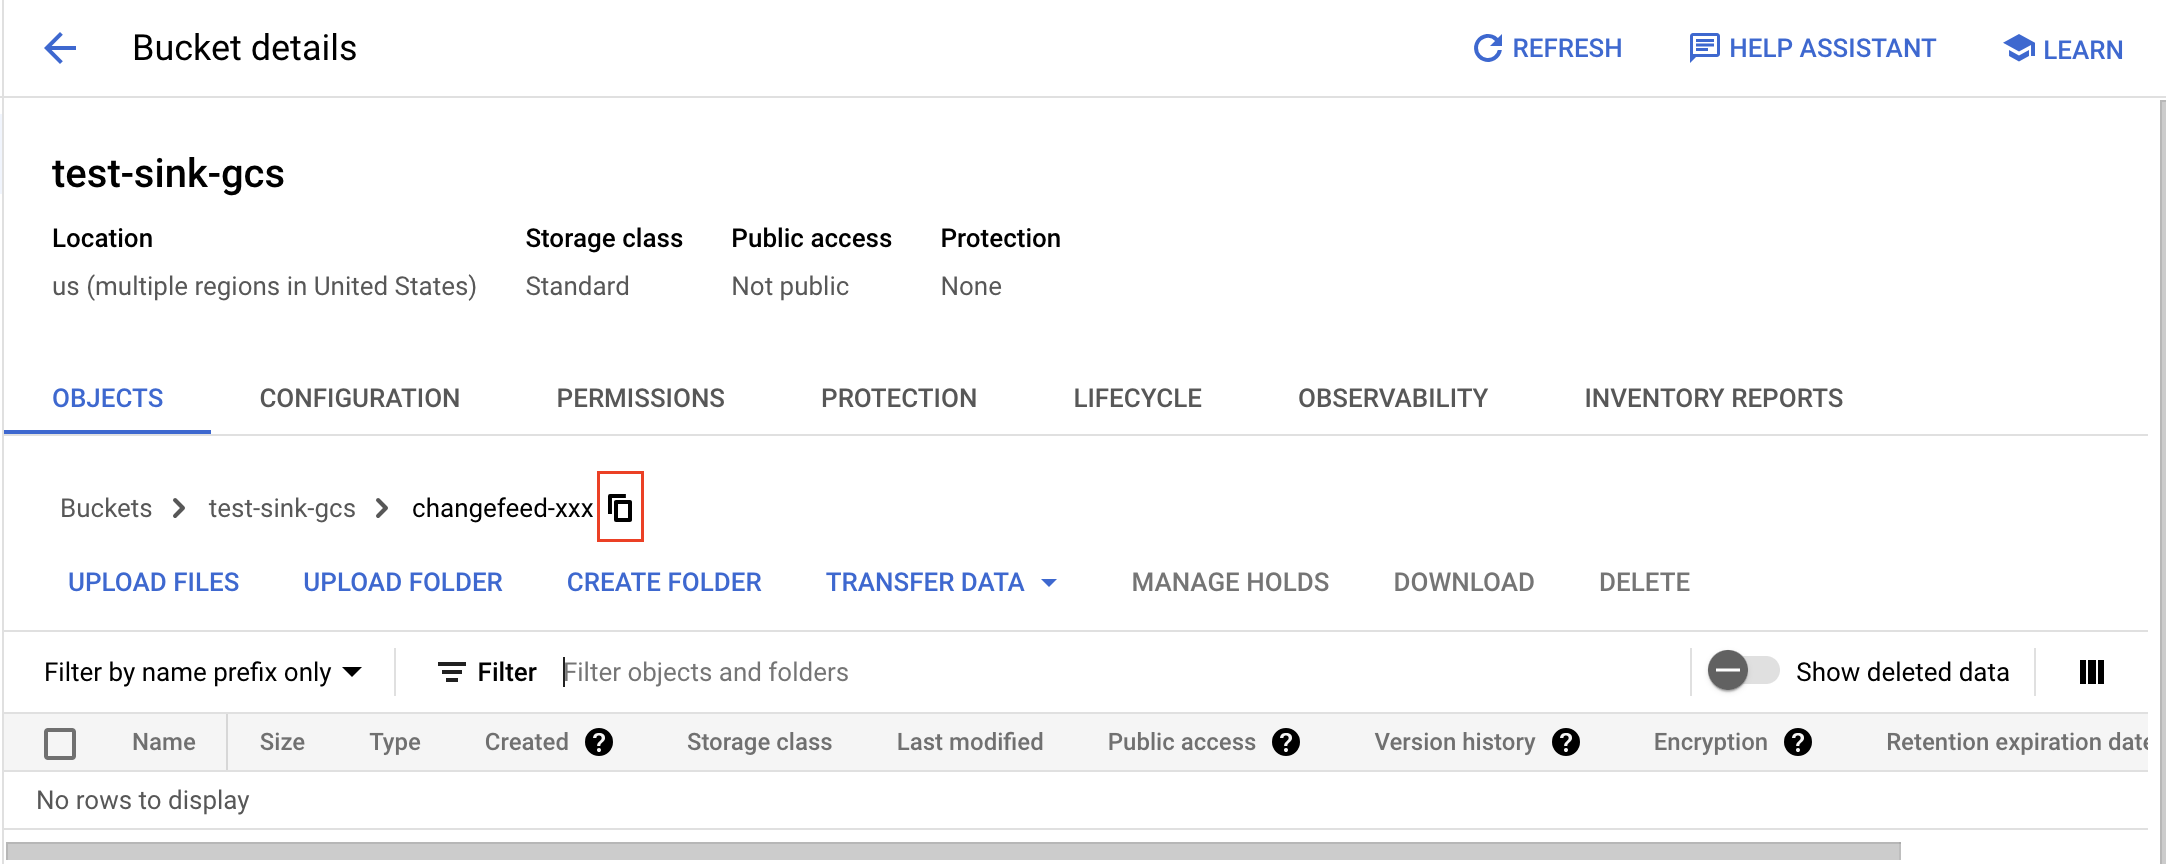
In the TiDB Cloud console, go to the Changefeed's Destination page, and fill in the bucket gsutil URI field.
For Azure Blob Storage, you must configure the container and get a SAS token in the Azure portal first. Take the following steps:
In the Azure portal, create a container to store changefeed data.
- In the left navigation pane, click Storage Accounts, and then select your storage account.
- In the storage account navigation menu, select Data storage > Containers, and then click + Container.
- Enter a name for your new container, set the anonymous access level (the recommended level is Private), and then click Create.
Get the URL of the target container.
- In the container list, select your target container.
- Click ... for the container, and then select Container properties.
- Save the URL value for later use, for example
https://<storage_account>.blob.core.windows.net/<container>.
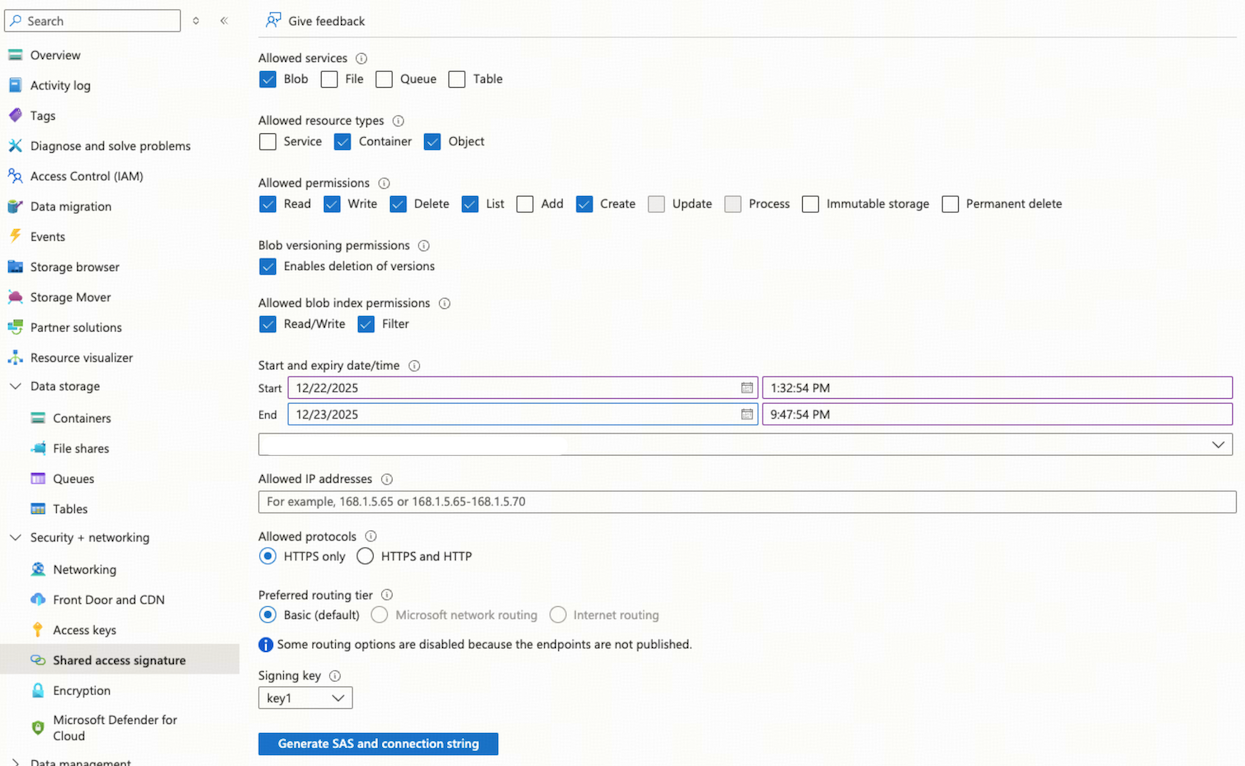
Generate a SAS token.
In the storage account navigation menu, select Security + networking > Shared access signature.
In the Allowed services section, select Blob.
In the Allowed resource types section, select Container and Object.
In the Allowed permissions section, select Read, Write, Delete, List, and Create.
Specify a validity period for the SAS token that is long enough to meet your needs.
Click Generate SAS and connection string, and then save the SAS token.
In the TiDB Cloud console, go to the Changefeed's Destination page, and fill in the following fields:
- Blob URL: enter the container URL obtained in step 2. You can optionally add a prefix.
- SAS Token: enter the generated SAS token obtained in step 3.
Click Next to establish the connection from the TiDB Cloud Dedicated cluster to Amazon S3, GCS, or Azure Blob Storage. TiDB Cloud will automatically test and verify if the connection is successful.
- If yes, you are directed to the next step of configuration.
- If not, a connectivity error is displayed, and you need to handle the error. After the error is resolved, click Next to retry the connection.
Step 2. Configure replication
Customize Table Filter to filter the tables that you want to replicate. For the rule syntax, refer to table filter rules.
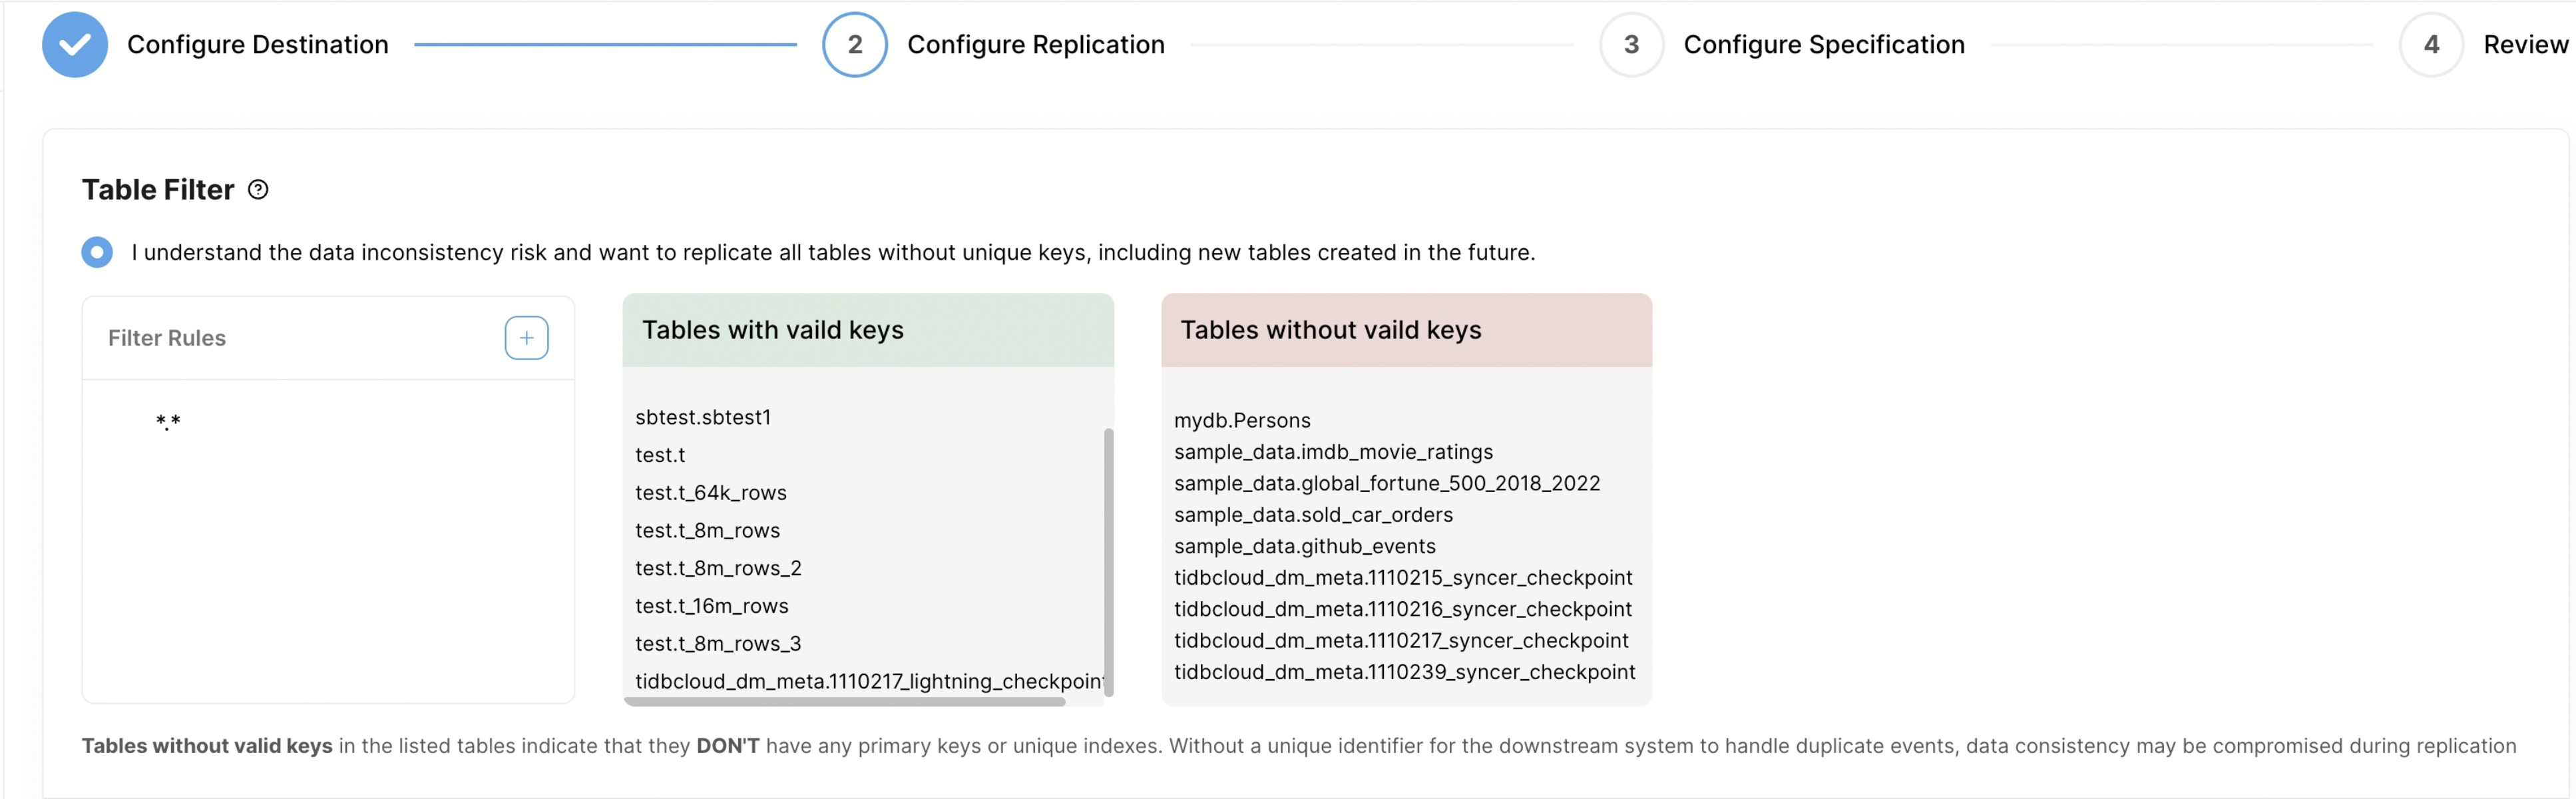
- Case Sensitive: you can set whether the matching of database and table names in filter rules is case-sensitive. By default, matching is case-insensitive.
- Filter Rules: you can set filter rules in this column. By default, there is a rule
*.*, which stands for replicating all tables. When you add a new rule, TiDB Cloud queries all the tables in TiDB and displays only the tables that match the rules in the box on the right. You can add up to 100 filter rules. - Tables with valid keys: this column displays the tables that have valid keys, including primary keys or unique indexes.
- Tables without valid keys: this column shows tables that lack primary keys or unique keys. These tables present a challenge during replication because the absence of a unique identifier can result in inconsistent data when handling duplicate events downstream. To ensure data consistency, it is recommended to add unique keys or primary keys to these tables before initiating the replication. Alternatively, you can employ filter rules to exclude these tables. For example, you can exclude the table
test.tbl1by using the rule"!test.tbl1".
Customize Event Filter to filter the events that you want to replicate.
- Tables matching: you can set which tables the event filter will be applied to in this column. The rule syntax is the same as that used for the preceding Table Filter area. You can add up to 10 event filter rules per changefeed.
- Event Filter: you can use the following event filters to exclude specific events from the changefeed:
- Ignore event: excludes specified event types.
- Ignore SQL: excludes DDL events that match specified expressions. For example,
^dropexcludes statements starting withDROP, andadd columnexcludes statements containingADD COLUMN. - Ignore insert value expression: excludes
INSERTstatements that meet specific conditions. For example,id >= 100excludesINSERTstatements whereidis greater than or equal to 100. - Ignore update new value expression: excludes
UPDATEstatements where the new value matches a specified condition. For example,gender = 'male'excludes updates that result ingenderbeingmale. - Ignore update old value expression: excludes
UPDATEstatements where the old value matches a specified condition. For example,age < 18excludes updates where the old value ofageis less than 18. - Ignore delete value expression: excludes
DELETEstatements that meet a specified condition. For example,name = 'john'excludesDELETEstatements wherenameis'john'.
In the Start Replication Position area, select one of the following replication positions:
- Start replication from now on
- Start replication from a specific TSO
- Start replication from a specific time
In the Data Format area, select either the CSV or Canal-JSON format.
To configure the CSV format, fill in the following fields:
- Binary Encode Method: The encoding method for binary data. You can choose base64 (default) or hex. If you want to integrate with AWS DMS, use hex.
- Date Separator: To rotate data based on the year, month, and day, or choose not to rotate at all.
- Delimiter: Specify the character used to separate values in the CSV file. The comma (
,) is the most commonly used delimiter. - Quote: Specify the character used to enclose values that contain the delimiter character or special characters. Typically, double quotes (
") are used as the quote character. - Null/Empty Values: Specify how null or empty values are represented in the CSV file. This is important for proper handling and interpretation of the data.
- Include Commit Ts: Control whether to include
commit-tsin the CSV row.
Canal-JSON is a plain JSON text format. To configure it, fill in the following fields:
- Date Separator: To rotate data based on the year, month, and day, or choose not to rotate at all.
- Enable TiDB Extension: When you enable this option, TiCDC sends WATERMARK events and adds the TiDB extension field to Canal-JSON messages.
In the Flush Parameters area, you can configure two items:
- Flush Interval: set to 60 seconds by default, adjustable within a range of 2 seconds to 10 minutes;
- File Size: set to 64 MB by default, adjustable within a range of 1 MB to 512 MB.

In the Split Event area, choose whether to split
UPDATEevents into separateDELETEandINSERTevents or keep as rawUPDATEevents. For more information, see Split primary or unique key UPDATE events for non-MySQL sinks.
Step 3. Configure specification
Click Next to configure your changefeed specification.
- In the Changefeed Specification area, specify the number of Replication Capacity Units (RCUs) to be used by the changefeed.
- In the Changefeed Name area, specify a name for the changefeed.
Step 4. Review the configuration and start replication
Click Next to review the changefeed configuration.
- If you have verified that all configurations are correct, click Create to proceed with the creation of the changefeed.
- If you need to modify any configurations, click Previous to go back and make the necessary changes.
The sink will start shortly, and you will observe the status of the sink changing from Creating to Running.
Click the name of the changefeed to go to its details page. On this page, you can view more information about the changefeed, including the checkpoint status, replication latency, and other relevant metrics.