小さなデータセットのMySQLシャードをTiDBに移行およびマージする
複数のMySQLデータベースインスタンスをアップストリームで1つのTiDBデータベースダウンストリームに移行およびマージする必要があり、データ量が多すぎない場合は、DMを使用してMySQLシャードを移行できます。このドキュメントの「小さなデータセット」とは、通常、1TiB前後またはそれ未満のデータを意味します。このドキュメントの例を通じて、移行の操作手順、注意事項、およびトラブルシューティングを学ぶことができます。
このドキュメントは、合計1TiB未満のMySQLシャードの移行に適用されます。合計1TiBを超えるデータを含むMySQLシャードを移行する場合、DMのみを使用して移行するには長い時間がかかります。この場合、 大規模なデータセットのMySQLシャードをTiDBに移行およびマージするで紹介した操作に従って移行することをお勧めします。
このドキュメントでは、移行手順を説明するための簡単な例を取り上げます。この例の2つのデータソースMySQLインスタンスのMySQLシャードは、ダウンストリームTiDBクラスタに移行されます。図を以下に示します。
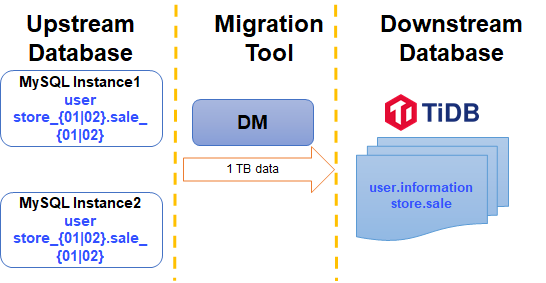
MySQLインスタンス1とMySQLインスタンス2の両方に、次のスキーマとテーブルが含まれています。この例では、両方のインスタンスでプレフィックスがsaleのstore_01およびstore_02スキーマから、 storeスキーマのダウンストリームsaleテーブルにテーブルを移行してマージします。
| スキーマ | テーブル |
|---|---|
| store_01 | sale_01、sale_02 |
| store_02 | sale_01、sale_02 |
ターゲットスキーマとテーブル:
| スキーマ | テーブル |
|---|---|
| お店 | セール |
前提条件
移行を開始する前に、次のタスクを完了していることを確認してください。
シャーディングされたテーブルの競合を確認します
移行に異なるシャードテーブルからのデータのマージが含まれる場合、マージ中に主キーまたは一意のインデックスの競合が発生する可能性があります。したがって、移行する前に、ビジネスの観点から現在のシャーディングスキームを詳しく調べ、競合を回避する方法を見つける必要があります。詳細については、 複数のシャードテーブル間での主キーまたは一意のインデックス間の競合を処理しますを参照してください。以下は簡単な説明です。
この例では、 sale_01とsale_02は次のように同じテーブル構造を持っています
CREATE TABLE `sale_01` (
`id` bigint(20) NOT NULL AUTO_INCREMENT,
`sid` bigint(20) NOT NULL,
`pid` bigint(20) NOT NULL,
`comment` varchar(255) DEFAULT NULL,
PRIMARY KEY (`id`),
UNIQUE KEY `sid` (`sid`)
) ENGINE=InnoDB DEFAULT CHARSET=latin1
id列が主キーで、 sid列がシャーディングキーです。 id列は自動増分であり、複数のシャーディングテーブル範囲が重複すると、データの競合が発生します。 sidは、インデックスがグローバルに一意であることを保証できるため、 自動インクリメント主キーの主キー属性を削除しますの手順に従って、 id列をバイパスできます。
CREATE TABLE `sale` (
  `id` bigint(20) NOT NULL,
  `sid` bigint(20) NOT NULL,
  `pid` bigint(20) NOT NULL,
  `comment` varchar(255) DEFAULT NULL,
  INDEX (`id`),
  UNIQUE KEY `sid` (`sid`)
) ENGINE=InnoDB DEFAULT CHARSET=latin1
ステップ1.データソースをロードする
DMへのアップストリームデータソースを構成するsource1.yamlという名前の新しいデータソースファイルを作成し、次のコンテンツを追加します。
# Configuration.
source-id: "mysql-01" # Must be unique.
# Specifies whether DM-worker pulls binlogs with GTID (Global Transaction Identifier).
# The prerequisite is that you have already enabled GTID in the upstream MySQL.
# If you have configured the upstream database service to switch master between different nodes automatically, you must enable GTID.
enable-gtid: true
from:
  host: "${host}"           # For example: 172.16.10.81
  user: "root"
  password: "${password}"   # Plaintext passwords are supported but not recommended. It is recommended that you use dmctl encrypt to encrypt plaintext passwords.
  port: ${port}             # For example: 3306
ターミナルで次のコマンドを実行します。 tiup dmctlを使用して、データソース構成をDMクラスタにロードします。
tiup dmctl --master-addr ${advertise-addr} operate-source create source1.yaml
パラメータは次のとおりです。
| パラメータ | 説明 |
|---|---|
| --master-addr | dmctlが接続するクラスタのDMマスターノードの{advertise-addr}。例:172.16.10.71:8261 |
| 操作-ソース作成 | データソースをDMクラスターにロードします。 |
すべてのデータソースがDMクラスタに追加されるまで、上記の手順を繰り返します。
ステップ2.移行タスクを構成します
task1.yamlという名前のタスク構成ファイルを作成し、それに次のコンテンツを書き込みます。
name: "shard_merge"               # The name of the task. Should be globally unique.
# Task mode. You can set it to the following:
# - full: Performs only full data migration (incremental replication is skipped)
# - incremental: Only performs real-time incremental replication using binlog. (full data migration is skipped)
# - all: Performs both full data migration and incremental replication. For migrating small to medium amount of data here, use this option.
task-mode: all
# Required for the MySQL shards. By default, the "pessimistic" mode is used.
# If you have a deep understanding of the principles and usage limitations of the optimistic mode, you can also use the "optimistic" mode.
# For more information, see [Merge and Migrate Data from Sharded Tables](https://docs.pingcap.com/tidb/dev/feature-shard-merge/)
shard-mode: "pessimistic"
meta-schema: "dm_meta"                        # A schema will be created in the downstream database to store the metadata
ignore-checking-items: ["auto_increment_ID"]  # In this example, there are auto-incremental primary keys upstream, so you do not need to check this item.

target-database:
  host: "${host}"                             # For example: 192.168.0.1
  port: 4000
  user: "root"
  password: "${password}"                     # Plaintext passwords are supported but not recommended. It is recommended that you use dmctl encrypt to encrypt plaintext passwords.

mysql-instances:
  -
    source-id: "mysql-01"                                    # ID of the data source, which is source-id in source1.yaml
    route-rules: ["sale-route-rule"]                         # Table route rules applied to the data source
    filter-rules: ["store-filter-rule", "sale-filter-rule"]  # Binlog event filter rules applied to the data source
    block-allow-list:  "log-bak-ignored"                     # Block & Allow Lists rules applied to the data source
  -
    source-id: "mysql-02"
    route-rules: ["sale-route-rule"]
    filter-rules: ["store-filter-rule", "sale-filter-rule"]
    block-allow-list:  "log-bak-ignored"

# Configurations for merging MySQL shards
routes:                       # Table renaming rules ('routes') from upstream to downstream tables, in order to support merging different sharded tables into a single target table.
  sale-route-rule:            # Rule name. Migrate and merge tables from upstream to the downstream.
    schema-pattern: "store_*" # Rule for matching upstream schema names. It supports the wildcards "*" and "?".
    table-pattern: "sale_*"   # Rule for matching upstream table names. It supports the wildcards "*" and "?".
    target-schema: "store"    # Name of the target schema.
    target-table:  "sale"     # Name of the target table.

# Filters out some DDL events.
filters:
  sale-filter-rule:           # Filter name.
    schema-pattern: "store_*" # The binlog events or DDL SQL statements of upstream MySQL  instance schemas that match schema-pattern are filtered by the rules below.
    table-pattern: "sale_*"   # The binlog events or DDL SQL statements of upstream MySQL  instance tables that match table-pattern are filtered by the rules below.
    events: ["truncate table", "drop table", "delete"]   # The binlog event array.
    action: Ignore                                       # The string (`Do`/`Ignore`). `Do` is the allow list. `Ignore` is the block list.
  store-filter-rule:
    schema-pattern: "store_*"
    events: ["drop database"]
    action: Ignore

# Block and allow list
block-allow-list:           # filter or only migrate all operations of some databases or some tables.
  log-bak-ignored:          # Rule name.
    do-dbs: ["store_*"]     # The allow list of the schemas to be migrated, similar to replicate-do-db in MySQL.
上記の例は、移行タスクを実行するための最小構成です。詳細については、 DM高度なタスクConfiguration / コンフィグレーションファイルを参照してください。
タスクファイルのroutes 、 filtersその他の構成の詳細については、次のドキュメントを参照してください。
ステップ3.タスクを開始します
移行タスクを開始する前に、 tiup dmctlのcheck-taskサブコマンドを実行して、考えられるエラーを回避するために、構成がDMの要件を満たしているかどうかを確認してください。
tiup dmctl --master-addr ${advertise-addr} check-task task.yaml
次のコマンドをtiup dmctlで実行して、移行タスクを開始します。
tiup dmctl --master-addr ${advertise-addr} start-task task.yaml
| パラメータ | 説明 |
|---|---|
| --master-addr | dmctlが接続するクラスタのDMマスターノードの{advertise-addr}。例:172.16.10.71:8261 |
| 開始タスク | データ移行タスクを開始します。 |
移行タスクの開始に失敗した場合は、エラー情報に従って構成情報を変更してから、 start-task task.yamlを再度実行して移行タスクを開始します。問題が発生した場合は、 エラーの処理およびFAQを参照してください。
ステップ4.タスクを確認します
移行タスクを開始した後、 dmtcl tiupを使用してquery-statusを実行し、タスクのステータスを表示できます。
tiup dmctl --master-addr ${advertise-addr} query-status ${task-name}
エラーが発生した場合は、 query-status <name of the error task>を使用してより詳細な情報を表示します。 query-statusコマンドのクエリ結果、タスクステータス、およびサブタスクステータスの詳細については、 TiDBデータ移行クエリのステータスを参照してください。
手順5.タスクを監視してログを確認する(オプション)
Grafanaまたはログを介して、移行タスクの履歴と内部運用メトリックを表示できます。
Grafana経由
TiUPを使用してDMクラスタをデプロイするときに、Prometheus、Alertmanager、およびGrafanaが正しくデプロイされている場合、GrafanaでDMモニタリングメトリックを表示できます。具体的には、Grafanaでのデプロイ時に指定したIPアドレスとポートを入力し、DMダッシュボードを選択します。
ログ経由
DMの実行中は、DM-master、DM-worker、およびdmctlの出力ログに移行タスクに関する情報が含まれます。各コンポーネントのログディレクトリは次のとおりです。
- DM-masterログディレクトリ:DM-masterプロセスパラメータ
--log-fileで指定されます。 DMがTiUPを使用して展開されている場合、ログディレクトリは/dm-deploy/dm-master-8261/log/です。 - DM-workerログディレクトリ:DM-workerプロセスパラメータ
--log-fileで指定されます。 DMがTiUPを使用して展開されている場合、ログディレクトリは/dm-deploy/dm-worker-8262/log/です。
- DM-masterログディレクトリ:DM-masterプロセスパラメータ