大規模なデータセットのMySQLシャードをTiDBに移行およびマージする
大規模なMySQLデータセット(たとえば、1 TiB以上)を異なるパーティションからTiDBに移行する場合、移行中にビジネスからのすべてのTiDBクラスタ書き込み操作を一時停止できる場合は、TiDBLightningを使用して実行できます。迅速な移行。移行後、TiDB DMを使用して、ビジネスニーズに応じて増分レプリケーションを実行することもできます。このドキュメントの「大規模なデータセット」とは、通常、1TiB以上のデータを意味します。
このドキュメントでは、例を使用して、このような種類の移行の手順全体を説明します。
MySQLシャードのデータサイズが1TiB未満の場合は、 小さなデータセットのMySQLシャードをTiDBに移行およびマージするで説明されている手順に従うことができます。これは、完全移行と増分移行の両方をサポートし、手順が簡単です。
次の図は、 DumplingとTiDBLightningを使用してMySQLシャードテーブルをTiDBに移行およびマージする方法を示しています。
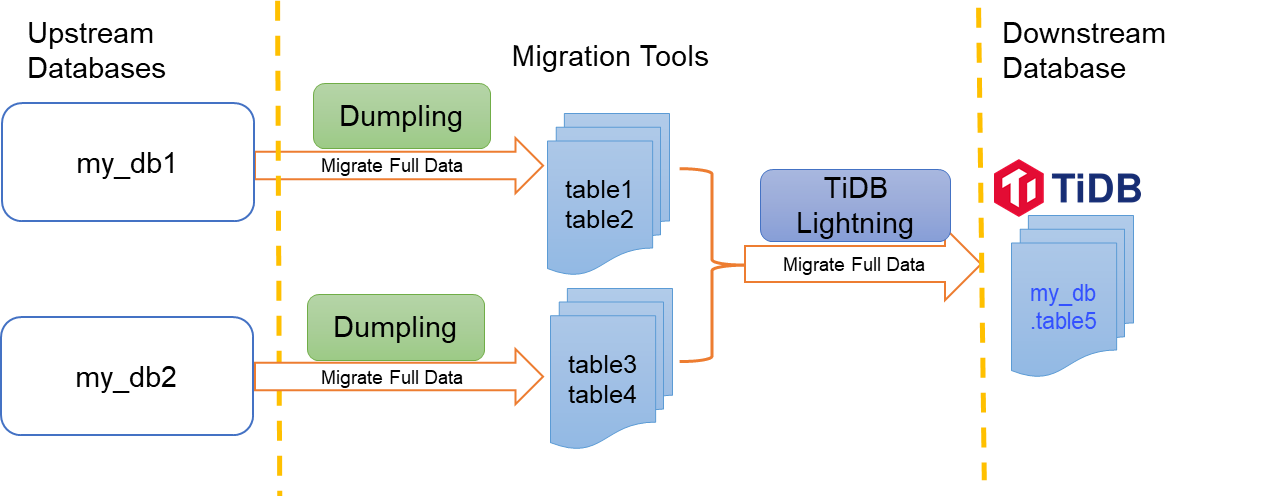
この例では、 my_db1とmy_db2の2つのデータベースがあることを前提としています。 Dumplingを使用して、 my_db1から2つのテーブルtable1とtable2をエクスポートし、 my_db2からそれぞれ2つのテーブルtable3とtable4をエクスポートします。その後、TiDB Lightingを使用して、エクスポートされた4つのテーブルをターゲットTiDBのmydbから同じtable5にインポートしてマージします。
このドキュメントでは、次の手順に従ってデータを移行できます。
完全なデータをエクスポートするには、Dumplingを使用します。この例では、2つのアップストリームデータベースからそれぞれ2つのテーブルをエクスポートします。
my_db1からtable1とtable2をエクスポートmy_db2からtable3とtable4をエクスポート
TiDB Lightningを起動して、TiDBのデータを
mydb.table5に移行します。(オプション)TiDB DMを使用して、増分レプリケーションを実行します。
前提条件
開始する前に、次のドキュメントを参照して、移行タスクの準備をしてください。
- TiUPを使用してDMクラスターをデプロイする
- TiUPを使用してDumplingとLightningをデプロイ
- DM-workerに必要な権限
- Lightningのアップストリーム権限
- Dumplingの下流の許可
リソース要件
オペレーティングシステム:このドキュメントの例では、新しいクリーンなCentOS7インスタンスを使用しています。仮想マシンは、ローカルの独自のホスト、またはベンダー提供のクラウドプラットフォームに展開できます。 TiDB Lightningは、デフォルトで必要なだけのCPUリソースを消費するため、専用マシンにTiDBLightningをデプロイすることをお勧めします。 TiDB Lightning専用のマシンがない場合は、他のコンポーネント( tikv-serverなど)との共有マシンにTiDB Lightningをデプロイし、論理CPUの数のregion-concurrency %を構成することで、TiDBLightningのCPU使用率を制限できます。
メモリとCPU :TiDB Lightningは大量のリソースを消費するため、64GBを超えるメモリと32コアCPUをTiDBLightningに割り当てることをお勧めします。最高のパフォーマンスを得るには、CPUコアとメモリ(GB)の比率が1:2以上であることを確認してください。
ディスク容量:
- Dumplingには、データソース全体を保存するのに十分なディスク容量が必要です。 SSDをお勧めします。
- インポート中、TiDB Lightningには、ソートされたキーと値のペアを格納するための一時的なスペースが必要です。ディスク容量は、データソースからの最大の単一テーブルを保持するのに十分である必要があります。
- フルデータボリュームが大きい場合は、アップストリームでのbinlogストレージ時間を増やすことができます。これは、インクリメンタルレプリケーション中にbinlogが失われないようにするためです。
注:MySQLからDumplingによってエクスポートされた正確なデータ量を計算することはできませんが、次のSQLステートメントを使用してinformation_schema.tablesテーブルのdata-lengthフィールドを要約することにより、データ量を見積もることができます。
/* Calculate the size of all schemas, in MiB. Replace ${schema_name} with your schema name. */
SELECT table_schema,SUM(data_length)/1024/1024 AS data_length,SUM(index_length)/1024/1024 AS index_length,SUM(data_length+index_length)/1024/1024 AS SUM FROM information_schema.tables WHERE table_schema = "${schema_name}" GROUP BY table_schema;

/* Calculate the size of the largest table, in MiB. Replace ${schema_name} with your schema name. */
SELECT table_name,table_schema,SUM(data_length)/1024/1024 AS data_length,SUM(index_length)/1024/1024 AS index_length,SUM(data_length+index_length)/1024/1024 AS SUM from information_schema.tables WHERE table_schema = "${schema_name}" GROUP BY table_name,table_schema ORDER BY SUM DESC LIMIT 5;
ターゲットTiKVクラスタのディスク容量
ターゲットTiKVクラスタには、インポートされたデータを格納するのに十分なディスク容量が必要です。 標準のハードウェア要件に加えて、ターゲットTiKVクラスタのストレージスペースは、データソースのサイズx レプリカの数x2よりも大きくする必要があります。たとえば、クラスタがデフォルトで3つのレプリカを使用する場合、ターゲットTiKVクラスタには、データソースのサイズの6倍を超えるストレージスペースが必要です。数式にはx 2あります。理由は次のとおりです。
- インデックスには余分なスペースが必要になる場合があります。
- RocksDBにはスペース増幅効果があります。
シャードテーブルの競合を確認する
移行に異なるシャードテーブルからのデータのマージが含まれる場合、マージ中に主キーまたは一意のインデックスの競合が発生する可能性があります。したがって、移行する前に、ビジネスの観点から現在のシャーディングスキームを詳しく調べ、競合を回避する方法を見つける必要があります。詳細については、 複数のシャードテーブル間での主キーまたは一意のインデックス間の競合を処理しますを参照してください。以下は簡単な説明です。
テーブル1〜4のテーブル構造は次のようになります。
CREATE TABLE `table1` (
  `id` bigint(20) NOT NULL AUTO_INCREMENT,
  `sid` bigint(20) NOT NULL,
  `pid` bigint(20) NOT NULL,
  `comment` varchar(255) DEFAULT NULL,
  PRIMARY KEY (`id`),
  UNIQUE KEY `sid` (`sid`)
) ENGINE=InnoDB DEFAULT CHARSET=latin1
これらの4つのテーブルでは、 id列が主キーです。これは自動インクリメンタルであり、異なるシャーディングテーブルが重複したidの範囲を生成し、移行中にターゲットテーブルで主キーの競合が発生します。一方、 sid列はシャーディングキーであり、インデックスがグローバルに一意であることを保証します。したがって、データマージの競合を回避するために、ターゲットtable5のid列の一意の制約を削除できます。
CREATE TABLE `table5` (
  `id` bigint(20) NOT NULL,
  `sid` bigint(20) NOT NULL,
  `pid` bigint(20) NOT NULL,
  `comment` varchar(255) DEFAULT NULL,
  INDEX (`id`),
  UNIQUE KEY `sid` (`sid`)
) ENGINE=InnoDB DEFAULT CHARSET=latin1
ステップ1。完全なデータをエクスポートするには、Dumplingを使用します
エクスポートする複数のシャードテーブルが同じアップストリームMySQLインスタンスにある場合は、 Dumplingの-fパラメーターを直接使用して、1回の操作でそれらをエクスポートできます。
シャーディングされたテーブルが異なるMySQLインスタンスに格納されている場合は、 Dumplingを使用してそれらをそれぞれエクスポートし、エクスポートされた結果を同じ親ディレクトリに配置できます。
次の例では、両方の方法が使用され、エクスポートされたデータは同じ親ディレクトリに保存されます。
まず、次のコマンドを実行して、 Dumplingを使用してmy_db1からtable1とtable2をエクスポートします。
tiup dumpling -h ${ip} -P 3306 -u root -t 16 -r 200000 -F 256MB -B my_db1 -f 'my_db1.table[12]' -o ${data-path}/my_db1
次の表で、上記のコマンドのパラメーターについて説明します。Dumplingパラメータの詳細については、 Dumplingの概要を参照してください。
${data-path}に十分な空き容量があることを確認してください。単一のテーブルのサイズが大きすぎるためにバックアッププロセスが中断されないように、 -Fのオプションを使用することを強くお勧めします。
次に、次のコマンドを実行して、 Dumplingを使用してmy_db2からtable3とtable4をエクスポートします。パスは${data-path}/my_db1ではなく${data-path}/my_db2であることに注意してください。
tiup dumpling -h ${ip} -P 3306 -u root -t 16 -r 200000 -F 256MB -B my_db2 -f 'my_db2.table[34]' -o ${data-path}/my_db2
上記の手順の後、すべてのソースデータテーブルが${data-path}ディレクトリにエクスポートされます。エクスポートされたすべてのデータを同じディレクトリに配置すると、TiDBLightningによる後続のインポートが便利になります。
インクリメンタルレプリケーションに必要な開始位置情報は、 ${data-path}ディレクトリのmy_db1およびmy_db2のサブディレクトリにあるmetadataのファイルにそれぞれあります。これらは、 Dumplingによって自動的に生成されるメタ情報ファイルです。インクリメンタルレプリケーションを実行するには、binlogの場所情報をこれらのファイルに記録する必要があります。
手順2.TiDBLightningを起動して、完全にエクスポートされたデータをインポートします
移行のためにTiDBLightningを開始する前に、チェックポイントの処理方法を理解し、必要に応じて適切な方法を選択することをお勧めします。
チェックポイント
大量のデータの移行には、通常、数時間または数日かかります。長時間実行されるプロセスが予期せず中断される可能性があります。データの一部がすでにインポートされている場合でも、すべてを最初からやり直すのは非常にイライラする可能性があります。
幸い、TiDB Lightningにはcheckpointsと呼ばれる機能があり、TiDB Lightningはインポートの進行状況を時々 checkpointsとして保存するため、中断されたインポートタスクを再起動時に最新のチェックポイントから再開できます。
回復不能なエラー(データの破損など)が原因でTiDB Lightningタスクがクラッシュした場合、チェックポイントからは取得されませんが、エラーが報告されてタスクが終了します。インポートされたデータの安全性を確保するには、他の手順に進む前に、 tidb-lightning-ctlコマンドを使用してこれらのエラーを解決する必要があります。オプションは次のとおりです。
- --checkpoint-error-destroy:このオプションを使用すると、失敗したターゲットテーブルの既存のデータをすべて最初に破棄することで、それらのテーブルへのデータのインポートを最初から再開できます。
- --checkpoint-error-ignore:移行が失敗した場合、このオプションは、エラーが発生しなかったかのようにエラーステータスをクリアします。
- --checkpoint-remove:このオプションは、エラーに関係なく、すべてのチェックポイントをクリアするだけです。
詳細については、 TiDBLightningチェックポイントを参照してください。
ターゲットスキーマを作成する
ダウンストリームでmydb.table5を作成します。
CREATE TABLE `table5` (
  `id` bigint(20) NOT NULL,
  `sid` bigint(20) NOT NULL,
  `pid` bigint(20) NOT NULL,
  `comment` varchar(255) DEFAULT NULL,
  INDEX (`id`),
  UNIQUE KEY `sid` (`sid`)
) ENGINE=InnoDB DEFAULT CHARSET=latin1
移行タスクを開始します
次の手順に従ってtidb-lightningを開始します。
tomlファイルを編集します。次の例では、
tidb-lightning.tomlを使用しています。[lightning] # Logs level = "info" file = "tidb-lightning.log" [mydumper] data-source-dir = ${data-path} [tikv-importer] # Choose a local backend. # "local": The default mode. It is used for large data volumes greater than 1 TiB. During migration, downstream TiDB cannot provide services. # "tidb": Used for data volumes less than 1 TiB. During migration, downstream TiDB can provide services normally. # For more information, see [TiDB Lightning Backends](https://docs.pingcap.com/tidb/stable/tidb-lightning-backends) backend = "local" # Set the temporary directory for the sorted key value pairs. It must be empty. # The free space must be greater than the size of the dataset to be imported. # It is recommended that you use a directory different from `data-source-dir` to get better migration performance by consuming I/O resources exclusively. sorted-kv-dir = "${sorted-kv-dir}" # Set the renaming rules ('routes') from source to target tables, in order to support merging different table shards into a single target table. Here you migrate `table1` and `table2` in `my_db1`, and `table3` and `table4` in `my_db2`, to the target `table5` in downstream `my_db`. [[mydumper.files]] pattern = '(^|/)my_db1\.table[1-2]\..*\.sql$' schema = "my_db" table = "table5" type = "sql" [[mydumper.files]] pattern = '(^|/)my_db2\.table[3-4]\..*\.sql$' schema = "my_db" table = "table5" type = "sql" # Information of the target TiDB cluster. For example purposes only. Replace the IP address with your IP address. [tidb] # Information of the target TiDB cluster. # Values here are only for illustration purpose. Replace them with your own values. host = ${host} # For example: "172.16.31.1" port = ${port} # For example: 4000 user = "${user_name}" # For example: "root" password = "${password}" # For example: "rootroot" status-port = ${status-port} # The table information is read from the status port. For example: 10080 # the IP address of the PD cluster. TiDB Lightning gets some information through the PD cluster. # For example: "172.16.31.3:2379". # When backend = "local", make sure that the values of status-port and pd-addr are correct. Otherwise an error will occur. pd-addr = "${ip}:${port}"tidb-lightningを実行します。シェルでプログラム名を直接呼び出してプログラムを実行すると、SIGHUPシグナルを受信した後、プロセスが予期せず終了する場合があります。nohupなどのツールを使用してプログラムを実行し、プロセスをシェルのバックtiupに置くことをお勧めしscreen。 S3から移行する場合は、Amazon S3バックエンドストアにアクセスできるアカウントのSecretKeyとAccessKeyを、環境変数としてLightningノードに渡す必要があります。~/.aws/credentialsからのクレデンシャルファイルの読み取りもサポートされています。例えば:
```shell
export AWS_ACCESS_KEY_ID=${access_key}
export AWS_SECRET_ACCESS_KEY=${secret_key}
nohup tiup tidb-lightning -config tidb-lightning.toml > nohup.out 2>&1 &
```
移行タスクを開始した後、次のいずれかの方法を使用して進行状況を確認できます。
grepのツールを使用して、ログ内のキーワードprogressを検索します。デフォルトでは、進行状況を報告するメッセージが5分ごとにログファイルにフラッシュされます。- 監視ダッシュボードを介して進行状況を表示します。詳細については、 TiDB Lightning Monitoringを参照してください。
- Webページで進行状況を表示します。 Webインターフェイスを参照してください。
インポートが完了すると、TiDBLightningは自動的に終了します。データが正常にインポートされたことを確認するには、ログの最後の5行のうちthe whole procedure completed行を確認します。
ノート:
移行が成功したかどうかに関係なく、ログの最後の行は常に
tidb lightning exitになります。これは、TiDB Lightningが正常に終了することを意味し、インポートタスクが正常に完了することを保証するものではありません。
移行中に問題が発生した場合は、 TiDB LightningFAQを参照してください。
手順3.(オプション)DMを使用して増分レプリケーションを実行する
binlogに基づいてソースデータベースの指定された位置からTiDBにデータ変更をレプリケートするには、TiDBDMを使用してインクリメンタルレプリケーションを実行できます。
データソースを追加する
DMへのアップストリームデータソースを構成するsource1.yamlという名前の新しいデータソースファイルを作成し、次のコンテンツを追加します。
# Configuration.
source-id: "mysql-01" # Must be unique.

# Specifies whether DM-worker pulls binlogs with GTID (Global Transaction Identifier).
# The prerequisite is that you have already enabled GTID in the upstream MySQL.
# If you have configured the upstream database service to switch master between different nodes automatically, you must enable GTID.
enable-gtid: true

from:
  host: "${host}"           # For example: 172.16.10.81
  user: "root"
  password: "${password}"   # Plaintext passwords are supported but not recommended. It is recommended that you use dmctl encrypt to encrypt plaintext passwords.
  port: ${port}             # For example: 3306
ターミナルで次のコマンドを実行します。 tiup dmctlを使用して、データソース構成をDMクラスタにロードします。
tiup dmctl --master-addr ${advertise-addr} operate-source create source1.yaml
パラメータは次のとおりです。
すべてのMySQLアップストリームインスタンスがデータソースとしてDMに追加されるまで、上記の手順を繰り返します。
レプリケーションタスクを作成する
task.yamlというタスク構成ファイルを編集して、各データソースの増分複製モードと複製開始点を構成します。
name: task-test               # The name of the task. Should be globally unique.
task-mode: incremental        # The mode of the task. "incremental" means full data migration is skipped and only incremental replication is performed.
# Required for incremental replication from sharded tables. By default, the "pessimistic" mode is used.
# If you have a deep understanding of the principles and usage limitations of the optimistic mode, you can also use the "optimistic" mode.
# For more information, see [Merge and Migrate Data from Sharded Tables](https://docs.pingcap.com/zh/tidb/dev/feature-shard-merge/).

shard-mode: "pessimistic"

# Configure the access information of the target TiDB database instance:
target-database:              # The target database instance
  host: "${host}"             # For example: 127.0.0.1
  port: 4000
  user: "root"
  password: "${password}"     # It is recommended to use a dmctl encrypted password.

# Use block-allow-list to configure tables that require sync:
block-allow-list:             # The set of filter rules on matching tables in the data sources, to decide which tables need to migrate and which not. Use the black-white-list if the DM version is earlier than or equal to v2.0.0-beta.2.
  bw-rule-1:                  # The ID of the block and allow list rule.
    do-dbs: ["my_db1"]        # The databases to be migrated. Here, my_db1 of instance 1 and my_db2 of instance 2 are configured as two separate rules to demonstrate how to prevent my_db2 of instance 1 from being replicated.
  bw-rule-2:
    do-dbs: ["my_db2"]
routes:                               # Table renaming rules ('routes') from upstream to downstream tables, in order to support merging different sharded table into a single target table.
  route-rule-1:                       # Rule name. Migrate and merge table1 and table2 from my_db1 to the downstream my_db.table5.
    schema-pattern: "my_db1"          # Rule for matching upstream schema names. It supports the wildcards "*" and "?".
    table-pattern: "table[1-2]"       # Rule for matching upstream table names. It supports the wildcards "*" and "?".
    target-schema: "my_db"            # Name of the target schema.
    target-table: "table5"            # Name of the target table.
  route-rule-2:                       # Rule name. Migrate and merge table3 and table4 from my_db2 to the downstream my_db.table5.
    schema-pattern: "my_db2"
    table-pattern: "table[3-4]"
    target-schema: "my_db"
    target-table: "table5"

# Configure data sources. The following uses two data sources as an example.
mysql-instances:
  - source-id: "mysql-01"             # Data source ID. It is the source-id in source1.yaml.
    block-allow-list: "bw-rule-1"     # Use the block and allow list configuration above. Replicate `my_db1` in instance 1.
    route-rules: ["route-rule-1"]     # Use the configured routing rule above to merge upstream tables.
#       syncer-config-name: "global"  # Use the syncers configuration below.
    meta:                             # The migration starting point of binlog when task-mode is incremental and there is no checkpoint in the downstream database. If there is a checkpoint, the checkpoint will be used.
      binlog-name: "${binlog-name}"   # The log location recorded in ${data-path}/my_db1/metadata in Step 1. You can either specify binlog-name + binlog-pos or binlog-gtid. When the upstream database service is configured to switch master between different nodes automatically, use binlog GTID here.
      binlog-pos: ${binlog-position}
      # binlog-gtid:                  " For example: 09bec856-ba95-11ea-850a-58f2b4af5188:1-9"
  - source-id: "mysql-02"             # Data source ID. It is the source-id in source1.yaml.
    block-allow-list: "bw-rule-2"     # Use the block and allow list configuration above. Replicate `my_db2` in instance2.
    route-rules: ["route-rule-2"]     # Use the routing rule configured above.

#       syncer-config-name: "global"  # Use the syncers configuration below.
    meta:                             # The migration starting point of binlog when task-mode is incremental and there is no checkpoint in the downstream database. If there is a checkpoint, the checkpoint will be used.
      # binlog-name: "${binlog-name}"   # The log location recorded in ${data-path}/my_db2/metadata in Step 1. You can either specify binlog-name + binlog-pos or binlog-gtid. When the upstream database service is configured to switch master between different nodes automatically, use binlog GTID here.
      # binlog-pos: ${binlog-position}
      binlog-gtid: "09bec856-ba95-11ea-850a-58f2b4af5188:1-9"
# (Optional) If you need to incrementally replicate some data changes that have been covered in the full migration, you need to enable the safe mode to avoid data migration errors during incremental replication.
# This scenario is common when the fully migrated data is not part of a consistent snapshot of the data source, and the incremental data is replicated from a location earlier than the fully migrated data.
# syncers:           # The running parameters of the sync processing unit.
#  global:           # Configuration name.
# If set to true, DM changes INSERT to REPLACE, and changes UPDATE to a pair of DELETE and REPLACE for data source replication operations.
# Thus, it can apply DML repeatedly during replication when primary keys or unique indexes exist in the table structure.
# TiDB DM automatically starts safe mode within 1 minute before starting or resuming an incremental replication task.
#    safe-mode: true
その他の構成については、 DM高度なタスクConfiguration / コンフィグレーションファイルを参照してください。
データ移行タスクを開始する前に、 tiup dmctlのcheck-taskサブコマンドを使用して、構成がDM構成要件を満たしているかどうかを確認することをお勧めします。
tiup dmctl --master-addr ${advertise-addr} check-task task.yaml
tiup dmctlを使用して次のコマンドを実行し、データ移行タスクを開始します。
tiup dmctl --master-addr ${advertise-addr} start-task task.yaml
このコマンドのパラメーターは次のとおりです。
タスクの開始に失敗した場合は、最初に返された結果からのプロンプトメッセージに従って構成を変更してから、 tiup dmctl回にstart-task task.yamlのサブコマンドを実行してタスクを再開します。問題が発生した場合は、 エラーの処理およびTiDBデータ移行FAQを参照してください。
移行ステータスを確認する
tiup dmctlでquery-statusコマンドを実行することにより、DMクラスタで実行中の移行タスクがあるかどうかとそのステータスを確認できます。
tiup dmctl --master-addr ${advertise-addr} query-status ${task-name}
詳細については、 クエリステータスを参照してください。
タスクを監視し、ログを表示する
Grafanaまたはログを介して、移行タスクの履歴と内部運用メトリックを表示できます。
Grafana経由
TiUPを使用してDMクラスタをデプロイするときに、Prometheus、Alertmanager、およびGrafanaが正しくデプロイされている場合、GrafanaでDMモニタリングメトリックを表示できます。具体的には、Grafanaでのデプロイ時に指定したIPアドレスとポートを入力し、DMダッシュボードを選択します。
ログ経由
DMの実行中は、DM-master、DM-worker、およびdmctlの出力ログに移行タスクに関する情報が含まれます。各コンポーネントのログディレクトリは次のとおりです。
- DM-masterログディレクトリ:DM-masterコマンドラインパラメータ
--log-fileで指定されます。 DMがTiUPを使用して展開されている場合、ログディレクトリは/dm-deploy/dm-master-8261/log/です。 - DM-workerログディレクトリ:DM-workerコマンドラインパラメータ
--log-fileで指定されます。 DMがTiUPを使用して展開されている場合、ログディレクトリは/dm-deploy/dm-worker-8262/log/です。
- DM-masterログディレクトリ:DM-masterコマンドラインパラメータ