Migrate and Merge MySQL Shards of Small Datasets to TiDB
If you want to migrate and merge multiple MySQL database instances upstream to one TiDB database downstream, and the amount of data is not too large, you can use DM to migrate MySQL shards. "Small datasets" in this document usually mean data around or less than one TiB. Through examples in this document, you can learn the operation steps, precautions, and troubleshooting of the migration.
This document applies to migrating MySQL shards less than 1 TiB in total. If you want to migrate MySQL shards with a total of more than 1 TiB of data, it will take a long time to migrate only using DM. In this case, it is recommended that you follow the operation introduced in Migrate and Merge MySQL Shards of Large Datasets to TiDB to perform migration.
This document takes a simple example to illustrate the migration procedure. The MySQL shards of the two data source MySQL instances in the example are migrated to the downstream TiDB cluster. The diagram is shown as follows.
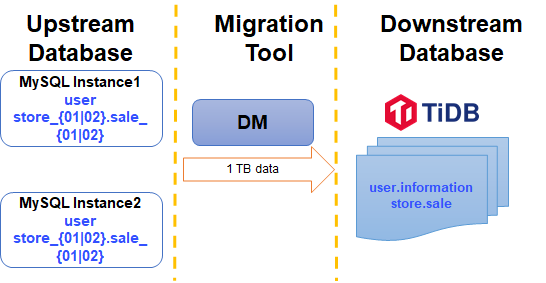
Both MySQL Instance 1 and MySQL Instance 2 contain the following schemas and tables. In this example, you migrate and merge tables from store_01 and store_02 schemas with a sale prefix in both instances, into the downstream sale table in the store schema.
Target schemas and tables:
Prerequisites
Before starting the migration, make sure you have completed the following tasks:
Check conflicts for the sharded tables
If the migration involves merging data from different sharded tables, primary key or unique index conflicts may occur during the merge. Therefore, before migration, you need to take a deep look at the current sharding scheme from the business point of view, and find a way to avoid the conflicts. For more details, see Handle conflicts between primary keys or unique indexes across multiple sharded tables. The following is a brief description.
In this example, sale_01 and sale_02 have the same table structure as follows
CREATE TABLE `sale_01` (
  `id` bigint(20) NOT NULL AUTO_INCREMENT,
  `sid` bigint(20) NOT NULL,
  `pid` bigint(20) NOT NULL,
  `comment` varchar(255) DEFAULT NULL,
  PRIMARY KEY (`id`),
  UNIQUE KEY `sid` (`sid`)
) ENGINE=InnoDB DEFAULT CHARSET=latin1
The id column is the primary key, and the sid column is the sharding key. The id column is auto-incremental, and duplicated multiple sharded table ranges will cause data conflicts. The sid can ensure that the index is globally unique, so you can follow the steps in Remove the primary key attribute of the auto-increment primary key to bypasses the id column.
CREATE TABLE `sale` (
  `id` bigint(20) NOT NULL,
  `sid` bigint(20) NOT NULL,
  `pid` bigint(20) NOT NULL,
  `comment` varchar(255) DEFAULT NULL,
  INDEX (`id`),
  UNIQUE KEY `sid` (`sid`)
) ENGINE=InnoDB DEFAULT CHARSET=latin1
Step 1. Load data sources
Create a new data source file called source1.yaml, which configures an upstream data source into DM, and add the following content:
# Configuration.
source-id: "mysql-01" # Must be unique.
# Specifies whether DM-worker pulls binlogs with GTID (Global Transaction Identifier).
# The prerequisite is that you have already enabled GTID in the upstream MySQL.
# If you have configured the upstream database service to switch master between different nodes automatically, you must enable GTID.
enable-gtid: true
from:
  host: "${host}"           # For example: 172.16.10.81
  user: "root"
  password: "${password}"   # Plaintext passwords are supported but not recommended. It is recommended that you use dmctl encrypt to encrypt plaintext passwords.
  port: ${port}             # For example: 3306
Run the following command in a terminal. Use tiup dmctl to load the data source configuration into the DM cluster:
tiup dmctl --master-addr ${advertise-addr} operate-source create source1.yaml
The parameters are described as follows.
Repeat the above steps until all data sources are added to the DM cluster.
Step 2. Configure the migration task
Create a task configuration file named task1.yaml and writes the following content to it:
name: "shard_merge"               # The name of the task. Should be globally unique.
# Task mode. You can set it to the following:
# - full: Performs only full data migration (incremental replication is skipped)
# - incremental: Only performs real-time incremental replication using binlog. (full data migration is skipped)
# - all: Performs both full data migration and incremental replication. For migrating small to medium amount of data here, use this option.
task-mode: all
# Required for the MySQL shards. By default, the "pessimistic" mode is used.
# If you have a deep understanding of the principles and usage limitations of the optimistic mode, you can also use the "optimistic" mode.
# For more information, see [Merge and Migrate Data from Sharded Tables](https://docs.pingcap.com/tidb/dev/feature-shard-merge/)
shard-mode: "pessimistic"
meta-schema: "dm_meta"                        # A schema will be created in the downstream database to store the metadata
ignore-checking-items: ["auto_increment_ID"]  # In this example, there are auto-incremental primary keys upstream, so you do not need to check this item.

target-database:
  host: "${host}"                             # For example: 192.168.0.1
  port: 4000
  user: "root"
  password: "${password}"                     # Plaintext passwords are supported but not recommended. It is recommended that you use dmctl encrypt to encrypt plaintext passwords.

mysql-instances:
  -
    source-id: "mysql-01"                                    # ID of the data source, which is source-id in source1.yaml
    route-rules: ["sale-route-rule"]                         # Table route rules applied to the data source
    filter-rules: ["store-filter-rule", "sale-filter-rule"]  # Binlog event filter rules applied to the data source
    block-allow-list:  "log-bak-ignored"                     # Block & Allow Lists rules applied to the data source
  -
    source-id: "mysql-02"
    route-rules: ["sale-route-rule"]
    filter-rules: ["store-filter-rule", "sale-filter-rule"]
    block-allow-list:  "log-bak-ignored"

# Configurations for merging MySQL shards
routes:                       # Table renaming rules ('routes') from upstream to downstream tables, in order to support merging different sharded tables into a single target table.
  sale-route-rule:            # Rule name. Migrate and merge tables from upstream to the downstream.
    schema-pattern: "store_*" # Rule for matching upstream schema names. It supports the wildcards "*" and "?".
    table-pattern: "sale_*"   # Rule for matching upstream table names. It supports the wildcards "*" and "?".
    target-schema: "store"    # Name of the target schema.
    target-table:  "sale"     # Name of the target table.

# Filters out some DDL events.
filters:
  sale-filter-rule:           # Filter name.
    schema-pattern: "store_*" # The binlog events or DDL SQL statements of upstream MySQL  instance schemas that match schema-pattern are filtered by the rules below.
    table-pattern: "sale_*"   # The binlog events or DDL SQL statements of upstream MySQL  instance tables that match table-pattern are filtered by the rules below.
    events: ["truncate table", "drop table", "delete"]   # The binlog event array.
    action: Ignore                                       # The string (`Do`/`Ignore`). `Do` is the allow list. `Ignore` is the block list.
  store-filter-rule:
    schema-pattern: "store_*"
    events: ["drop database"]
    action: Ignore

# Block and allow list
block-allow-list:           # filter or only migrate all operations of some databases or some tables.
  log-bak-ignored:          # Rule name.
    do-dbs: ["store_*"]     # The allow list of the schemas to be migrated, similar to replicate-do-db in MySQL.
The above example is the minimum configuration to perform the migration task. For more information, see DM Advanced Task Configuration File.
For more information on routes, filters and other configurations in the task file, see the following documents:
- Table routing
- Block & Allow Table Lists
- Binlog event filter
- Filter Certain Row Changes Using SQL Expressions
Step 3. Start the task
Before starting a migration task, run the check-task subcommand in tiup dmctl to check whether the configuration meets the requirements of DM so as to avoid possible errors.
tiup dmctl --master-addr ${advertise-addr} check-task task.yaml
Run the following command in tiup dmctl to start a migration task:
tiup dmctl --master-addr ${advertise-addr} start-task task.yaml
If the migration task fails to start, modify the configuration information according to the error information, and then run start-task task.yaml again to start the migration task. If you encounter problems, see Handle Errors and FAQ.
Step 4. Check the task
After starting the migration task, you can use dmtcl tiup to run query-status to view the status of the task.
tiup dmctl --master-addr ${advertise-addr} query-status ${task-name}
If you encounter errors, use query-status <name of the error task> to view more detailed information. For details about the query results, task status and sub task status of the query-status command, see TiDB Data Migration Query Status.
Step 5. Monitor tasks and check logs (optional)
You can view the history of a migration task and internal operational metrics through Grafana or logs.
Via Grafana
If Prometheus, Alertmanager, and Grafana are correctly deployed when you deploy the DM cluster using TiUP, you can view DM monitoring metrics in Grafana. Specifically, enter the IP address and port specified during deployment in Grafana and select the DM dashboard.
Via logs
When DM is running, DM-master, DM-worker, and dmctl output logs, which includes information about migration tasks. The log directory of each component is as follows.
- DM-master log directory: It is specified by the DM-master process parameter
--log-file. If DM is deployed using TiUP, the log directory is/dm-deploy/dm-master-8261/log/. - DM-worker log directory: It is specified by the DM-worker process parameter
--log-file. If DM is deployed using TiUP, the log directory is/dm-deploy/dm-worker-8262/log/.
- DM-master log directory: It is specified by the DM-master process parameter