Connect to TiDB with DBeaver
TiDB is a MySQL-compatible database, and DBeaver Community is a free cross-platform database tool for developers, database administrators, analysts, and everyone working with data.
In this tutorial, you can learn how to connect to TiDB using DBeaver Community.
Prerequisites
To complete this tutorial, you need:
- DBeaver Community 23.0.3 or higher.
- A TiDB cluster.
If you don't have a TiDB cluster, you can create one as follows:
- (Recommended) Create a TiDB Cloud Starter instance.
- Deploy a local test TiDB Self-Managed cluster or Deploy a production TiDB Self-Managed cluster.
In addition, to connect to a TiDB Cloud Starter or TiDB Cloud Essential public endpoint from DBeaver on Windows, you must configure an additional SSL certificate (ISRG Root X1) as follows. Otherwise, the connection will fail. For other operating systems, you can skip these steps.
Download the ISRG Root X1 certificate and save it to a local path, such as
C:\certs\isrgrootx1.pem.In DBeaver, edit your connection and go to the SSL tab:
- Select Use SSL.
- In the CA certificate field, select the
isrgrootx1.pemfile you downloaded. - Leave the other certificate fields empty.
On the Driver properties tab, remove any existing
sslMode,useSSL, orrequireSSLentries to avoid SSL configuration conflicts.Click Test Connection to verify that the connection is successful.
Connect to TiDB
Connect to TiDB depending on the TiDB deployment option you've selected.
Navigate to the My TiDB page, and then click the name of your target TiDB Cloud Starter or Essential instance to go to its overview page.
Click Connect in the upper-right corner. A connection dialog is displayed.
Ensure the configurations in the connection dialog match your operating environment.
- Connection Type is set to
Public - Branch is set to
main - Connect With is set to
DBeaver - Operating System matches your environment.
- Connection Type is set to
Click Generate Password to create a random password.
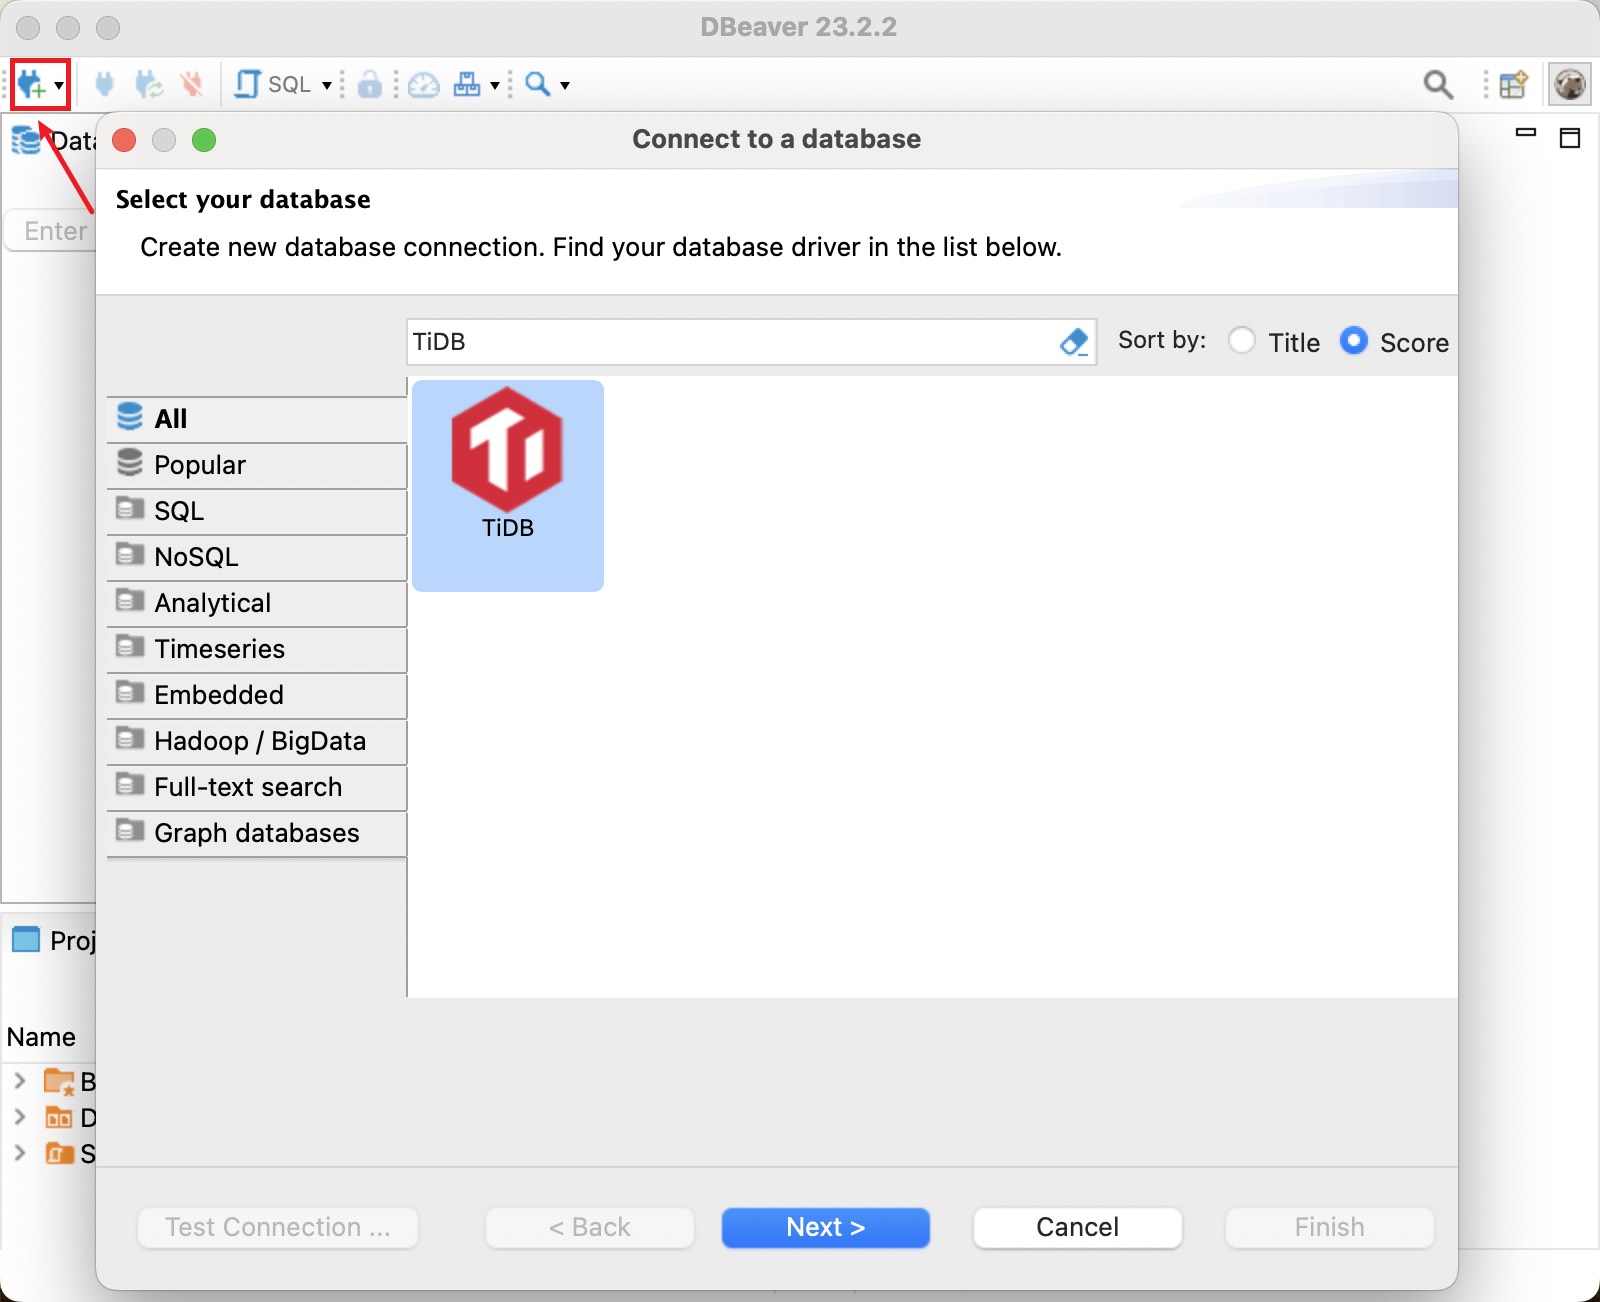
Launch DBeaver and click New Database Connection in the upper-left corner. In the Connect to a database dialog, select TiDB from the list, and then click Next.
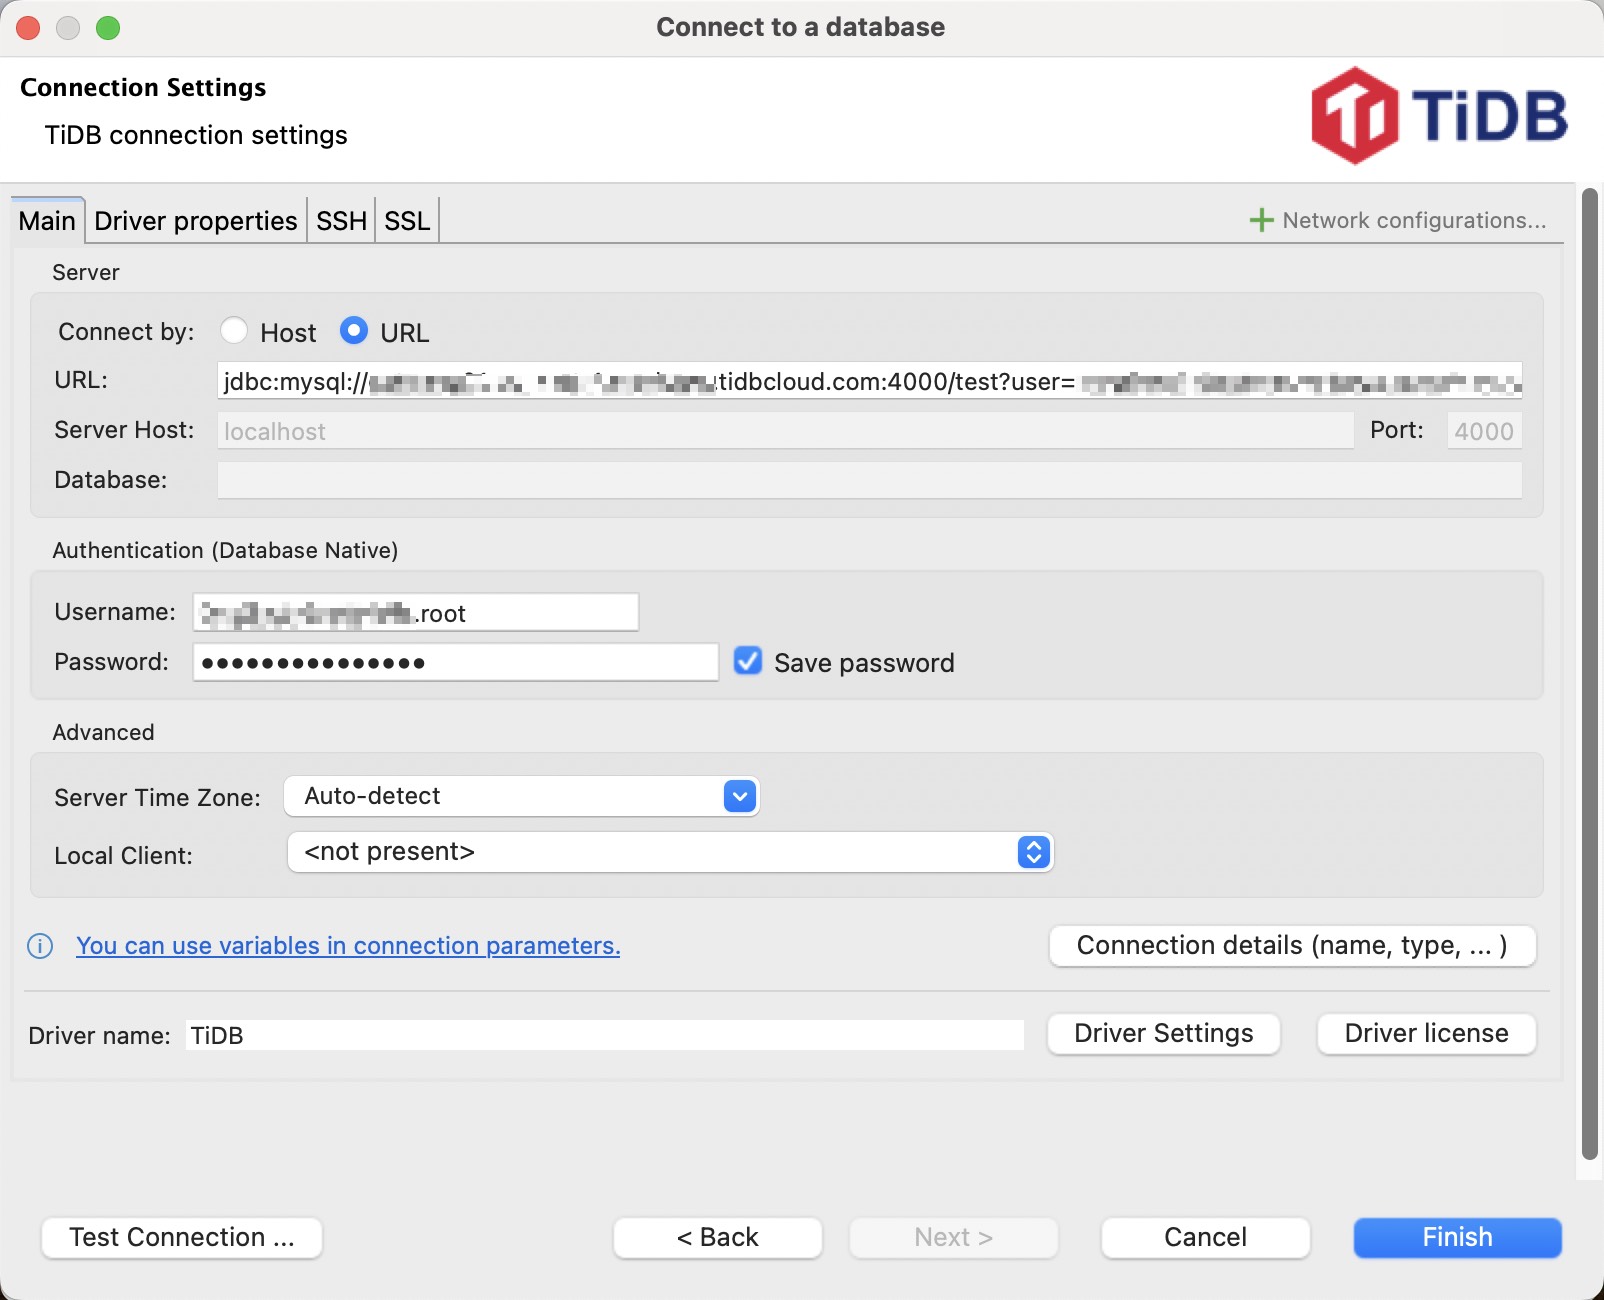
Copy the connection string from the TiDB Cloud connection dialog. In DBeaver, select URL for Connect by and paste the connection string into the URL field.
In the Authentication (Database Native) section, enter your Username and Password. An example is as follows:
Click Test Connection to validate the connection to your target TiDB Cloud Starter or Essential instance.
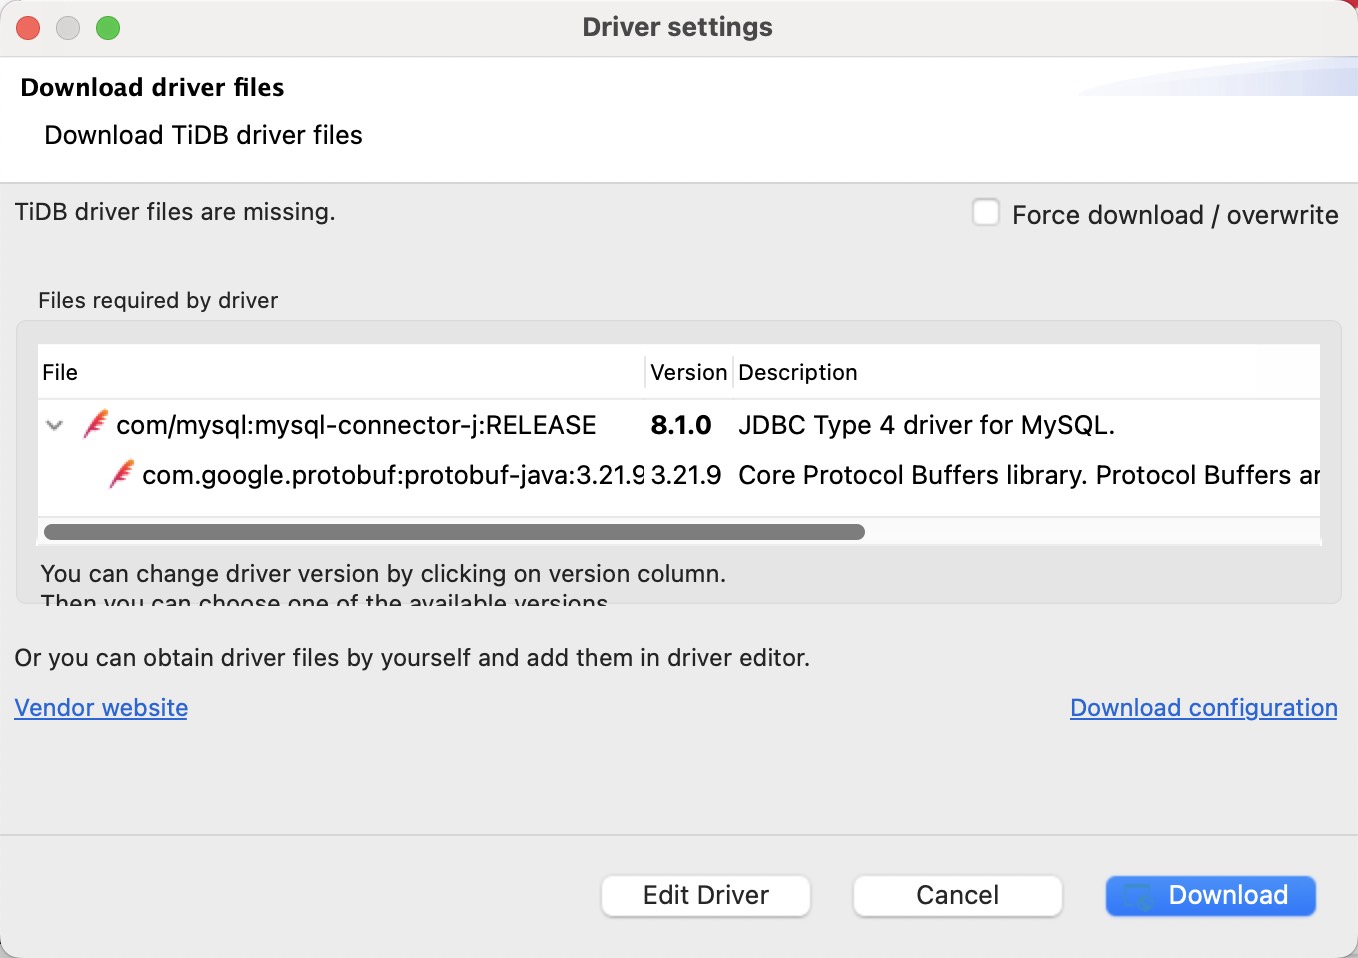
If the Download driver files dialog is displayed, click Download to get the driver files.
If the connection test is successful, the Connection test dialog is displayed as follows. Click OK to close it.

Click Finish to save the connection configuration.
Navigate to the My TiDB page, and then click the name of your target TiDB Cloud Premium instance to go to its overview page.
In the left navigation pane, click Settings > Networking.
On the Networking page, click Enable for Public Endpoint, and then click Add IP Address.
Ensure that your client IP address is added to the access list.
In the left navigation pane, click Overview to return to the instance overview page.
Click Connect in the upper-right corner. A connection dialog is displayed.
In the connection dialog, select Public from the Connection Type drop-down list.
- If a message indicates that the public endpoint is still being enabled, wait until the process completes.
- If you have not set a password yet, click Set Root Password in the dialog.
- If you need to verify the server certificate or if the connection fails and requires a CA certificate, click CA cert to download it.
- In addition to the Public connection type, TiDB Cloud Premium supports Private Endpoint connections. For more information, see Connect to TiDB Cloud Premium via AWS PrivateLink.
Launch DBeaver and click New Database Connection in the upper-left corner. In the Connect to a database dialog, select TiDB from the list, and then click Next.
Copy and paste the appropriate connection string into the DBeaver connection panel. The mappings between DBeaver fields and TiDB Cloud Premium connection string are as follows:
Keep the SSL settings disabled.
Click Test Connection to validate the connection to the TiDB Cloud Premium instance.
Click Finish to save the connection configuration.
Navigate to the My TiDB page, and then click the name of your target TiDB Cloud Dedicated cluster to go to its overview page.
Click Connect in the upper-right corner. A connection dialog is displayed.
In the connection dialog, select Public from the Connection Type drop-down list, and then click CA cert to download the CA certificate.
If you have not configured the IP access list, click Configure IP Access List or follow the steps in Configure an IP Access List to configure it before your first connection.
In addition to the Public connection type, TiDB Cloud Dedicated supports Private Endpoint and VPC Peering connection types. For more information, see Connect to Your TiDB Cloud Dedicated Cluster.
Launch DBeaver and click New Database Connection in the upper-left corner. In the Connect to a database dialog, select TiDB from the list, and then click Next.
Copy and paste the appropriate connection string into the DBeaver connection panel. The mappings between DBeaver fields and TiDB Cloud Dedicated connection string are as follows:
An example is as follows:
Click Test Connection to validate the connection to the TiDB Cloud Dedicated cluster.
If the Download driver files dialog is displayed, click Download to get the driver files.
If the connection test is successful, the Connection test dialog is displayed as follows. Click OK to close it.
Click Finish to save the connection configuration.
Launch DBeaver and click New Database Connection in the upper-left corner. In the Connect to a database dialog, select TiDB from the list, and then click Next.
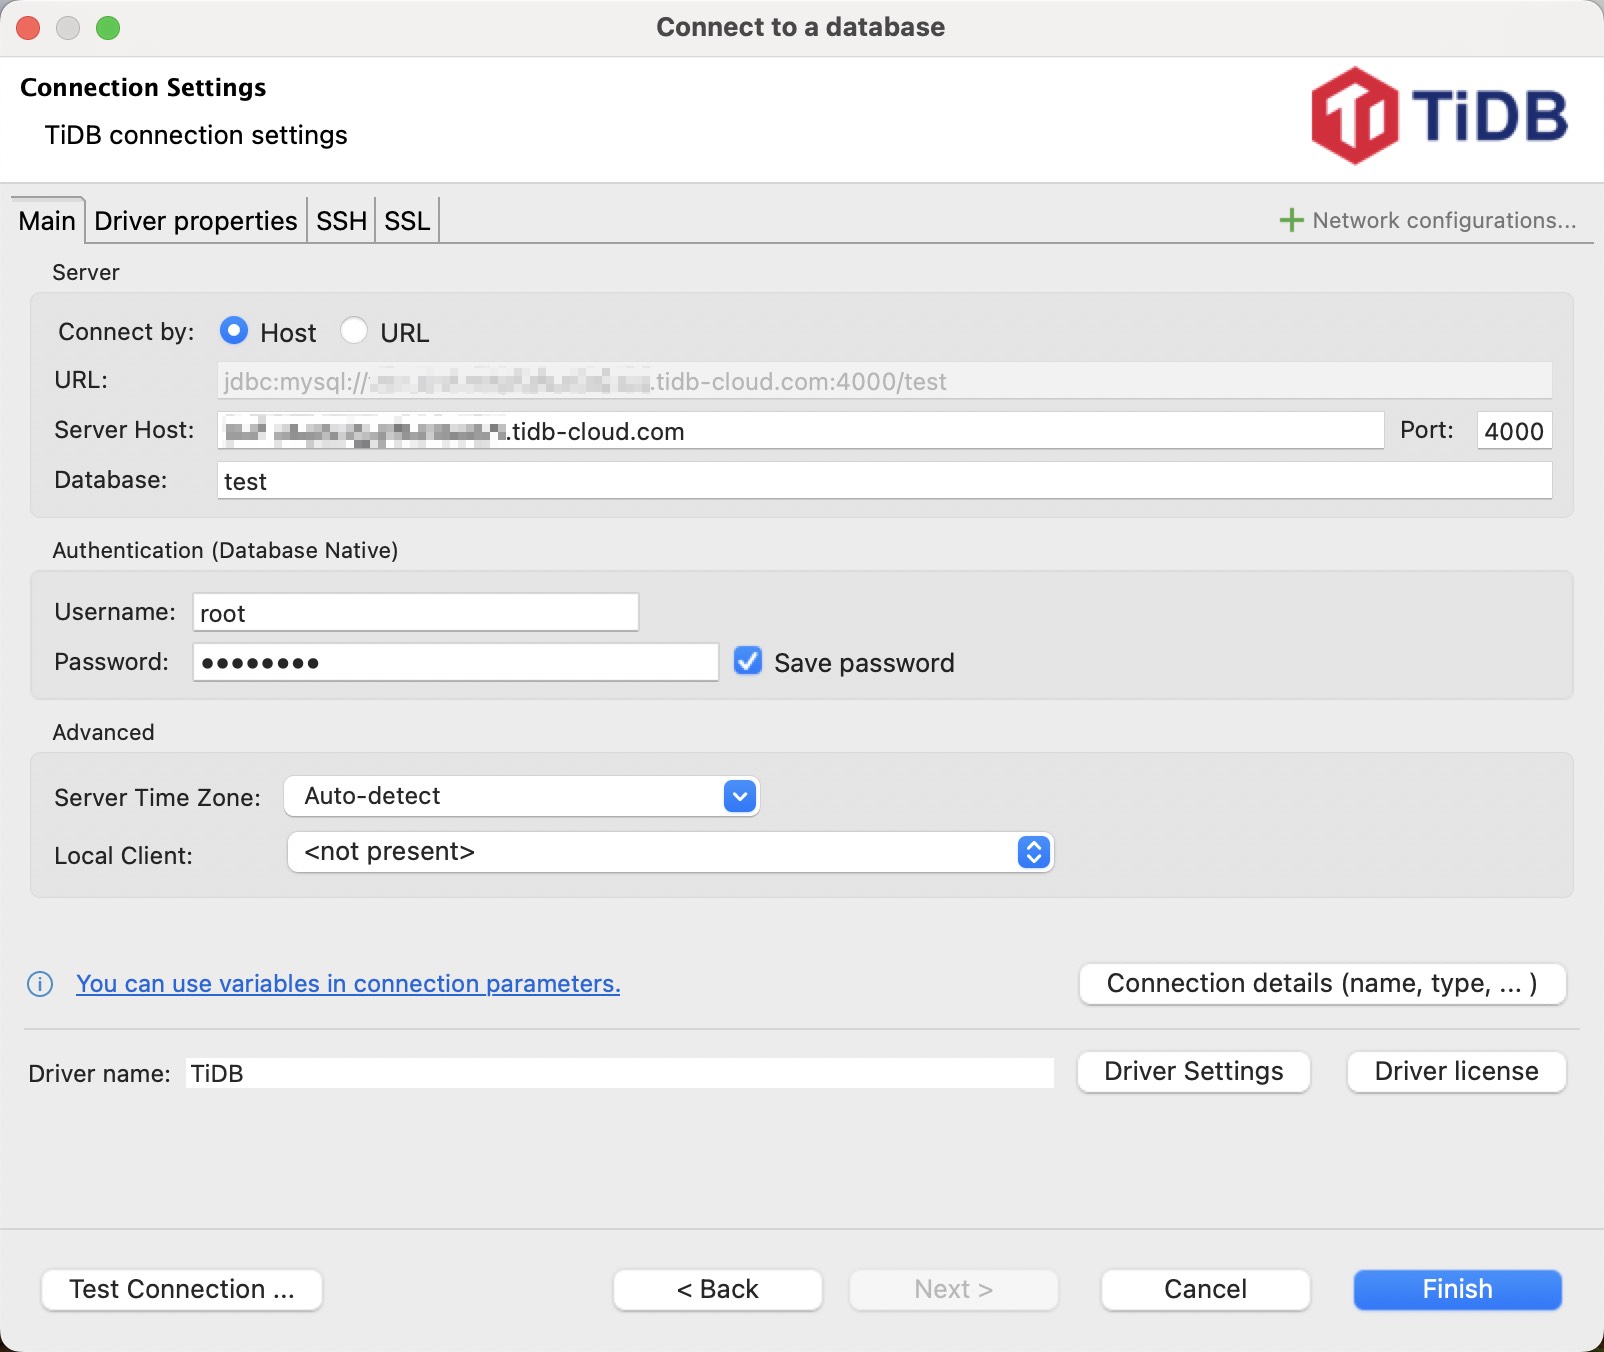
Configure the following connection parameters:
- Server Host: The IP address or domain name of your TiDB Self-Managed cluster.
- Port: The port number of your TiDB Self-Managed cluster.
- Username: The username to use to connect to your TiDB Self-Managed cluster.
- Password: The password of the username.
An example is as follows:

Click Test Connection to validate the connection to the TiDB Self-Managed cluster.
If the Download driver files dialog is displayed, click Download to get the driver files.
If the connection test is successful, the Connection test dialog is displayed as follows. Click OK to close it.
Click Finish to save the connection configuration.
Next steps
- Learn more usage of DBeaver from the documentation of DBeaver.
- Learn the best practices for TiDB application development with the chapters in the Developer guide, such as Insert data, Update data, Delete data, Single table reading, Transactions, and SQL performance optimization.
- Learn through the professional TiDB developer courses and earn TiDB certifications after passing the exam.
Need help?
- Ask the community on Discord or Slack.
- Submit a support ticket for TiDB Cloud
- Submit a support ticket for TiDB Self-Managed