Connect to TiDB Cloud Starter or Essential via AWS PrivateLink
This document describes how to connect to your TiDB Cloud Starter or TiDB Cloud Essential instance via AWS PrivateLink.
TiDB Cloud supports highly secure and one-way access to the TiDB Cloud service hosted in an AWS VPC via the AWS PrivateLink, as if the service were in your own VPC. A private endpoint is exposed in your VPC and you can create a connection to the TiDB Cloud service via the endpoint with permission.
Powered by AWS PrivateLink, the endpoint connection is secure and private, and does not expose your data to the public internet. In addition, the endpoint connection supports CIDR overlap and is easier for network management.
The architecture of the private endpoint is as follows:
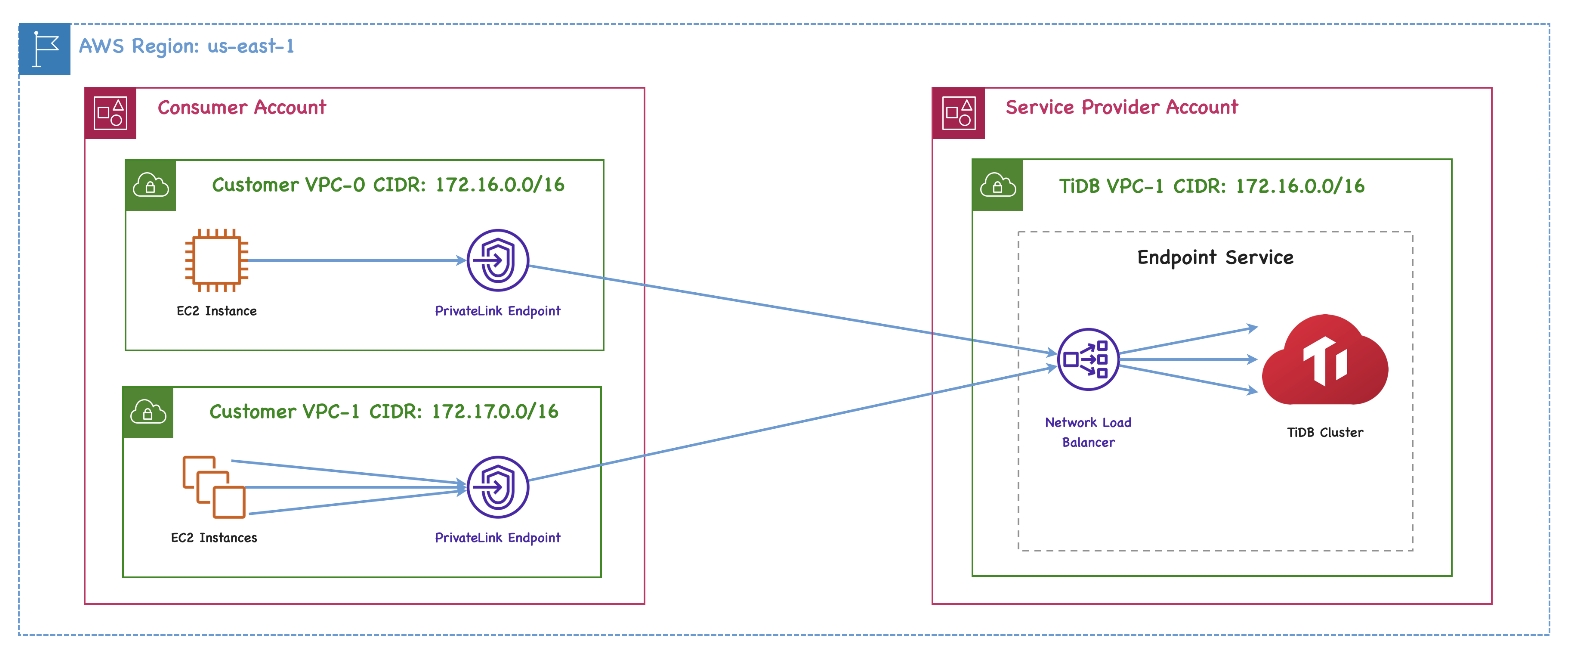
For more detailed definitions of the private endpoint and endpoint service, see the following AWS documents:
Restrictions
- Currently, TiDB Cloud supports AWS PrivateLink connections only when the endpoint service is hosted in AWS. If the service is hosted in other cloud providers, the AWS PrivateLink connection is not applicable.
- Cross-region private endpoint connections are not supported.
Prerequisites
Make sure that DNS hostnames and DNS resolution are both enabled in your AWS VPC settings. They are disabled by default when you create a VPC in the AWS Management Console.
Choose an endpoint model
Depending on your TiDB Cloud plan, choose the appropriate private endpoint model:
- For TiDB Cloud Starter instances or for TiDB Cloud Essential instances created before July 1, 2026, use the endpoint shared model. In this model, a single private endpoint can be shared by multiple TiDB Cloud Starter or TiDB Cloud Essential instances in the same AWS Region and VPC.
- For TiDB Cloud Essential instances created starting July 1, 2026, use the endpoint exclusive model. In this model, each TiDB Cloud Essential instance uses its own standalone private endpoint. This model eliminates the need to include the account prefix when connecting, but you need to repeat the setup steps for each TiDB Cloud Essential instance.
Set up a private endpoint with AWS (endpoint shared model)
To connect to your TiDB Cloud Starter or TiDB Cloud Essential instance via a private endpoint using the shared model, follow these steps:
- Choose a TiDB Cloud Starter or Essential instance
- Create an AWS interface endpoint
- Authorize your private endpoint in TiDB Cloud (optional)
- Connect to your TiDB Cloud Starter or Essential instance
Step 1. Choose a TiDB Cloud Starter or Essential instance
On the My TiDB page, click the name of your target TiDB Cloud Starter or TiDB Cloud Essential instance to go to its overview page.
Click Connect in the upper-right corner. A connection dialog is displayed.
In the Connection Type drop-down list, select Private Endpoint.
Take a note of Service Name, Availability Zone ID, and Region ID.
Step 2. Create an AWS interface endpoint
To use the AWS Management Console to create a VPC interface endpoint, perform the following steps:
Sign in to the AWS Management Console and open the Amazon VPC console at https://console.aws.amazon.com/vpc/.
Click Endpoints in the navigation pane, and then click Create Endpoint in the upper-right corner.
The Create endpoint page is displayed.
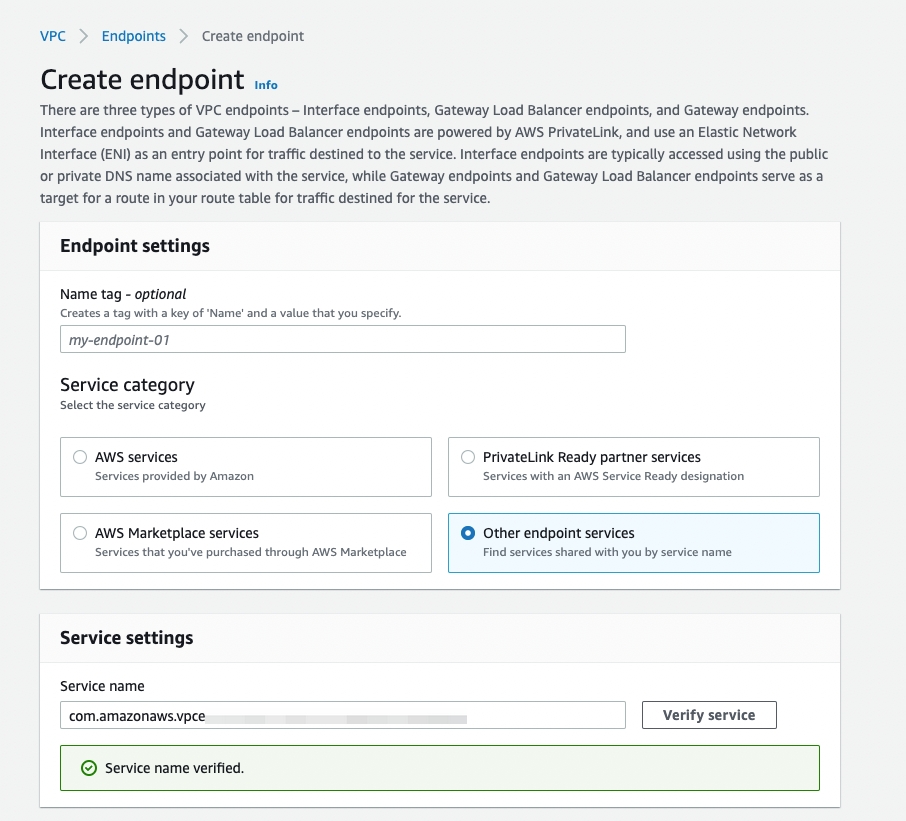
Select Endpoint services that use NLBs and GWLBs.
Enter the service name that you found in step 1.
Click Verify service.
Select your VPC in the drop-down list. Expand Additional settings and select the Enable DNS name checkbox.
In the Subnets area, select the availability zone where your TiDB Cloud Starter or Essential instance is located, and select the Subnet ID.
Select your security group properly in the Security groups area.
Click Create endpoint.
To use the AWS CLI to create a VPC interface endpoint, perform the following steps:
- To get the VPC ID and Subnet ID, navigate to your AWS Management Console, and locate them in the relevant sections. Make sure that you fill in the Availability Zone ID that you found in step 1.
- Copy the command provided below, replace the relevant arguments with the information you obtained, and then execute it in your terminal.
aws ec2 create-vpc-endpoint --vpc-id ${your_vpc_id} --region ${region_id} --service-name ${service_name} --vpc-endpoint-type Interface --subnet-ids ${your_subnet_id}
Then you can connect to the endpoint service with the private DNS name.
Step 3. Authorize your private endpoint in TiDB Cloud (optional)
After creating the AWS interface endpoint, you can authorize it for your target TiDB Cloud Starter or TiDB Cloud Essential instance to restrict access.
On the My TiDB page, click the name of your target TiDB Cloud Starter or TiDB Cloud Essential instance to go to its overview page.
Click Settings > Networking in the left navigation pane.
Scroll down to the Private Endpoint section and then locate the Authorized Networks table.
Click Add Rule to add a firewall rule.
- Endpoint Service Name: paste the service name you got from Step 1.
- Firewall Rule Name: enter a name to identify this connection.
- Your VPC Endpoint ID: paste your 22-character VPC Endpoint ID from the AWS Management Console (starts with
vpce-).
Click Submit.
Step 4. Connect to your TiDB Cloud Starter or Essential instance
After you have created the interface endpoint, go back to the TiDB Cloud console and take the following steps:
- On the My TiDB page, click the name of your target TiDB Cloud Starter or Essential instance to go to its overview page.
- Click Connect in the upper-right corner. A connection dialog is displayed.
- In the Connection Type drop-down list, select Private Endpoint.
- In the Connect With drop-down list, select your preferred connection method. The corresponding connection string is displayed at the bottom of the dialog.
- Connect to your TiDB Cloud Starter or Essential instance with the connection string.
Set up a private endpoint with AWS (endpoint exclusive model)
In the endpoint exclusive model, each TiDB Cloud Essential instance uses its own standalone private endpoint. This model eliminates the need to include the account prefix when connecting, but you need to repeat the setup steps for each TiDB Cloud Essential instance.
To connect to a TiDB Cloud Essential instance via a private endpoint using the exclusive model, take the following steps:
- Select a TiDB Cloud Essential instance
- Create an AWS interface endpoint
- Create a private endpoint connection
- Enable private DNS
- Connect to your TiDB Cloud Essential instance
If you have multiple instances, you need to repeat these steps for each instance that you want to connect to using AWS PrivateLink.
Step 1. Select a TiDB Cloud Essential instance
- On the My TiDB page of your TiDB Cloud console, click the name of your target TiDB Cloud Essential instance to go to its overview page.
- Click Connect in the upper-right corner. A connection dialog is displayed.
- In the Connection Type drop-down list, select Private Endpoint, and then click Create Private Endpoint Connection.
Step 2. Create an AWS interface endpoint
In the connection dialog, if you see the TiDB Private Link Service is ready message, the corresponding endpoint service is ready. You can provide the following information to create the endpoint.
In the connection dialog, click How to Generate VPC Endpoint ID, and then fill in the Your VPC ID and Your Subnet IDs fields. You can find these IDs from your AWS Management Console. For multiple subnets, enter the IDs separated by spaces.
Click Generate Command to get the following endpoint creation command.
aws ec2 create-vpc-endpoint --vpc-id ${your_vpc_id} --region ${your_region} --service-name ${your_endpoint_service_name} --vpc-endpoint-type Interface --subnet-ids ${your_application_subnet_ids}
Then, you can create an AWS interface endpoint either using the AWS CLI or using the AWS Management Console.
To use the AWS CLI to create a VPC interface endpoint, perform the following steps:
- Copy the generated command and run it in your terminal.
- Record the VPC endpoint ID you just created.
To use the AWS Management Console to create a VPC interface endpoint, perform the following steps:
Sign in to the AWS Management Console and open the Amazon VPC console at https://console.aws.amazon.com/vpc/.
Click Endpoints in the navigation pane, and then click Create Endpoint in the upper-right corner.
The Create endpoint page is displayed.
In the Endpoint settings area, fill in a name tag if needed, and then select the Endpoint services that use NLBs and GWLBs option.
In the Service settings area, enter the service name
${your_endpoint_service_name}from the generated command (--service-name ${your_endpoint_service_name}).Click Verify service.
In the Network settings area, select your VPC in the drop-down list.
In the Subnets area, select the availability zones where your TiDB Cloud Essential instance is located.
In the Security groups area, select your security group properly.
Click Create endpoint.
Step 3. Create a private endpoint connection
- Go back to the TiDB Cloud console.
- On the Create AWS Private Endpoint Connection page, enter your VPC endpoint ID.
- Click Create Private Endpoint Connection.
Step 4. Enable private DNS
Enable private DNS in AWS. You can either use the AWS CLI or the AWS Management Console.
To enable private DNS using your AWS CLI, copy the following aws ec2 modify-vpc-endpoint command from the Create Private Endpoint Connection page and run it in your AWS CLI.
aws ec2 modify-vpc-endpoint --vpc-endpoint-id ${your_vpc_endpoint_id} --private-dns-enabled
Alternatively, you can find the command on the Networking page of your instance. Locate the private endpoint and click ... > Enable DNS in the Action column.
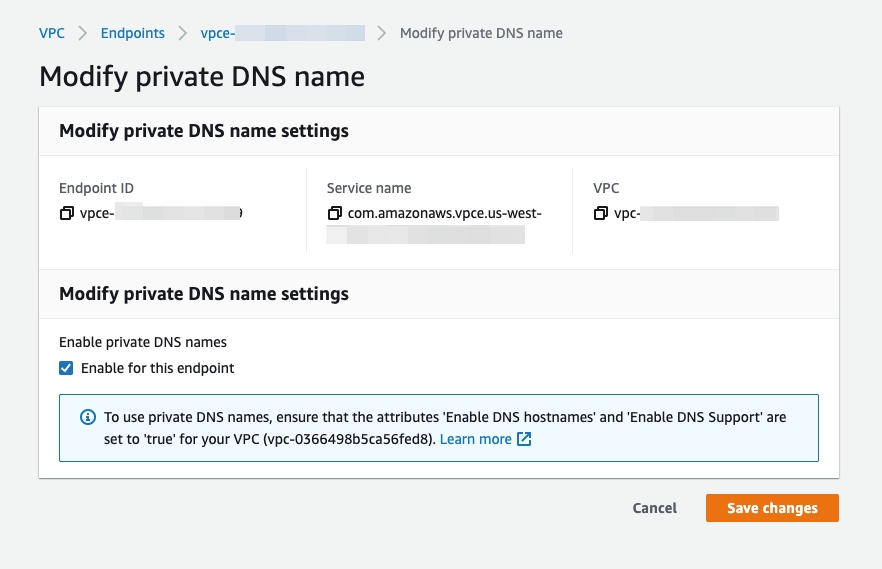
To enable private DNS in your AWS Management Console:
Go to VPC > Endpoints.
Right-click your endpoint ID and select Modify private DNS name.
Select the Enable for this endpoint check box.
Click Save changes.
Step 5. Connect to your TiDB Cloud Essential instance
After you have accepted the private endpoint connection, you are redirected back to the connection dialog.
- Wait for the private endpoint connection status to change from System Checking to Active (approximately 5 minutes).
- In the Connect With drop-down list, select your preferred connection method. The corresponding connection string is displayed at the bottom of the dialog.
- Connect to your instance using the connection string.
Troubleshooting
I cannot connect to a TiDB Cloud Starter or Essential instance via a private endpoint after enabling private DNS. Why?
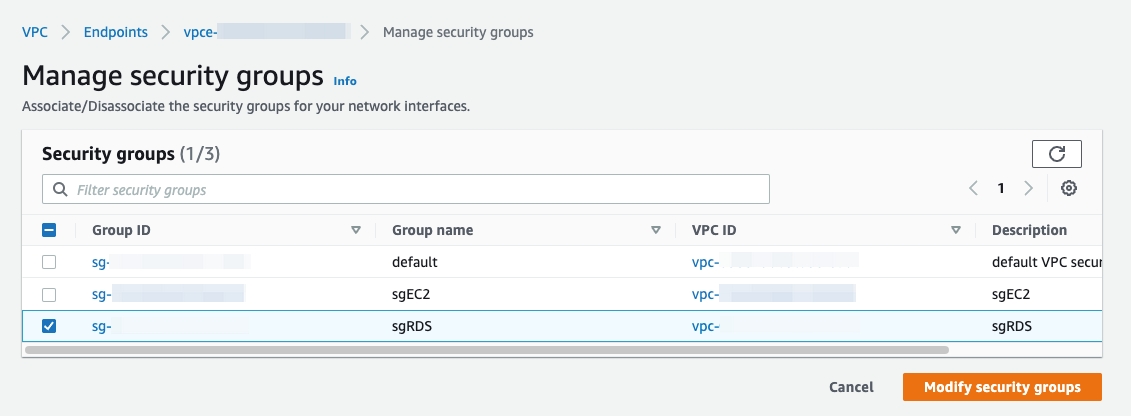
You might need to properly set the security group for your VPC endpoint in the AWS Management Console. Go to VPC > Endpoints. Right-click your VPC endpoint and select the proper Manage security groups. A proper security group within your VPC that allows inbound access from your EC2 instances on Port 4000 or a customer-defined port.