Migrate and Merge MySQL Shards of Large Datasets to TiDB
If you want to migrate a large MySQL dataset (for example, more than 1 TiB) from different partitions into TiDB, and you are able to suspend all the TiDB cluster write operations from your business during the migration, you can use TiDB Lightning to do the migration quickly. After migration, you can also use TiDB DM to perform incremental replication according to your business needs. "Large datasets" in this document usually mean data around one TiB or more.
This document uses an example to walk through the whole procedure of such kind of migration.
If the data size of the MySQL shards is less than 1 TiB, you can follow the procedure described in Migrate and Merge MySQL Shards of Small Datasets to TiDB, which supports both full and incremental migration and the steps are easier.
The following diagram shows how to migrate and merge MySQL sharded tables to TiDB using Dumpling and TiDB Lightning.
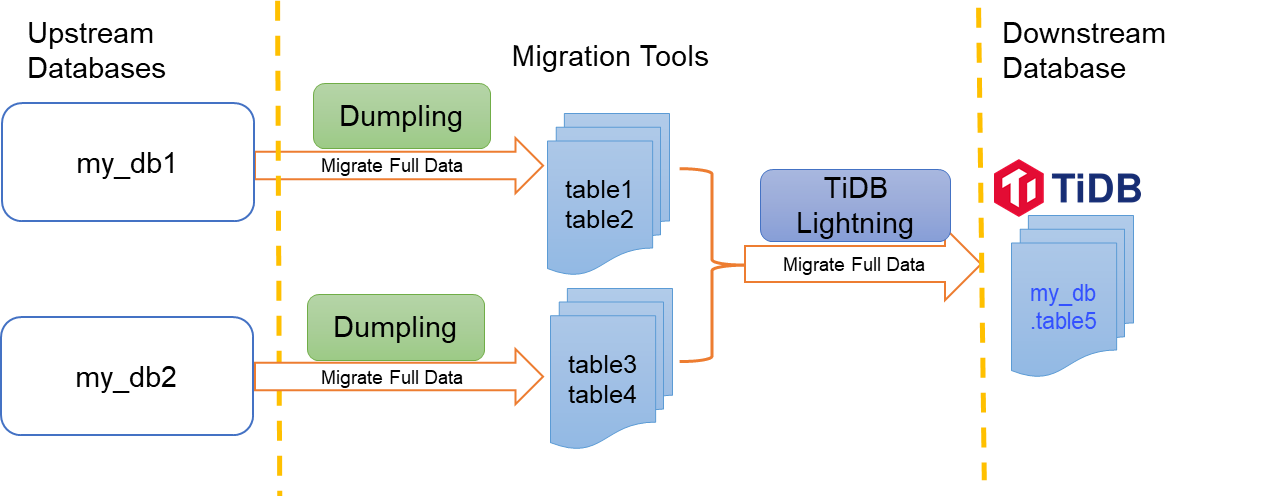
This example assumes that you have two databases, my_db1 and my_db2. You use Dumpling to export two tables table1 and table2 from my_db1, and two tables table3 and table4 from my_db2, respectively. After that, you use TiDB Lighting to import and merge the four exported tables into the same table5 from mydb in the target TiDB.
In this document, you can migrate data following this procedure:
Use Dumpling to export full data. In this example, you export 2 tables respectively from 2 upstream databases:
- Export
table1andtable2frommy_db1 - Export
table3andtable4frommy_db2
- Export
Start TiDB Lightning to migrate data to
mydb.table5in TiDB.(Optional) Use TiDB DM to perform incremental replication.
Prerequisites
Before getting started, see the following documents to prepare for the migration task.
Resource requirements
Operating system: Examples in this document use new, clean CentOS 7 instances. You can deploy a virtual machine on your own host locally, or on a vendor-provided cloud platform. TiDB Lightning consumes as much CPU resources as needed by default, so it is recommended to deploy TiDB Lightning on a dedicated machine. If you do not have a dedicated machine for TiDB Lightning, you can deploy TiDB Lightning on a shared machine with other components (such as tikv-server) and limit TiDB Lightning's CPU usage by configuring region-concurrency to 75% of the number of logical CPUs.
Memory and CPU: TiDB Lightning consumes high resources, so it is recommended to allocate more than 64 GB of memory and 32-core CPU for TiDB Lightning. To get the best performance, make sure the CPU core to memory (GB) ratio is more than 1:2.
Disk space:
- Dumpling requires enough disk space to store the whole data source. SSD is recommended.
- During the import, TiDB Lightning needs temporary space to store the sorted key-value pairs. The disk space should be enough to hold the largest single table from the data source.
- If the full data volume is large, you can increase the binlog storage time in the upstream. This is to ensure that the binlogs are not lost during the incremental replication.
Note: You cannot calculate the exact data volume exported by Dumpling from MySQL, but you can estimate the data volume by using the following SQL statement to summarize the data-length field in the information_schema.tables table:
/* Calculate the size of all schemas, in MiB. Replace ${schema_name} with your schema name. */
SELECT table_schema,SUM(data_length)/1024/1024 AS data_length,SUM(index_length)/1024/1024 AS index_length,SUM(data_length+index_length)/1024/1024 AS SUM FROM information_schema.tables WHERE table_schema = "${schema_name}" GROUP BY table_schema;

/* Calculate the size of the largest table, in MiB. Replace ${schema_name} with your schema name. */
SELECT table_name,table_schema,SUM(data_length)/1024/1024 AS data_length,SUM(index_length)/1024/1024 AS index_length,SUM(data_length+index_length)/1024/1024 AS SUM from information_schema.tables WHERE table_schema = "${schema_name}" GROUP BY table_name,table_schema ORDER BY SUM DESC LIMIT 5;
Disk space for the target TiKV cluster
The target TiKV cluster must have enough disk space to store the imported data. In addition to the standard hardware requirements, the storage space of the target TiKV cluster must be larger than the size of the data source x the number of replicas x 2. For example, if the cluster uses 3 replicas by default, the target TiKV cluster must have a storage space larger than 6 times the size of the data source. The formula has x 2 because:
- Index might take extra space.
- RocksDB has a space amplification effect.
Check conflicts for Sharded Tables
If the migration involves merging data from different sharded tables, primary key or unique index conflicts may occur during the merge. Therefore, before migration, you need to take a deep look at the current sharding scheme from the business point of view, and find a way to avoid the conflicts. For more details, see Handle conflicts between primary keys or unique indexes across multiple sharded tables. The following is a brief description.
Assume that tables 1~4 have the same table structure as follows.
CREATE TABLE `table1` (
  `id` bigint(20) NOT NULL AUTO_INCREMENT,
  `sid` bigint(20) NOT NULL,
  `pid` bigint(20) NOT NULL,
  `comment` varchar(255) DEFAULT NULL,
  PRIMARY KEY (`id`),
  UNIQUE KEY `sid` (`sid`)
) ENGINE=InnoDB DEFAULT CHARSET=latin1
For those four tables, the id column is the primary key. It is auto-incremental, which will cause different sharded tables to generate duplicated id ranges and cause the primary key conflict on the target table during the migration. On the other hand, the sid column is the sharding key, which ensures that the index is unique globally. So you can remove the unique constraint of the id column in the target table5 to avoid the data merge conflicts.
CREATE TABLE `table5` (
  `id` bigint(20) NOT NULL,
  `sid` bigint(20) NOT NULL,
  `pid` bigint(20) NOT NULL,
  `comment` varchar(255) DEFAULT NULL,
  INDEX (`id`),
  UNIQUE KEY `sid` (`sid`)
) ENGINE=InnoDB DEFAULT CHARSET=latin1
Step1. Use Dumpling to export full data
If those multiple sharded tables to be exported are in the same upstream MySQL instance, you can directly use the -f parameter of Dumpling to export them in a single operation.
If the sharded tables are stored in different MySQL instances, you can use Dumpling to export them respectively and place the exported results in the same parent directory.
In the following example, both methods are used, and then the exported data is stored in the same parent directory.
First, run the following command to use Dumpling to export table1 and table2 from my_db1:
tiup dumpling -h ${ip} -P 3306 -u root -t 16 -r 200000 -F 256MB -B my_db1 -f 'my_db1.table[12]' -o ${data-path}/my_db1
The following table describes parameters in the command above. For more information about Dumpling parameters, see Dumpling Overview.
Ensure that there is enough free space in ${data-path}. It is strongly recommended to use the -F option to avoid interruptions in the backup process due to oversized single tables.
Then, run the following command to use Dumpling to export table3 and table4 from my_db2. Note that the path is ${data-path}/my_db2 instead of ${data-path}/my_db1.
tiup dumpling -h ${ip} -P 3306 -u root -t 16 -r 200000 -F 256MB -B my_db2 -f 'my_db2.table[34]' -o ${data-path}/my_db2
After the preceding procedures, all source data tables are now exported to the ${data-path} directory. Putting all the exported data on the same directory makes subsequent import by TiDB Lightning convenient.
The starting position information needed for incremental replication is in the metadata files in my_db1 and my_db2 sub-directories of ${data-path} directory respectively. They are meta-information files automatically generated by Dumpling. To perform incremental replication, you need to record the binlog locations information in these files.
Step 2. Start TiDB Lightning to import full exported data
Before starting TiDB Lightning for migration, it is recommended that you understand how to handle checkpoints, and then choose the appropriate way to proceed according to your needs.
Checkpoints
Migrating a large volume of data usually takes hours or even days. There is a certain chance that the long-running process is interrupted unexpectedly. It can be very frustrating to redo everything from scratch, even if some part of data has already been imported.
Fortunately, TiDB Lightning provides a feature called checkpoints, which makes TiDB Lightning save the import progress as checkpoints from time to time, so that an interrupted import task can be resumed from the latest checkpoint upon restart.
If the TiDB Lightning task crashes due to unrecoverable errors (for example, data corruption), it will not pick up from the checkpoint, but will report an error and quit the task. To ensure the safety of the imported data, you must resolve these errors by using the tidb-lightning-ctl command before proceeding with other steps. The options include:
- --checkpoint-error-destroy: This option allows you to restart importing data into failed target tables from scratch by destroying all the existing data in those tables first.
- --checkpoint-error-ignore: If migration has failed, this option clears the error status as if no errors ever happened.
- --checkpoint-remove: This option simply clears all checkpoints, regardless of errors.
For more information, see TiDB Lightning Checkpoints.
Create a target schema
Create mydb.table5 at downstream.
CREATE TABLE `table5` (
  `id` bigint(20) NOT NULL,
  `sid` bigint(20) NOT NULL,
  `pid` bigint(20) NOT NULL,
  `comment` varchar(255) DEFAULT NULL,
  INDEX (`id`),
  UNIQUE KEY `sid` (`sid`)
) ENGINE=InnoDB DEFAULT CHARSET=latin1
Start the migration task
Follow these steps to start tidb-lightning:
Edit the toml file.
tidb-lightning.tomlis used in the following example:[lightning] # Logs level = "info" file = "tidb-lightning.log" [mydumper] data-source-dir = ${data-path} [tikv-importer] # Choose a local backend. # "local": The default mode. It is used for large data volumes greater than 1 TiB. During migration, downstream TiDB cannot provide services. # "tidb": Used for data volumes less than 1 TiB. During migration, downstream TiDB can provide services normally. # For more information, see [TiDB Lightning Backends](https://docs.pingcap.com/tidb/stable/tidb-lightning-backends) backend = "local" # Set the temporary directory for the sorted key value pairs. It must be empty. # The free space must be greater than the size of the dataset to be imported. # It is recommended that you use a directory different from `data-source-dir` to get better migration performance by consuming I/O resources exclusively. sorted-kv-dir = "${sorted-kv-dir}" # Set the renaming rules ('routes') from source to target tables, in order to support merging different table shards into a single target table. Here you migrate `table1` and `table2` in `my_db1`, and `table3` and `table4` in `my_db2`, to the target `table5` in downstream `my_db`. [[mydumper.files]] pattern = '(^|/)my_db1\.table[1-2]\..*\.sql$' schema = "my_db" table = "table5" type = "sql" [[mydumper.files]] pattern = '(^|/)my_db2\.table[3-4]\..*\.sql$' schema = "my_db" table = "table5" type = "sql" # Information of the target TiDB cluster. For example purposes only. Replace the IP address with your IP address. [tidb] # Information of the target TiDB cluster. # Values here are only for illustration purpose. Replace them with your own values. host = ${host} # For example: "172.16.31.1" port = ${port} # For example: 4000 user = "${user_name}" # For example: "root" password = "${password}" # For example: "rootroot" status-port = ${status-port} # The table information is read from the status port. For example: 10080 # the IP address of the PD cluster. TiDB Lightning gets some information through the PD cluster. # For example: "172.16.31.3:2379". # When backend = "local", make sure that the values of status-port and pd-addr are correct. Otherwise an error will occur. pd-addr = "${ip}:${port}"Run
tidb-lightning. If you run the program by directly invoking the program name in a shell, the process may quit unexpectedly after receiving a SIGHUP signal. It is recommended that you run the program using tools such asnohuporscreenortiup, and put the process to the shell background. If you migrate from S3, the SecretKey and AccessKey of the account that has access to the Amazon S3 backend store needs to be passed into the Lightning node as environment variables. Reading credential files from~/.aws/credentialsis also supported. For example:export AWS_ACCESS_KEY_ID=${access_key} export AWS_SECRET_ACCESS_KEY=${secret_key} nohup tiup tidb-lightning -config tidb-lightning.toml > nohup.out 2>&1 &After starting the migration task, you can check the progress by using either of the following methods:
- Use
greptool to search the keywordprogressin the log. By default, a message reporting the progress is flushed into the log file every 5 minutes. - View progress via the monitoring dashboard. For more information, see TiDB Lightning Monitoring.
- View the progress via the Web page. See Web Interface.
- Use
After the importing finishes, TiDB Lightning will exit automatically. To make sure that the data is imported successfully, check for the whole procedure completed among the last 5 lines in the log.
If you encounter any problems during migration, see TiDB Lightning FAQs.
Step 3. (Optional) Use DM to perform incremental replication
To replicate the data changes based on binlog from a specified position in the source database to TiDB, you can use TiDB DM to perform incremental replication.
Add the data source
Create a new data source file called source1.yaml, which configures an upstream data source into DM, and add the following content:
# Configuration.
source-id: "mysql-01" # Must be unique.

# Specifies whether DM-worker pulls binlogs with GTID (Global Transaction Identifier).
# The prerequisite is that you have already enabled GTID in the upstream MySQL.
# If you have configured the upstream database service to switch master between different nodes automatically, you must enable GTID.
enable-gtid: true

from:
  host: "${host}"           # For example: 172.16.10.81
  user: "root"
  password: "${password}"   # Plaintext passwords are supported but not recommended. It is recommended that you use dmctl encrypt to encrypt plaintext passwords.
  port: ${port}             # For example: 3306
Run the following command in a terminal. Use tiup dmctl to load the data source configuration into the DM cluster:
tiup dmctl --master-addr ${advertise-addr} operate-source create source1.yaml
The parameters are described as follows.
Repeat the above steps until all MySQL upstream instances are added to the DM as data sources.
Create a replication task
Edit a task configuration file called task.yaml, to configure the incremental replication mode and replication starting point for each data source.
name: task-test               # The name of the task. Should be globally unique.
task-mode: incremental        # The mode of the task. "incremental" means full data migration is skipped and only incremental replication is performed.
# Required for incremental replication from sharded tables. By default, the "pessimistic" mode is used.
# If you have a deep understanding of the principles and usage limitations of the optimistic mode, you can also use the "optimistic" mode.
# For more information, see [Merge and Migrate Data from Sharded Tables](https://docs.pingcap.com/zh/tidb/dev/feature-shard-merge/).

shard-mode: "pessimistic"

# Configure the access information of the target TiDB database instance:
target-database:              # The target database instance
  host: "${host}"             # For example: 127.0.0.1
  port: 4000
  user: "root"
  password: "${password}"     # It is recommended to use a dmctl encrypted password.

# Use block-allow-list to configure tables that require sync:
block-allow-list:             # The set of filter rules on matching tables in the data sources, to decide which tables need to migrate and which not. Use the black-white-list if the DM version is earlier than or equal to v2.0.0-beta.2.
  bw-rule-1:                  # The ID of the block and allow list rule.
    do-dbs: ["my_db1"]        # The databases to be migrated. Here, my_db1 of instance 1 and my_db2 of instance 2 are configured as two separate rules to demonstrate how to prevent my_db2 of instance 1 from being replicated.
  bw-rule-2:
    do-dbs: ["my_db2"]
routes:                               # Table renaming rules ('routes') from upstream to downstream tables, in order to support merging different sharded table into a single target table.
  route-rule-1:                       # Rule name. Migrate and merge table1 and table2 from my_db1 to the downstream my_db.table5.
    schema-pattern: "my_db1"          # Rule for matching upstream schema names. It supports the wildcards "*" and "?".
    table-pattern: "table[1-2]"       # Rule for matching upstream table names. It supports the wildcards "*" and "?".
    target-schema: "my_db"            # Name of the target schema.
    target-table: "table5"            # Name of the target table.
  route-rule-2:                       # Rule name. Migrate and merge table3 and table4 from my_db2 to the downstream my_db.table5.
    schema-pattern: "my_db2"
    table-pattern: "table[3-4]"
    target-schema: "my_db"
    target-table: "table5"

# Configure data sources. The following uses two data sources as an example.
mysql-instances:
  - source-id: "mysql-01"             # Data source ID. It is the source-id in source1.yaml.
    block-allow-list: "bw-rule-1"     # Use the block and allow list configuration above. Replicate `my_db1` in instance 1.
    route-rules: ["route-rule-1"]     # Use the configured routing rule above to merge upstream tables.
#       syncer-config-name: "global"  # Use the syncers configuration below.
    meta:                             # The migration starting point of binlog when task-mode is incremental and there is no checkpoint in the downstream database. If there is a checkpoint, the checkpoint will be used.
      binlog-name: "${binlog-name}"   # The log location recorded in ${data-path}/my_db1/metadata in Step 1. You can either specify binlog-name + binlog-pos or binlog-gtid. When the upstream database service is configured to switch master between different nodes automatically, use binlog GTID here.
      binlog-pos: ${binlog-position}
      # binlog-gtid:                  " For example: 09bec856-ba95-11ea-850a-58f2b4af5188:1-9"
  - source-id: "mysql-02"             # Data source ID. It is the source-id in source1.yaml.
    block-allow-list: "bw-rule-2"     # Use the block and allow list configuration above. Replicate `my_db2` in instance2.
    route-rules: ["route-rule-2"]     # Use the routing rule configured above.

#       syncer-config-name: "global"  # Use the syncers configuration below.
    meta:                             # The migration starting point of binlog when task-mode is incremental and there is no checkpoint in the downstream database. If there is a checkpoint, the checkpoint will be used.
      # binlog-name: "${binlog-name}"   # The log location recorded in ${data-path}/my_db2/metadata in Step 1. You can either specify binlog-name + binlog-pos or binlog-gtid. When the upstream database service is configured to switch master between different nodes automatically, use binlog GTID here.
      # binlog-pos: ${binlog-position}
      binlog-gtid: "09bec856-ba95-11ea-850a-58f2b4af5188:1-9"
# (Optional) If you need to incrementally replicate some data changes that have been covered in the full migration, you need to enable the safe mode to avoid data migration errors during incremental replication.
# This scenario is common when the fully migrated data is not part of a consistent snapshot of the data source, and the incremental data is replicated from a location earlier than the fully migrated data.
# syncers:           # The running parameters of the sync processing unit.
#  global:           # Configuration name.
# If set to true, DM changes INSERT to REPLACE, and changes UPDATE to a pair of DELETE and REPLACE for data source replication operations.
# Thus, it can apply DML repeatedly during replication when primary keys or unique indexes exist in the table structure.
# TiDB DM automatically starts safe mode within 1 minute before starting or resuming an incremental replication task.
#    safe-mode: true
For more configurations, see DM Advanced Task Configuration File.
Before you start the data migration task, it is recommended to use the check-task subcommand in tiup dmctl to check if the configuration meets the DM configuration requirements.
tiup dmctl --master-addr ${advertise-addr} check-task task.yaml
Use tiup dmctl to run the following command to start the data migration task.
tiup dmctl --master-addr ${advertise-addr} start-task task.yaml
The parameters in this command are described as follows.
If the task fails to start, first make configuration changes according to the prompt messages from the returned result, and then run the start-task task.yaml subcommand in tiup dmctl to restart the task. If you encounter problems, see Handle Errors and TiDB Data Migration FAQ.
Check the migration status
You can check if there are running migration tasks in the DM cluster and their status by running the query-status command in tiup dmctl.
tiup dmctl --master-addr ${advertise-addr} query-status ${task-name}
For more information, see Query Status.
Monitor tasks and view logs
You can view the history of a migration task and internal operational metrics through Grafana or logs.
Via Grafana
If Prometheus, Alertmanager, and Grafana are correctly deployed when you deploy the DM cluster using TiUP, you can view DM monitoring metrics in Grafana. Specifically, enter the IP address and port specified during deployment in Grafana and select the DM dashboard.
Via logs
When DM is running, DM-master, DM-worker, and dmctl output logs, which includes information about migration tasks. The log directory of each component is as follows.
- DM-master log directory: It is specified by the DM-master command line parameter
--log-file. If DM is deployed using TiUP, the log directory is/dm-deploy/dm-master-8261/log/. - DM-worker log directory: It is specified by the DM-worker command line parameter
--log-file. If DM is deployed using TiUP, the log directory is/dm-deploy/dm-worker-8262/log/.
- DM-master log directory: It is specified by the DM-master command line parameter