TiDB Binlog Tutorial
This tutorial starts with a simple TiDB Binlog deployment with a single node of each component (Placement Driver, TiKV Server, TiDB Server, Pump, and Drainer), set up to push data into a MariaDB Server instance.
This tutorial is targeted toward users who have some familiarity with the TiDB Architecture, who may have already set up a TiDB cluster (not mandatory), and who wants to gain hands-on experience with TiDB Binlog. This tutorial is a good way to "kick the tires" of TiDB Binlog and to familiarize yourself with the concepts of its architecture.
This tutorial assumes you're using a modern Linux distribution on x86-64. A minimal CentOS 7 installation running in VMware is used in this tutorial for the examples. It's recommended that you start from a clean install, so that you aren't impacted by quirks of your existing environment. If you don't want to use local virtualization, you can easily start a CentOS 7 VM using your cloud service.
TiDB Binlog Overview
TiDB Binlog is a solution to collect binary log data from TiDB and provide real-time data backup and replication. It pushes incremental data updates from a TiDB Server cluster into downstream platforms.
You can use TiDB Binlog for incremental backups, to replicate data from one TiDB cluster to another, or to send TiDB updates through Kafka to a downstream platform of your choice.
TiDB Binlog is particularly useful when you migrate data from MySQL or MariaDB to TiDB, in which case you may use the TiDB DM (Data Migration) platform to get data from a MySQL/MariaDB cluster into TiDB, and then use TiDB Binlog to keep a separate, downstream MySQL/MariaDB instance/cluster in sync with your TiDB cluster. TiDB Binlog enables application traffic to TiDB to be pushed to a downstream MySQL or MariaDB instance/cluster, which reduces the risk of a migration to TiDB because you can easily revert the application to MySQL or MariaDB without downtime or data loss.
See TiDB Binlog Cluster User Guide for more information.
Architecture
TiDB Binlog comprises two components: the Pump and the Drainer. Several Pump nodes make up a pump cluster. Each Pump node connects to TiDB Server instances and receives updates made to each of the TiDB Server instances in a cluster. A Drainer connects to the Pump cluster and transforms the received updates into the correct format for a particular downstream destination, for example, Kafka, another TiDB Cluster or a MySQL/MariaDB server.
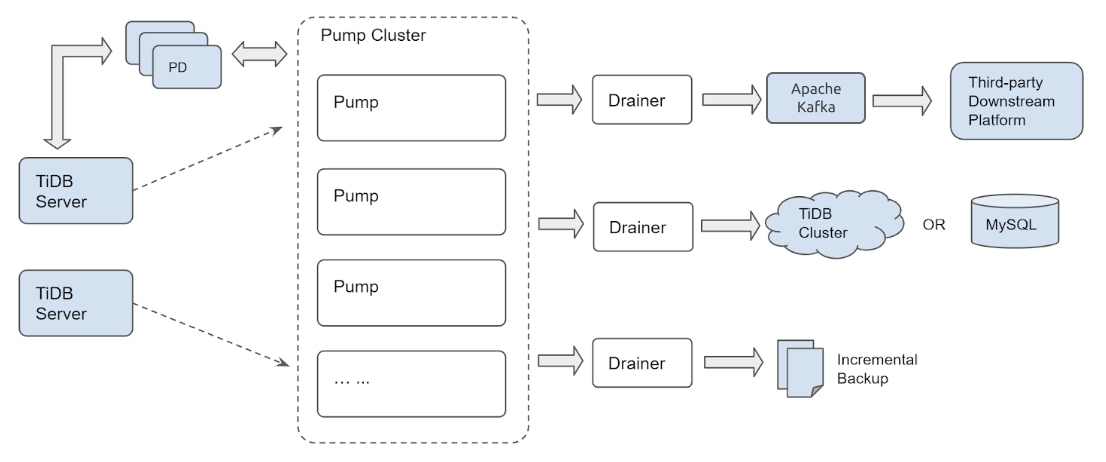
The clustered architecture of Pump ensures that updates won't be lost as new TiDB Server instances join or leave the TiDB Cluster or Pump nodes join or leave the Pump cluster.
Installation
We're using MariaDB Server in this case instead of MySQL Server because RHEL/CentOS 7 includes MariaDB Server in their default package repositories. We'll need the client as well as the server for later use. Let's install them now:
sudo yum install -y mariadb-server
curl -L https://download.pingcap.org/tidb-latest-linux-amd64.tar.gz | tar xzf -
cd tidb-latest-linux-amd64
Expected output:
[kolbe@localhost ~]$ curl -LO https://download.pingcap.org/tidb-latest-linux-amd64.tar.gz | tar xzf -
  % Total    % Received % Xferd  Average Speed   Time    Time     Time  Current
                                 Dload  Upload   Total   Spent    Left  Speed
100  368M  100  368M    0     0  8394k      0  0:00:44  0:00:44 --:--:-- 11.1M
[kolbe@localhost ~]$ cd tidb-latest-linux-amd64
[kolbe@localhost tidb-latest-linux-amd64]$
Configuration
Now we'll start a simple TiDB cluster, with a single instance for each of pd-server, tikv-server, and tidb-server.
Populate the config files using:
printf > pd.toml %s\\n 'log-file="pd.log"' 'data-dir="pd.data"'
printf > tikv.toml %s\\n 'log-file="tikv.log"' '[storage]' 'data-dir="tikv.data"' '[pd]' 'endpoints=["127.0.0.1:2379"]' '[rocksdb]' max-open-files=1024 '[raftdb]' max-open-files=1024
printf > pump.toml %s\\n 'log-file="pump.log"' 'data-dir="pump.data"' 'addr="127.0.0.1:8250"' 'advertise-addr="127.0.0.1:8250"' 'pd-urls="http://127.0.0.1:2379"'
printf > tidb.toml %s\\n 'store="tikv"' 'path="127.0.0.1:2379"' '[log.file]' 'filename="tidb.log"' '[binlog]' 'enable=true'
printf > drainer.toml %s\\n 'log-file="drainer.log"' '[syncer]' 'db-type="mysql"' '[syncer.to]' 'host="127.0.0.1"' 'user="root"' 'password=""' 'port=3306'
Use the following commands to see the configuration details:
for f in *.toml; do echo "$f:"; cat "$f"; echo; done
Expected output:
drainer.toml:
log-file="drainer.log"
[syncer]
db-type="mysql"
[syncer.to]
host="127.0.0.1"
user="root"
password=""
port=3306

pd.toml:
log-file="pd.log"
data-dir="pd.data"

pump.toml:
log-file="pump.log"
data-dir="pump.data"
addr="127.0.0.1:8250"
advertise-addr="127.0.0.1:8250"
pd-urls="http://127.0.0.1:2379"

tidb.toml:
store="tikv"
path="127.0.0.1:2379"
[log.file]
filename="tidb.log"
[binlog]
enable=true

tikv.toml:
log-file="tikv.log"
[storage]
data-dir="tikv.data"
[pd]
endpoints=["127.0.0.1:2379"]
[rocksdb]
max-open-files=1024
[raftdb]
max-open-files=1024
Bootstrapping
Now we can start each component. This is best done in a specific order - firstly the Placement Driver (PD), then TiKV Server, then Pump (because TiDB must connect to the Pump service to send the binary log), and finally the TiDB Server.
Start all the services using:
./bin/pd-server --config=pd.toml &>pd.out &
./bin/tikv-server --config=tikv.toml &>tikv.out &
./bin/pump --config=pump.toml &>pump.out &
sleep 3
./bin/tidb-server --config=tidb.toml &>tidb.out &
Expected output:
[kolbe@localhost tidb-latest-linux-amd64]$ ./bin/pd-server --config=pd.toml &>pd.out &
[1] 20935
[kolbe@localhost tidb-latest-linux-amd64]$ ./bin/tikv-server --config=tikv.toml &>tikv.out &
[2] 20944
[kolbe@localhost tidb-latest-linux-amd64]$ ./bin/pump --config=pump.toml &>pump.out &
[3] 21050
[kolbe@localhost tidb-latest-linux-amd64]$ sleep 3
[kolbe@localhost tidb-latest-linux-amd64]$ ./bin/tidb-server --config=tidb.toml &>tidb.out &
[4] 21058
If you execute jobs, you should see a list of running daemons:
[kolbe@localhost tidb-latest-linux-amd64]$ jobs
[1]   Running                 ./bin/pd-server --config=pd.toml &>pd.out &
[2]   Running                 ./bin/tikv-server --config=tikv.toml &>tikv.out &
[3]-  Running                 ./bin/pump --config=pump.toml &>pump.out &
[4]+  Running                 ./bin/tidb-server --config=tidb.toml &>tidb.out &
If one of the services has failed to start (if you see "Exit 1" instead of "Running", for example), try to restart that individual service.
Connecting
You should have all 4 components of our TiDB Cluster running now, and you can now connect to the TiDB Server on port 4000 using the MariaDB/MySQL command-line client:
mysql -h 127.0.0.1 -P 4000 -u root -e 'select tidb_version()\G'
Expected output:
[kolbe@localhost tidb-latest-linux-amd64]$ mysql -h 127.0.0.1 -P 4000 -u root -e 'select tidb_version()\G'
*************************** 1. row ***************************
tidb_version(): Release Version: v3.0.0-beta.1-154-gd5afff70c
Git Commit Hash: d5afff70cdd825d5fab125c8e52e686cc5fb9a6e
Git Branch: master
UTC Build Time: 2019-04-24 03:10:00
GoVersion: go version go1.12 linux/amd64
Race Enabled: false
TiKV Min Version: 2.1.0-alpha.1-ff3dd160846b7d1aed9079c389fc188f7f5ea13e
Check Table Before Drop: false
At this point we have a TiDB Cluster running, and we have pump reading binary logs from the cluster and storing them as relay logs in its data directory. The next step is to start a MariaDB server that drainer can write to.
Start drainer using:
sudo systemctl start mariadb
./bin/drainer --config=drainer.toml &>drainer.out &
If you are using an operating system that makes it easier to install MySQL server, that's also OK. Just make sure it's listening on port 3306 and that you can either connect to it as user "root" with an empty password, or adjust drainer.toml as necessary.
mysql -h 127.0.0.1 -P 3306 -u root
show databases;
Expected output:
[kolbe@localhost ~]$ mysql -h 127.0.0.1 -P 3306 -u root
Welcome to the MariaDB monitor.  Commands end with ; or \g.
Your MariaDB connection id is 20
Server version: 5.5.60-MariaDB MariaDB Server

Copyright (c) 2000, 2018, Oracle, MariaDB Corporation Ab and others.

Type 'help;' or '\h' for help. Type '\c' to clear the current input statement.

MariaDB [(none)]> show databases;
+--------------------+
| Database           |
+--------------------+
| information_schema |
| mysql              |
| performance_schema |
| test               |
| tidb_binlog        |
+--------------------+
5 rows in set (0.01 sec)
Here we can already see the tidb_binlog database, which contains the checkpoint table used by drainer to record up to what point binary logs from the TiDB cluster have been applied.
MariaDB [tidb_binlog]> use tidb_binlog;
Database changed
MariaDB [tidb_binlog]> select * from checkpoint;
+---------------------+---------------------------------------------+
| clusterID           | checkPoint                                  |
+---------------------+---------------------------------------------+
| 6678715361817107733 | {"commitTS":407637466476445697,"ts-map":{}} |
+---------------------+---------------------------------------------+
1 row in set (0.00 sec)
Now, let's open another client connection to the TiDB server, so that we can create a table and insert some rows into it. (It's recommended that you do this under a GNU screen so you can keep multiple clients open at the same time.)
mysql -h 127.0.0.1 -P 4000 --prompt='TiDB [\d]> ' -u root
create database tidbtest;
use tidbtest;
create table t1 (id int unsigned not null AUTO_INCREMENT primary key);
insert into t1 () values (),(),(),(),();
select * from t1;
Expected output:
TiDB [(none)]> create database tidbtest;
Query OK, 0 rows affected (0.12 sec)

TiDB [(none)]> use tidbtest;
Database changed
TiDB [tidbtest]> create table t1 (id int unsigned not null AUTO_INCREMENT primary key);
Query OK, 0 rows affected (0.11 sec)

TiDB [tidbtest]> insert into t1 () values (),(),(),(),();
Query OK, 5 rows affected (0.01 sec)
Records: 5  Duplicates: 0  Warnings: 0

TiDB [tidbtest]> select * from t1;
+----+
| id |
+----+
|  1 |
|  2 |
|  3 |
|  4 |
|  5 |
+----+
5 rows in set (0.00 sec)
Switching back to the MariaDB client, we should find the new database, new table, and the newly inserted rows:
use tidbtest;
show tables;
select * from t1;
Expected output:
MariaDB [(none)]> use tidbtest;
Reading table information for completion of table and column names
You can turn off this feature to get a quicker startup with -A

Database changed
MariaDB [tidbtest]> show tables;
+--------------------+
| Tables_in_tidbtest |
+--------------------+
| t1                 |
+--------------------+
1 row in set (0.00 sec)

MariaDB [tidbtest]> select * from t1;
+----+
| id |
+----+
|  1 |
|  2 |
|  3 |
|  4 |
|  5 |
+----+
5 rows in set (0.00 sec)
You should see the same rows that you inserted into TiDB when querying the MariaDB server. Congratulations! You've just set up TiDB Binlog!
binlogctl
Information about Pumps and Drainers that have joined the cluster is stored in PD. You can use the binlogctl tool query and manipulate information about their states. See binlogctl guide for more information.
Use binlogctl to get a view of the current status of Pumps and Drainers in the cluster:
./bin/binlogctl -cmd drainers
./bin/binlogctl -cmd pumps
Expected output:
[kolbe@localhost tidb-latest-linux-amd64]$ ./bin/binlogctl -cmd drainers
[2019/04/11 17:44:10.861 -04:00] [INFO] [nodes.go:47] ["query node"] [type=drainer] [node="{NodeID: localhost.localdomain:8249, Addr: 192.168.236.128:8249, State: online, MaxCommitTS: 407638907719778305, UpdateTime: 2019-04-11 17:44:10 -0400 EDT}"]

[kolbe@localhost tidb-latest-linux-amd64]$ ./bin/binlogctl -cmd pumps
[2019/04/11 17:44:13.904 -04:00] [INFO] [nodes.go:47] ["query node"] [type=pump] [node="{NodeID: localhost.localdomain:8250, Addr: 192.168.236.128:8250, State: online, MaxCommitTS: 407638914024079361, UpdateTime: 2019-04-11 17:44:13 -0400 EDT}"]
If you kill a Drainer, the cluster puts it in the "paused" state, which means that the cluster expects it to rejoin:
pkill drainer
./bin/binlogctl -cmd drainers
Expected output:
[kolbe@localhost tidb-latest-linux-amd64]$ pkill drainer
[kolbe@localhost tidb-latest-linux-amd64]$ ./bin/binlogctl -cmd drainers
[2019/04/11 17:44:22.640 -04:00] [INFO] [nodes.go:47] ["query node"] [type=drainer] [node="{NodeID: localhost.localdomain:8249, Addr: 192.168.236.128:8249, State: paused, MaxCommitTS: 407638915597467649, UpdateTime: 2019-04-11 17:44:18 -0400 EDT}"]
You can use "NodeIDs" with binlogctl to control individual nodes. In this case, the NodeID of the drainer is "localhost.localdomain:8249" and the NodeID of the Pump is "localhost.localdomain:8250".
The main use of binlogctl in this tutorial is likely to be in the event of a cluster restart. If you end all processes in the TiDB cluster and try to restart them (not including the downstream MySQL/MariaDB server or Drainer), Pump will refuse to start because it cannot contact Drainer and believe that Drainer is still "online".
There are 3 solutions to this issue:
Stop Drainer using
binlogctlinstead of killing the process:./bin/binlogctl --pd-urls=http://127.0.0.1:2379 --cmd=drainers ./bin/binlogctl --pd-urls=http://127.0.0.1:2379 --cmd=offline-drainer --node-id=localhost.localdomain:8249Start Drainer before starting Pump.
Use
binlogctlafter starting PD (but before starting Drainer and Pump) to update the state of the paused Drainer:./bin/binlogctl --pd-urls=http://127.0.0.1:2379 --cmd=update-drainer --node-id=localhost.localdomain:8249 --state=offline
Cleanup
To stop the TiDB cluster and TiDB Binlog processes, you can execute pkill -P $$ in the shell where you started all the processes that form the cluster (pd-server, tikv-server, pump, tidb-server, drainer). To give each component enough time to shut down cleanly, it's helpful to stop them in a particular order:
for p in tidb-server drainer pump tikv-server pd-server; do pkill "$p"; sleep 1; done
Expected output:
kolbe@localhost tidb-latest-linux-amd64]$ for p in tidb-server drainer pump tikv-server pd-server; do pkill "$p"; sleep 1; done
[4]-  Done                    ./bin/tidb-server --config=tidb.toml &>tidb.out
[5]+  Done                    ./bin/drainer --config=drainer.toml &>drainer.out
[3]+  Done                    ./bin/pump --config=pump.toml &>pump.out
[2]+  Done                    ./bin/tikv-server --config=tikv.toml &>tikv.out
[1]+  Done                    ./bin/pd-server --config=pd.toml &>pd.out
If you wish to restart the cluster after all services exit, use the same commands you ran originally to start the services. As discussed in the binlogctl section above, you'll need to start drainer before pump, and pump before tidb-server.
./bin/pd-server --config=pd.toml &>pd.out &
./bin/tikv-server --config=tikv.toml &>tikv.out &
./bin/drainer --config=drainer.toml &>drainer.out &
sleep 3
./bin/pump --config=pump.toml &>pump.out &
sleep 3
./bin/tidb-server --config=tidb.toml &>tidb.out &
If any of the components fail to start, try to restart the failed individual component(s).
Conclusion
In this tutorial, we've set up TiDB Binlog to replicate from a TiDB cluster to a downstream MariaDB server, using a cluster with a single Pump and a single Drainer. As we've seen, TiDB Binlog is a comprehensive platform for capturing and processing changes to a TiDB cluster.
In a more robust development, testing, or production deployment, you'd have multiple TiDB servers for high availability and scaling purposes, and you'd use multiple Pump instances to ensure that application traffic to TiDB server instances is unaffected by problems in the Pump cluster. You may also use additional Drainer instances to push updates to different downstream platforms or to implement incremental backups.