TiDBBinlogログチュートリアル
このチュートリアルは、各コンポーネント(Placement Driver、TiKV Server、TiDB Server、 Pump、およびDrainer ) の単一ノードを持つ単純な TiDB Binlogデプロイメントから始まり、MariaDB Server インスタンスにデータをプッシュするようにセットアップされます。
このチュートリアルは、 TiDBアーキテクチャに多少精通していて、すでに TiDB クラスターを設定している可能性があり (必須ではありません)、 TiDB Binlogの実践的な経験を積みたいと考えているユーザーを対象としています。このチュートリアルは、 TiDB Binlogを実際に試し、そのアーキテクチャの概念を理解するのに最適です。
このチュートリアルでは、x86-64 で最新の Linux ディストリビューションを使用していることを前提としています。このチュートリアルでは、例として VMware で実行されている最小限の CentOS 7 インストールを使用しています。既存の環境の癖の影響を受けないように、クリーン インストールから開始することをお勧めします。ローカル仮想化を使用しない場合は、クラウド サービスを使用して CentOS 7 VM を簡単に起動できます。
TiDBBinlogの概要
TiDB Binlog は、TiDB からバイナリ ログ データを収集し、リアルタイムのデータ バックアップとレプリケーションを提供するソリューションです。TiDB サーバー クラスターから下流のプラットフォームに増分データ更新をプッシュします。
TiDB Binlog は、増分バックアップ、ある TiDB クラスターから別の TiDB クラスターへのデータの複製、または TiDB 更新を Kafka 経由で任意のダウンストリーム プラットフォームに送信するために使用できます。
TiDB Binlog は、MySQL または MariaDB から TiDB にデータを移行する場合に特に便利です。この場合、TiDB DM (データ移行) プラットフォームを使用して、MySQL/MariaDB クラスターから TiDB にデータを取得し、TiDB Binlogを使用して別のダウンストリーム MySQL/MariaDB インスタンス/クラスターを TiDB クラスターと同期させることができます。TiDB Binlog を使用すると、TiDB へのアプリケーション トラフィックをダウンストリーム MySQL または MariaDB インスタンス/クラスターにプッシュできるため、ダウンタイムやデータ損失なしでアプリケーションを MySQL または MariaDB に簡単に戻すことができるため、TiDB への移行のリスクが軽減されます。
詳細についてはTiDB Binlogクラスタユーザー ガイド参照してください。
アーキテクチャ
TiDB Binlog は、 PumpとDrainerの 2 つのコンポーネントで構成されています。複数のPumpノードが Pump クラスターを構成します。各Pumpノードは TiDB サーバー インスタンスに接続し、クラスター内の各 TiDB サーバー インスタンスに対する更新を受け取ります。DrainerはPumpクラスターに接続し、受信した更新を特定のダウンストリームの宛先 (Kafka、別の TiDBクラスタ、MySQL/MariaDBサーバーなど) に適した形式に変換します。
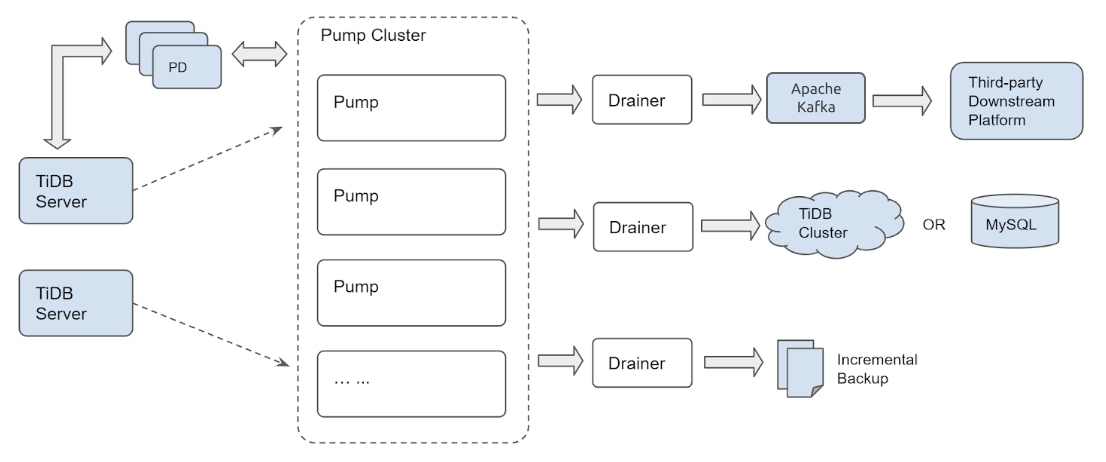
Pumpのクラスター化されたアーキテクチャにより、新しい TiDB サーバー インスタンスが TiDBクラスタに参加または離脱したり、 PumpノードがPumpクラスターに参加または離脱したりしても、更新が失われないことが保証されます。
インストール
RHEL/CentOS 7 にはデフォルトのパッケージ リポジトリに MariaDB Server が含まれているため、この場合は MySQL Server ではなく MariaDB Server を使用します。後で使用するために、クライアントとサーバーの両方が必要になります。今すぐインストールしましょう。
sudo yum install -y mariadb-server
curl -L https://download.pingcap.org/tidb-community-server-v8.1.0-linux-amd64.tar.gz | tar xzf -
cd tidb-latest-linux-amd64
期待される出力:
[kolbe@localhost ~]$ curl -LO https://download.pingcap.org/tidb-latest-linux-amd64.tar.gz | tar xzf -
  % Total    % Received % Xferd  Average Speed   Time    Time     Time  Current
                                 Dload  Upload   Total   Spent    Left  Speed
100  368M  100  368M    0     0  8394k      0  0:00:44  0:00:44 --:--:-- 11.1M
[kolbe@localhost ~]$ cd tidb-latest-linux-amd64
[kolbe@localhost tidb-latest-linux-amd64]$
コンフィグレーション
ここで、 pd-server 、 tikv-server 、 tidb-serverのそれぞれに 1 つのインスタンスを持つ単純な TiDB クラスターを起動します。
次を使用して設定ファイルを入力します。
printf > pd.toml %s\\n 'log-file="pd.log"' 'data-dir="pd.data"'
printf > tikv.toml %s\\n 'log-file="tikv.log"' '[storage]' 'data-dir="tikv.data"' '[pd]' 'endpoints=["127.0.0.1:2379"]' '[rocksdb]' max-open-files=1024 '[raftdb]' max-open-files=1024
printf > pump.toml %s\\n 'log-file="pump.log"' 'data-dir="pump.data"' 'addr="127.0.0.1:8250"' 'advertise-addr="127.0.0.1:8250"' 'pd-urls="http://127.0.0.1:2379"'
printf > tidb.toml %s\\n 'store="tikv"' 'path="127.0.0.1:2379"' '[log.file]' 'filename="tidb.log"' '[binlog]' 'enable=true'
printf > drainer.toml %s\\n 'log-file="drainer.log"' '[syncer]' 'db-type="mysql"' '[syncer.to]' 'host="127.0.0.1"' 'user="root"' 'password=""' 'port=3306'
構成の詳細を表示するには、次のコマンドを使用します。
for f in *.toml; do echo "$f:"; cat "$f"; echo; done
期待される出力:
drainer.toml:
log-file="drainer.log"
[syncer]
db-type="mysql"
[syncer.to]
host="127.0.0.1"
user="root"
password=""
port=3306

pd.toml:
log-file="pd.log"
data-dir="pd.data"

pump.toml:
log-file="pump.log"
data-dir="pump.data"
addr="127.0.0.1:8250"
advertise-addr="127.0.0.1:8250"
pd-urls="http://127.0.0.1:2379"

tidb.toml:
store="tikv"
path="127.0.0.1:2379"
[log.file]
filename="tidb.log"
[binlog]
enable=true

tikv.toml:
log-file="tikv.log"
[storage]
data-dir="tikv.data"
[pd]
endpoints=["127.0.0.1:2379"]
[rocksdb]
max-open-files=1024
[raftdb]
max-open-files=1024
ブートストラップ
これで、各コンポーネントを起動できます。これは、特定の順序で実行するのが最適です。最初に Placement Driver (PD)、次に TiKV Server、次にPump (TiDB はバイナリ ログを送信するためにPumpサービスに接続する必要があるため)、最後に TiDB Server です。
以下を使用してすべてのサービスを開始します。
./bin/pd-server --config=pd.toml &>pd.out &
./bin/tikv-server --config=tikv.toml &>tikv.out &
./pump --config=pump.toml &>pump.out &
sleep 3
./bin/tidb-server --config=tidb.toml &>tidb.out &
期待される出力:
[kolbe@localhost tidb-latest-linux-amd64]$ ./bin/pd-server --config=pd.toml &>pd.out &
[1] 20935
[kolbe@localhost tidb-latest-linux-amd64]$ ./bin/tikv-server --config=tikv.toml &>tikv.out &
[2] 20944
[kolbe@localhost tidb-latest-linux-amd64]$ ./pump --config=pump.toml &>pump.out &
[3] 21050
[kolbe@localhost tidb-latest-linux-amd64]$ sleep 3
[kolbe@localhost tidb-latest-linux-amd64]$ ./bin/tidb-server --config=tidb.toml &>tidb.out &
[4] 21058
jobsを実行すると、実行中のデーモンのリストが表示されます。
[kolbe@localhost tidb-latest-linux-amd64]$ jobs
[1]   Running                 ./bin/pd-server --config=pd.toml &>pd.out &
[2]   Running                 ./bin/tikv-server --config=tikv.toml &>tikv.out &
[3]-  Running                 ./pump --config=pump.toml &>pump.out &
[4]+  Running                 ./bin/tidb-server --config=tidb.toml &>tidb.out &
いずれかのサービスが起動に失敗した場合 (たとえば、「 Running 」ではなく「 Exit 1 」が表示される場合)、そのサービスを個別に再起動してみてください。
接続中
これで、TiDBクラスタの 4 つのコンポーネントがすべて実行され、MariaDB/MySQL コマンドライン クライアントを使用してポート 4000 で TiDB サーバーに接続できるようになります。
mysql -h 127.0.0.1 -P 4000 -u root -e 'select tidb_version()\G'
期待される出力:
[kolbe@localhost tidb-latest-linux-amd64]$ mysql -h 127.0.0.1 -P 4000 -u root -e 'select tidb_version()\G'
*************************** 1. row ***************************
tidb_version(): Release Version: v3.0.0-beta.1-154-gd5afff70c
Git Commit Hash: d5afff70cdd825d5fab125c8e52e686cc5fb9a6e
Git Branch: master
UTC Build Time: 2019-04-24 03:10:00
GoVersion: go version go1.12 linux/amd64
Race Enabled: false
TiKV Min Version: 2.1.0-alpha.1-ff3dd160846b7d1aed9079c389fc188f7f5ea13e
Check Table Before Drop: false
この時点では、TiDBクラスタが稼働しており、クラスターからバイナリ ログを読み取り、それをデータ ディレクトリにリレー ログとして保存していpump 。次の手順では、 drainerが書き込み可能な MariaDBサーバーを起動します。
開始drainer次を使用します:
sudo systemctl start mariadb
./drainer --config=drainer.toml &>drainer.out &
MySQLサーバーのインストールが簡単なオペレーティング システムを使用している場合でも問題ありません。ポート 3306 でリッスンしていること、および空のパスワードを使用してユーザー「root」として接続できること、または必要に応じてdrainer.toml を調整できることを確認してください。
mysql -h 127.0.0.1 -P 3306 -u root
show databases;
期待される出力:
[kolbe@localhost ~]$ mysql -h 127.0.0.1 -P 3306 -u root
Welcome to the MariaDB monitor.  Commands end with ; or \g.
Your MariaDB connection id is 20
Server version: 5.5.60-MariaDB MariaDB Server

Copyright (c) 2000, 2018, Oracle, MariaDB Corporation Ab and others.

Type 'help;' or '\h' for help. Type '\c' to clear the current input statement.

MariaDB [(none)]> show databases;
+--------------------+
| Database           |
+--------------------+
| information_schema |
| mysql              |
| performance_schema |
| test               |
| tidb_binlog        |
+--------------------+
5 rows in set (0.01 sec)
ここでは、TiDB クラスターからのバイナリ ログがどの時点まで適用されたかを記録するためにdrainerによって使用されるcheckpointテーブルを含むtidb_binlogデータベースがすでに表示されています。
MariaDB [tidb_binlog]> use tidb_binlog;
Database changed
MariaDB [tidb_binlog]> select * from checkpoint;
+---------------------+---------------------------------------------+
| clusterID           | checkPoint                                  |
+---------------------+---------------------------------------------+
| 6678715361817107733 | {"commitTS":407637466476445697,"ts-map":{}} |
+---------------------+---------------------------------------------+
1 row in set (0.00 sec)
ここで、TiDBサーバーへの別のクライアント接続を開き、テーブルを作成してそこにいくつかの行を挿入できるようにします。(複数のクライアントを同時に開いたままにできるように、GNU 画面でこれを行うことをお勧めします。)
mysql -h 127.0.0.1 -P 4000 --prompt='TiDB [\d]> ' -u root
create database tidbtest;
use tidbtest;
create table t1 (id int unsigned not null AUTO_INCREMENT primary key);
insert into t1 () values (),(),(),(),();
select * from t1;
期待される出力:
TiDB [(none)]> create database tidbtest;
Query OK, 0 rows affected (0.12 sec)

TiDB [(none)]> use tidbtest;
Database changed
TiDB [tidbtest]> create table t1 (id int unsigned not null AUTO_INCREMENT primary key);
Query OK, 0 rows affected (0.11 sec)

TiDB [tidbtest]> insert into t1 () values (),(),(),(),();
Query OK, 5 rows affected (0.01 sec)
Records: 5  Duplicates: 0  Warnings: 0

TiDB [tidbtest]> select * from t1;
+----+
| id |
+----+
|  1 |
|  2 |
|  3 |
|  4 |
|  5 |
+----+
5 rows in set (0.00 sec)
MariaDB クライアントに戻ると、新しいデータベース、新しいテーブル、新しく挿入された行が見つかります。
use tidbtest;
show tables;
select * from t1;
期待される出力:
MariaDB [(none)]> use tidbtest;
Reading table information for completion of table and column names
You can turn off this feature to get a quicker startup with -A

Database changed
MariaDB [tidbtest]> show tables;
+--------------------+
| Tables_in_tidbtest |
+--------------------+
| t1                 |
+--------------------+
1 row in set (0.00 sec)

MariaDB [tidbtest]> select * from t1;
+----+
| id |
+----+
|  1 |
|  2 |
|  3 |
|  4 |
|  5 |
+----+
5 rows in set (0.00 sec)
MariaDBサーバーをクエリしたときに、TiDB に挿入したのと同じ行が表示されるはずです。おめでとうございます。これで TiDB Binlogの設定が完了しました。
binlogctl
クラスターに参加しているポンプとドレイナーに関する情報は PD に保存されます。binlogctl ツールを使用して、それらの状態に関する情報を照会および操作できます。詳細については、 binlogctl ガイド参照してください。
binlogctlを使用して、クラスター内のポンプとドレーナーの現在のステータスを表示します。
./binlogctl -cmd drainers
./binlogctl -cmd pumps
期待される出力:
[kolbe@localhost tidb-latest-linux-amd64]$ ./binlogctl -cmd drainers
[2019/04/11 17:44:10.861 -04:00] [INFO] [nodes.go:47] ["query node"] [type=drainer] [node="{NodeID: localhost.localdomain:8249, Addr: 192.168.236.128:8249, State: online, MaxCommitTS: 407638907719778305, UpdateTime: 2019-04-11 17:44:10 -0400 EDT}"]

[kolbe@localhost tidb-latest-linux-amd64]$ ./binlogctl -cmd pumps
[2019/04/11 17:44:13.904 -04:00] [INFO] [nodes.go:47] ["query node"] [type=pump] [node="{NodeID: localhost.localdomain:8250, Addr: 192.168.236.128:8250, State: online, MaxCommitTS: 407638914024079361, UpdateTime: 2019-04-11 17:44:13 -0400 EDT}"]
Drainerを強制終了すると、クラスターはそれを「一時停止」状態にします。つまり、クラスターは Drainer が再参加することを期待します。
pkill drainer
./binlogctl -cmd drainers
期待される出力:
[kolbe@localhost tidb-latest-linux-amd64]$ pkill drainer
[kolbe@localhost tidb-latest-linux-amd64]$ ./binlogctl -cmd drainers
[2019/04/11 17:44:22.640 -04:00] [INFO] [nodes.go:47] ["query node"] [type=drainer] [node="{NodeID: localhost.localdomain:8249, Addr: 192.168.236.128:8249, State: paused, MaxCommitTS: 407638915597467649, UpdateTime: 2019-04-11 17:44:18 -0400 EDT}"]
個々のノードを制御するには、「NodeIDs」をbinlogctlで使用します。この場合、drainerの NodeID は「localhost.localdomain:8249」、Pumpの NodeID は「localhost.localdomain:8250」です。
このチュートリアルでのbinlogctlの主な使用法は、クラスターの再起動時です。TiDB クラスター内のすべてのプロセスを終了して再起動しようとすると (ダウンストリームの MySQL/MariaDBサーバーまたはDrainerは含みません)、 Pump はDrainerに接続できず、 Drainerがまだ「オンライン」であると認識するため、起動を拒否します。
この問題には 3 つの解決策があります。
プロセスを強制終了する代わりに、
binlogctl使用してDrainer を停止します。./binlogctl --pd-urls=http://127.0.0.1:2379 --cmd=drainers ./binlogctl --pd-urls=http://127.0.0.1:2379 --cmd=offline-drainer --node-id=localhost.localdomain:8249Pumpを起動する前にDrainerを起動してください。
PD を起動した後 (ただし、 DrainerとPump を起動する前) に
binlogctl使用して、一時停止中のDrainerの状態を更新します。./binlogctl --pd-urls=http://127.0.0.1:2379 --cmd=update-drainer --node-id=localhost.localdomain:8249 --state=offline
掃除
TiDB クラスターと TiDB Binlogプロセスを停止するには、クラスターを構成するすべてのプロセス (pd-server、tikv-server、pump、tidb-server、 drainer) を開始したシェルでpkill -P $$実行します。各コンポーネントがクリーンにシャットダウンするのに十分な時間を与えるには、特定の順序で停止すると便利です。
for p in tidb-server drainer pump tikv-server pd-server; do pkill "$p"; sleep 1; done
期待される出力:
kolbe@localhost tidb-latest-linux-amd64]$ for p in tidb-server drainer pump tikv-server pd-server; do pkill "$p"; sleep 1; done
[4]-  Done                    ./bin/tidb-server --config=tidb.toml &>tidb.out
[5]+  Done                    ./drainer --config=drainer.toml &>drainer.out
[3]+  Done                    ./pump --config=pump.toml &>pump.out
[2]+  Done                    ./bin/tikv-server --config=tikv.toml &>tikv.out
[1]+  Done                    ./bin/pd-server --config=pd.toml &>pd.out
すべてのサービスが終了した後にクラスターを再起動する場合は、サービスを開始するために最初に実行したのと同じコマンドを使用します。上記のbinlogctlセクションで説明したように、 pump前にdrainer 、 tidb-server前にpump開始する必要があります。
./bin/pd-server --config=pd.toml &>pd.out &
./bin/tikv-server --config=tikv.toml &>tikv.out &
./drainer --config=drainer.toml &>drainer.out &
sleep 3
./pump --config=pump.toml &>pump.out &
sleep 3
./bin/tidb-server --config=tidb.toml &>tidb.out &
いずれかのコンポーネントが起動に失敗した場合は、失敗した個々のコンポーネントを再起動してください。
結論
このチュートリアルでは、単一のPumpと単一のDrainerを備えたクラスターを使用して、TiDB クラスターから下流の MariaDBサーバーにレプリケートするように TiDB Binlogを設定しました。これまで見てきたように、TiDB Binlog はTiDB クラスターへの変更をキャプチャして処理するための包括的なプラットフォームです。
より堅牢な開発、テスト、または本番の展開では、高可用性とスケーリングのために複数の TiDB サーバーを用意し、複数のPumpインスタンスを使用して、TiDBサーバーインスタンスへのアプリケーション トラフィックがPumpクラスターの問題の影響を受けないようにします。また、追加のDrainerインスタンスを使用して、さまざまなダウンストリーム プラットフォームに更新をプッシュしたり、増分バックアップを実装したりすることもできます。