DR Solution Based on Primary and Secondary Clusters
Disaster recovery (DR) based on primary and secondary databases is a common solution. In this solution, the DR system has a primary cluster and a secondary cluster. The primary cluster handles user requests, while the secondary cluster backs up data from the primary cluster. When the primary cluster fails, the secondary cluster takes over services and continues to provide services using the backup data. This ensures that the business system continues to run normally without any interruptions caused by a failure.
The primary-secondary DR solution has the following benefits:
- High availability: The primary-secondary architecture enhances system availability, ensuring fast recovery from any failure.
- Fast switchover: When the primary cluster fails, the system can quickly switch to the secondary cluster and continue to provide services.
- Data consistency: The secondary cluster backs up the data from the primary cluster in almost real time. In this way, the data is basically up-to-date when the system switches to the secondary cluster due to a failure.
This document includes the following contents:
- Set up a primary cluster and a secondary cluster.
- Replicate data from the primary cluster to the secondary cluster.
- Monitor the clusters.
- Perform a DR switchover.
Meanwhile, this document also describes how to query business data on the secondary cluster and how to perform bidirectional replication between the primary and secondary clusters.
Set up primary and secondary clusters based on TiCDC
Architecture
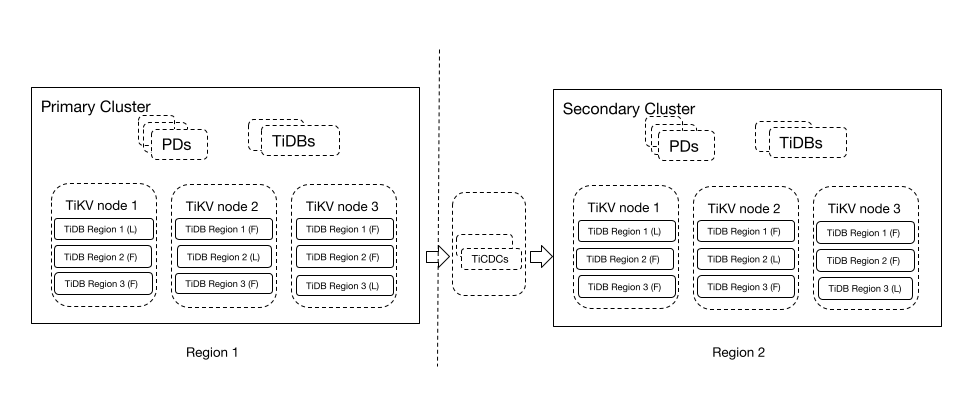
The preceding architecture includes two TiDB clusters: a primary cluster and a secondary cluster.
- Primary cluster: The active cluster that runs in region 1 and has three replicas. This cluster handles read and write requests.
- Secondary cluster: The standby cluster that runs in region 2 and replicates data from the primary cluster through TiCDC.
This DR architecture is simple and easy to use. Being capable of tolerating regional failures, the DR system guarantees that the write performance of the primary cluster does not deteriorate, and the secondary cluster can handle some read-only business that is not latency-sensitive. The Recovery Point Objective (RPO) of this solution is in seconds, and the Recovery Time Objective (RTO) can be minutes or even lower. This is a solution recommended by many database vendors for important production systems.
Set up primary and secondary clusters
In this document, the TiDB primary and secondary clusters are deployed in two different regions (region 1 and region 2). TiCDC is deployed together with the secondary cluster, because there is a certain network latency between the primary and secondary clusters. Deploying TiCDC with the secondary cluster can avoid the impact of network latency, which helps achieve optimal replication performance. The deployment topology of the example provided in this document is as follows (one component node is deployed on one server):
| Region | Host | Cluster | Component |
|---|---|---|---|
| Region 1 | 10.0.1.9 | Primary | Monitor, Grafana, or AlterManager |
| Region 2 | 10.0.1.11 | Secondary | Monitor, Grafana, or AlterManager |
| Region 1 | 10.0.1.1/10.0.1.2/10.0.1.3 | Primary | PD |
| Region 2 | 10.1.1.1/10.1.1.2/10.1.1.3 | Secondary | PD |
| Region 2 | 10.1.1.9/10.1.1.10 | Primary | TiCDC |
| Region 1 | 10.0.1.4/10.0.1.5 | Primary | TiDB |
| Region 2 | 10.1.1.4/10.1.1.5 | Secondary | TiDB |
| Region 1 | 10.0.1.6/10.0.1.7/10.0.1.8 | Primary | TiKV |
| Region 2 | 10.1.1.6/10.1.1.7/10.1.1.8 | Secondary | TiKV |
For server configurations, see the following documents:
For details about how to deploy TiDB primary and secondary clusters, see Deploy a TiDB cluster.
When deploying TiCDC, note that the secondary cluster and TiCDC must be deployed and managed together, and the network between them must be connected.
To deploy TiCDC on an existing primary cluster, see Deploy TiCDC.
To deploy a new primary cluster and TiCDC, use the following deployment template and modify the configuration parameters as needed:
global: user: "tidb" ssh_port: 22 deploy_dir: "/tidb-deploy" data_dir: "/tidb-data" server_configs: {} pd_servers: - host: 10.0.1.1 - host: 10.0.1.2 - host: 10.0.1.3 tidb_servers: - host: 10.0.1.4 - host: 10.0.1.5 tikv_servers: - host: 10.0.1.6 - host: 10.0.1.7 - host: 10.0.1.8 monitoring_servers: - host: 10.0.1.9 grafana_servers: - host: 10.0.1.9 alertmanager_servers: - host: 10.0.1.9 cdc_servers: - host: 10.1.1.9 gc-ttl: 86400 data_dir: "/cdc-data" ticdc_cluster_id: "DR_TiCDC" - host: 10.1.1.10 gc-ttl: 86400 data_dir: "/cdc-data" ticdc_cluster_id: "DR_TiCDC"
Replicate data from the primary cluster to the secondary cluster
After setting up the TiDB primary and secondary clusters, first migrate the data from the primary cluster to the secondary cluster, and then create a replication task to replicate real-time change data from the primary cluster to the secondary cluster.
Select an external storage
An external storage is used when migrating data and replicating real-time change data. Amazon S3 is a recommended choice. If the TiDB cluster is deployed in a self-built data center, the following methods are recommended:
- Build MinIO as the backup storage system, and use the S3 protocol to back up data to MinIO.
- Mount Network File System (NFS, such as NAS) disks to br command-line tool, TiKV, and TiCDC instances, and use the POSIX file system interface to write backup data to the corresponding NFS directory.
The following example uses MinIO as the storage system and is for reference only. Note that you need to prepare a separate server to deploy MinIO in region 1 or region 2.
wget https://dl.min.io/server/minio/release/linux-amd64/minio
chmod +x minio
# Configure access-key and access-secret-id to access MinIO
export HOST_IP='10.0.1.10' # Replace it with the IP address of MinIO
export MINIO_ROOT_USER='minio'
export MINIO_ROOT_PASSWORD='miniostorage'
# Create the redo and backup directories. `backup` and `redo` are bucket names.
mkdir -p data/redo
mkdir -p data/backup
# Start minio at port 6060
nohup ./minio server ./data --address :6060 &
The preceding command starts a MinIO server on one node to simulate Amazon S3 services. Parameters in the command are configured as follows:
endpoint:http://10.0.1.10:6060/access-key:miniosecret-access-key:miniostoragebucket:redo/backup
The link is as follows:
s3://backup?access-key=minio&secret-access-key=miniostorage&endpoint=http://10.0.1.10:6060&force-path-style=true
Migrate data
Use the backup and restore feature to migrate data from the primary cluster to the secondary cluster.
Disable GC. To ensure that newly written data is not deleted during incremental migration, you should disable GC for the upstream cluster before backup. In this way, history data is not deleted.
Execute the following statement to disable GC:
SET GLOBAL tidb_gc_enable=FALSE;To verify that the change takes effect, query the value of
tidb_gc_enable:SELECT @@global.tidb_gc_enable;If the value is
0, it means that GC is disabled:+-------------------------+ | @@global.tidb_gc_enable | +-------------------------+ | 0 | +-------------------------+ 1 row in set (0.00 sec)Back up data. Execute the
BACKUPstatement in the upstream cluster to back up data:BACKUP DATABASE * TO '`s3://backup?access-key=minio&secret-access-key=miniostorage&endpoint=http://10.0.1.10:6060&force-path-style=true`';+----------------------+----------+--------------------+---------------------+---------------------+ | Destination | Size | BackupTS | Queue Time | Execution Time | +----------------------+----------+--------------------+---------------------+---------------------+ | s3://backup | 10315858 | 431434047157698561 | 2022-02-25 19:57:59 | 2022-02-25 19:57:59 | +----------------------+----------+--------------------+---------------------+---------------------+ 1 row in set (2.11 sec)After the
BACKUPstatement is executed, TiDB returns metadata about the backup data. Pay attention toBackupTS, because data generated before it is backed up. In this document,BackupTSis used as the start of incremental migration.Restore data. Execute the
RESTOREstatement in the secondary cluster to restore data:RESTORE DATABASE * FROM '`s3://backup?access-key=minio&secret-access-key=miniostorage&endpoint=http://10.0.1.10:6060&force-path-style=true`';+----------------------+----------+----------+---------------------+---------------------+ | Destination | Size | BackupTS | Queue Time | Execution Time | +----------------------+----------+----------+---------------------+---------------------+ | s3://backup | 10315858 | 0 | 2022-02-25 20:03:59 | 2022-02-25 20:03:59 | +----------------------+----------+----------+---------------------+---------------------+ 1 row in set (41.85 sec)
Replicate incremental data
After migrating data as described in the preceding section, you can replicate incremental data from the primary cluster to the secondary cluster starting from the BackupTS.
Create a changefeed.
Create a changefeed configuration file
changefeed.toml.[consistent] # eventual consistency: redo logs are used to ensure eventual consistency in disaster scenarios. level = "eventual" # The size of a single redo log, in MiB. The default value is 64, and the recommended value is less than 128. max-log-size = 64 # The interval for refreshing or uploading redo logs to Amazon S3, in milliseconds. The default value is 1000, and the recommended value range is 500-2000. flush-interval = 2000 # The path where redo logs are saved. storage = "s3://redo?access-key=minio&secret-access-key=miniostorage&endpoint=http://10.0.1.10:6060&force-path-style=true"In the primary cluster, run the following command to create a changefeed from the primary to the secondary cluster:
tiup cdc cli changefeed create --server=http://10.1.1.9:8300 \
--sink-uri="mysql://{username}:{password}@10.1.1.4:4000" \
--changefeed-id="dr-primary-to-secondary" --start-ts="431434047157698561"
For more information about the changefeed configurations, see TiCDC Changefeed Configurations.
To check whether a changefeed task runs properly, run the
changefeed querycommand. The query result includes the task information and the task state. You can specify the--simpleor-sargument to display only the basic replication state and the checkpoint information. If you do not specify this argument, the output includes detailed task configuration, replication state, and replication table information.tiup cdc cli changefeed query -s --server=http://10.1.1.9:8300 --changefeed-id="dr-primary-to-secondary"{ "state": "normal", "tso": 431434047157998561, # The TSO to which the changefeed has been replicated "checkpoint": "2020-08-27 10:12:19.579", # The physical time corresponding to the TSO "error": null }Enable GC.
TiCDC ensures that history data is not garbage collected before it is replicated. Therefore, after creating a changefeed from the primary cluster to the secondary cluster, you can execute the following statement to enable GC again.
Execute the following statement to enable GC:
SET GLOBAL tidb_gc_enable=TRUE;To verify that the change takes effect, query the value of
tidb_gc_enable:SELECT @@global.tidb_gc_enable;If the value is
1, it means that GC is enabled:+-------------------------+ | @@global.tidb_gc_enable | +-------------------------+ | 1 | +-------------------------+ 1 row in set (0.00 sec)
Monitor the primary and secondary clusters
Currently, no DR dashboard is available in TiDB. You can check the status of TiDB primary and secondary clusters using the following dashboards and decide whether to perform a DR switchover:
Perform DR switchover
This section describes how to perform a planned DR switchover, a DR switchover upon disasters, and the steps to rebuild a secondary cluster.
Planned primary and secondary switchover
It is important to conduct regular DR drills for critical business systems to test their reliability. The following are the recommended steps for DR drills. Note that simulated business writes and usage of proxy services to access databases are not considered, and therefore the steps might differ from actual application scenarios. You can modify the configurations as required.
Stop business writes on the primary cluster.
After there are no more writes, query the latest TSO (
Position) of the TiDB cluster:mysql> show master status; +-------------+--------------------+--------------+------------------+-------------------+ | File | Position | Binlog_Do_DB | Binlog_Ignore_DB | Executed_Gtid_Set | +-------------+--------------------+--------------+------------------+-------------------+ | tidb-binlog | 438223974697009153 | | | | +-------------+--------------------+--------------+------------------+-------------------+ 1 row in set (0.33 sec)Poll the changefeed
dr-primary-to-secondaryuntil it meets the conditionTSO >= Position.tiup cdc cli changefeed query -s --server=http://10.1.1.9:8300 --changefeed-id="dr-primary-to-secondary" { "state": "normal", "tso": 438224029039198209, # The TSO to which the changefeed has been replicated "checkpoint": "2022-12-22 14:53:25.307", # The physical time corresponding to the TSO "error": null }Stop the changefeed
dr-primary-to-secondary. You can pause the changefeed by removing it:tiup cdc cli changefeed remove --server=http://10.1.1.9:8300 --changefeed-id="dr-primary-to-secondary"Create a changefeed
dr-secondary-to-primarywithout specifying thestart-tsparameter. The changefeed starts replicating data from the current time.Modify the database access configurations of business applications. Restart the business applications so that they can access the secondary cluster.
Check whether the business applications are running normally.
You can restore the previous primary and secondary cluster configurations by repeating the preceding steps.
Primary and secondary switchover upon disasters
When a disaster occurs, for example, power outage in the region where the primary cluster locates, the replication between the primary and secondary clusters might be interrupted suddenly. As a result, the data in the secondary cluster is inconsistent with the primary cluster.
Restore the secondary cluster to a transaction-consistent state. Specifically, run the following command on any TiCDC node in region 2 to apply the redo log to the secondary cluster:
tiup cdc redo apply --storage "s3://redo?access-key=minio&secret-access-key=miniostorage&endpoint=http://10.0.1.10:6060&force-path-style=true" --tmp-dir /tmp/redo --sink-uri "mysql://{username}:{password}@10.1.1.4:4000"The descriptions of parameters in this command are as follows:
--storage: The path where redo logs are stored in Amazon S3--tmp-dir: The cache directory for downloading redo logs from Amazon S3--sink-uri: The address of the secondary cluster
Modify the database access configurations of business applications. Restart the business applications so that they can access the secondary cluster.
Check whether the business applications are running normally.
Rebuild the primary and secondary clusters
After the disaster encountered by the primary cluster is resolved or the primary cluster cannot be recovered temporarily, the TiDB cluster is fragile because only the secondary cluster is in service as the primary cluster. To maintain the reliability of the system, you need to rebuild the DR cluster.
To rebuild the TiDB primary and secondary clusters, you can deploy a new cluster to form a new DR system. For details, see the following documents:
- Set up primary and secondary clusters
- Replicate data from the primary cluster to the secondary cluster
- After the preceding steps are completed, to make the new primary cluster, see Primary and secondary switchover.
Query business data on the secondary cluster
In a primary-secondary DR scenario, it is common that the secondary cluster is used as a read-only cluster to run some latency-insensitive queries. TiDB also provides this feature by its primary-secondary DR solution.
When creating the changefeed, enable the Syncpoint feature in the configuration file. Then the changefeed periodically (at sync-point-interval) sets the consistent snapshot point that has been replicated to the secondary cluster by executing SET GLOBAL tidb_external_ts = @@tidb_current_ts on the secondary cluster.
To query data from the secondary cluster, configure SET GLOBAL|SESSION tidb_enable_external_ts_read = ON; in the business application. Then you can get the data that is transactionally consistent with the primary cluster.
# Starting from v6.4.0, only the changefeed with the SYSTEM_VARIABLES_ADMIN or SUPER privilege can use the TiCDC Syncpoint feature.
enable-sync-point = true

# Specifies the interval at which Syncpoint aligns the primary and secondary snapshots. It also indicates the maximum latency at which you can read the complete transaction, for example, read the transaction data generated on the primary cluster two minutes ago from the secondary cluster.
# The format is in h m s. For example, "1h30m30s". The default value is "10m" and the minimum value is "30s".
sync-point-interval = "10m"

# Specifies how long the data is retained by Syncpoint in the downstream table. When this duration is exceeded, the data is cleaned up.
# The format is in h m s. For example, "24h30m30s". The default value is "24h".
sync-point-retention = "1h"

[consistent]
# eventual consistency: redo logs are used to ensure eventual consistency in disaster scenarios.
level = "eventual"
# The size of a single redo log, in MiB. The default value is 64, and the recommended value is less than 128.
max-log-size = 64
# Interval for refreshing or uploading redo logs to Amazon S3, in milliseconds. The default value is 1000, and the recommended value range is 500-2000.
flush-interval = 2000
# The path where redo logs are saved.
storage = "s3://redo?access-key=minio&secret-access-key=miniostorage&endpoint=http://10.0.1.10:6060&force-path-style=true"
Perform bidirectional replication between the primary and secondary clusters
In this DR scenario, the TiDB clusters in two regions can act as each other's disaster recovery clusters: the business traffic is written to the corresponding TiDB cluster based on the region configuration, and the two TiDB clusters back up each other's data.

With the bidirectional replication feature, the TiDB clusters in two regions can replicate each other's data. This DR solution guarantees data security and reliability, and also ensures the write performance of the database. In a planned DR switchover, you do not need to stop the running changefeeds before starting a new changefeed, which simplifies the operation and maintenance.
To build a bidirectional DR cluster, see TiCDC bidirectional replication.
Troubleshooting
If you encounter any problem in the preceding steps, you can first find the solution to the problem in TiDB FAQs. If the problem is not resolved, you can report an issue on GitHub.