Placement Rules
Placement Rules is an experimental feature of the Placement Driver (PD) introduced in v4.0. It is a replica rule system that guides PD to generate corresponding schedules for different types of data. By combining different scheduling rules, you can finely control the attributes of any continuous data range, such as the number of replicas, the storage location, the host type, whether to participate in Raft election, and whether to act as the Raft leader.
The Placement Rules feature is enabled by default in v5.0 and later versions of TiDB. To disable it, refer to Disable Placement Rules.
Rule system
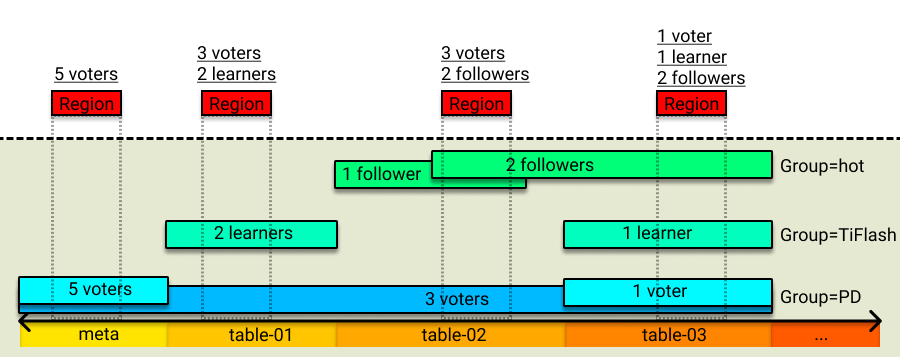
The configuration of the whole rule system consists of multiple rules. Each rule can specify attributes such as the number of replicas, the Raft role, the placement location, and the key range in which this rule takes effect. When PD is performing schedule, it first finds the rule corresponding to the Region in the rule system according to the key range of the Region, and then generates the corresponding schedule to make the distribution of the Region replica comply with the rule.
The key ranges of multiple rules can have overlapping parts, which means that a Region can match multiple rules. In this case, PD decides whether the rules overwrite each other or take effect at the same time according to the attributes of rules. If multiple rules take effect at the same time, PD will generate schedules in sequence according to the stacking order of the rules for rule matching.
In addition, to meet the requirement that rules from different sources are isolated from each other, these rules can be organized in a more flexible way. Therefore, the concept of "Group" is introduced. Generally, users can place rules in different groups according to different sources.
Rule fields
The following table shows the meaning of each field in a rule:
| Field name | Type and restriction | Description |
|---|---|---|
GroupID | string | The group ID that marks the source of the rule. |
ID | string | The unique ID of a rule in a group. |
Index | int | The stacking sequence of rules in a group. |
Override | true/false | Whether to overwrite rules with smaller index (in a group). |
StartKey | string, in hexadecimal form | Applies to the starting key of a range. |
EndKey | string, in hexadecimal form | Applies to the ending key of a range. |
Role | string | Replica roles, including voter/leader/follower/learner. |
Count | int, positive integer | The number of replicas. |
LabelConstraint | []Constraint | Filters nodes based on the label. |
LocationLabels | []string | Used for physical isolation. |
IsolationLevel | string | Used to set the minimum physical isolation level |
LabelConstraint is similar to the function in Kubernetes that filters labels based on these four primitives: in, notIn, exists, and notExists. The meanings of these four primitives are as follows:
in: the label value of the given key is included in the given list.notIn: the label value of the given key is not included in the given list.exists: includes the given label key.notExists: does not include the given label key.
The meaning and function of LocationLabels are the same with those earlier than v4.0. For example, if you have deployed [zone,rack,host] that defines a three-layer topology: the cluster has multiple zones (Availability Zones), each zone has multiple racks, and each rack has multiple hosts. When performing schedule, PD first tries to place the Region's peers in different zones. If this try fails (such as there are three replicas but only two zones in total), PD guarantees to place these replicas in different racks. If the number of racks is not enough to guarantee isolation, then PD tries the host-level isolation.
The meaning and function of IsolationLevel is elaborated in Cluster topology configuration. For example, if you have deployed [zone,rack,host] that defines a three-layer topology with LocationLabels and set IsolationLevel to zone, then PD ensures that all peers of each Region are placed in different zones during the scheduling. If the minimum isolation level restriction on IsolationLevel cannot be met (for example, 3 replicas are configured but there are only 2 data zones in total), PD will not try to make up to meet this restriction. The default value of IsolationLevel is an empty string, which means that it is disabled.
Fields of the rule group
The following table shows the description of each field in a rule group:
| Field name | Type and restriction | Description |
|---|---|---|
ID | string | The group ID that marks the source of the rule. |
Index | int | The stacking sequence of different groups. |
Override | true/false | Whether to override groups with smaller indexes. |
Configure rules
The operations in this section are based on pd-ctl, and the commands involved in the operations also support calls via HTTP API.
Enable Placement Rules
The Placement Rules feature is enabled by default in v5.0 and later versions of TiDB. To disable it, refer to Disable Placement Rules. To enable this feature after it has been disabled, you can modify the PD configuration file as follows before initializing the cluster:
[replication]
enable-placement-rules = true
In this way, PD enables this feature after the cluster is successfully bootstrapped and generates corresponding rules according to the max-replicas and location-labels configurations:
{
  "group_id": "pd",
  "id": "default",
  "start_key": "",
  "end_key": "",
  "role": "voter",
  "count": 3,
  "location_labels": ["zone", "rack", "host"],
  "isolation_level": ""
}
For a bootstrapped cluster, you can also enable Placement Rules online through pd-ctl:
pd-ctl config placement-rules enable
PD also generates default rules based on the max-replicas and location-labels configurations.
Disable Placement Rules
You can use pd-ctl to disable the Placement Rules feature and switch to the previous scheduling strategy.
pd-ctl config placement-rules disable
Set rules using pd-ctl
pd-ctl supports using the following methods to view rules in the system, and the output is a JSON-format rule or a rule list.
To view the list of all rules:
pd-ctl config placement-rules showTo view the list of all rules in a PD Group:
pd-ctl config placement-rules show --group=pdTo view the rule of a specific ID in a Group:
pd-ctl config placement-rules show --group=pd --id=defaultTo view the rule list that matches a Region:
pd-ctl config placement-rules show --region=2In the above example,
2is the Region ID.
Adding rules and editing rules are similar. You need to write the corresponding rules into a file and then use the save command to save the rules to PD:
cat > rules.json <<EOF
[
    {
        "group_id": "pd",
        "id": "rule1",
        "role": "voter",
        "count": 3,
        "location_labels": ["zone", "rack", "host"]
    },
    {
        "group_id": "pd",
        "id": "rule2",
        "role": "voter",
        "count": 2,
        "location_labels": ["zone", "rack", "host"]
    }
]
EOF
pd-ctl config placement save --in=rules.json
The above operation writes rule1 and rule2 to PD. If a rule with the same GroupID + ID already exists in the system, this rule is overwritten.
To delete a rule, you only need to set the count of the rule to 0, and the rule with the same GroupID + ID will be deleted. The following command deletes the pd / rule2 rule:
cat > rules.json <<EOF
[
    {
        "group_id": "pd",
        "id": "rule2"
    }
]
EOF
pd-ctl config placement save --in=rules.json
Use pd-ctl to configure rule groups
To view the list of all rule groups:
pd-ctl config placement-rules rule-group showTo view the rule group of a specific ID:
pd-ctl config placement-rules rule-group show pdTo set the
indexandoverrideattributes of the rule group:pd-ctl config placement-rules rule-group set pd 100 trueTo delete the configuration of a rule group (use the default group configuration if there is any rule in the group):
pd-ctl config placement-rules rule-group delete pd
Use pd-ctl to batch update groups and rules in groups
To view and modify the rule groups and all rules in the groups at the same time, execute the rule-bundle subcommand.
In this subcommand, get {group_id} is used to query a group, and the output result shows the rule group and rules of the group in a nested form:
pd-ctl config placement-rules rule-bundle get pd
The output of the above command:
{
  "group_id": "pd",
  "group_index": 0,
  "group_override": false,
  "rules": [
    {
      "group_id": "pd",
      "id": "default",
      "start_key": "",
      "end_key": "",
      "role": "voter",
      "count": 3
    }
  ]
}
To write the output to a file, add the --out argument to the rule-bundle get subcommand, which is convenient for subsequent modification and saving.
pd-ctl config placement-rules rule-bundle get pd --out="group.json"
After the modification is finished, you can use the rule-bundle set subcommand to save the configuration in the file to the PD server. Unlike the save command described in Set rules using pd-ctl, this command replaces all the rules of this group on the server side.
pd-ctl config placement-rules rule-bundle set pd --in="group.json"
Use pd-ctl to view and modify all configurations
You can also view and modify all configuration using pd-ctl. To do that, save all configuration to a file, edit the configuration file, and then save the file to the PD server to overwrite the previous configuration. This operation also uses the rule-bundle subcommand.
For example, to save all configuration to the rules.json file, execute the following command:
pd-ctl config placement-rules rule-bundle load --out="rules.json"
After editing the file, execute the following command to save the configuration to the PD server:
pd-ctl config placement-rules rule-bundle save --in="rules.json"
Use tidb-ctl to query the table-related key range
If you need special configuration for metadata or a specific table, you can execute the keyrange command in tidb-ctl to query related keys. Remember to add --encode at the end of the command.
tidb-ctl keyrange --database test --table ttt --encode
global ranges:
  meta: (6d00000000000000f8, 6e00000000000000f8)
  table: (7400000000000000f8, 7500000000000000f8)
table ttt ranges: (NOTE: key range might be changed after DDL)
  table: (7480000000000000ff2d00000000000000f8, 7480000000000000ff2e00000000000000f8)
  table indexes: (7480000000000000ff2d5f690000000000fa, 7480000000000000ff2d5f720000000000fa)
    index c2: (7480000000000000ff2d5f698000000000ff0000010000000000fa, 7480000000000000ff2d5f698000000000ff0000020000000000fa)
    index c3: (7480000000000000ff2d5f698000000000ff0000020000000000fa, 7480000000000000ff2d5f698000000000ff0000030000000000fa)
    index c4: (7480000000000000ff2d5f698000000000ff0000030000000000fa, 7480000000000000ff2d5f698000000000ff0000040000000000fa)
  table rows: (7480000000000000ff2d5f720000000000fa, 7480000000000000ff2e00000000000000f8)
Typical usage scenarios
This section introduces the typical usage scenarios of Placement Rules.
Scenario 1: Use three replicas for normal tables and five replicas for the metadata to improve cluster disaster tolerance
You only need to add a rule that limits the key range to the range of metadata, and set the value of count to 5. Here is an example of this rule:
{
  "group_id": "pd",
  "id": "meta",
  "index": 1,
  "override": true,
  "start_key": "6d00000000000000f8",
  "end_key": "6e00000000000000f8",
  "role": "voter",
  "count": 5,
  "location_labels": ["zone", "rack", "host"]
}
Scenario 2: Place five replicas in three data centers in the proportion of 2:2:1, and the Leader should not be in the third data center
Create three rules. Set the number of replicas to 2, 2, and 1 respectively. Limit the replicas to the corresponding data centers through label_constraints in each rule. In addition, change role to follower for the data center that does not need a Leader.
[
    {
        "group_id": "pd",
        "id": "zone1",
        "start_key": "",
        "end_key": "",
        "role": "voter",
        "count": 2,
        "label_constraints": [
            {"key": "zone", "op": "in", "values": ["zone1"]}
        ],
        "location_labels": ["rack", "host"]
    },
    {
        "group_id": "pd",
        "id": "zone2",
        "start_key": "",
        "end_key": "",
        "role": "voter",
        "count": 2,
        "label_constraints": [
            {"key": "zone", "op": "in", "values": ["zone2"]}
        ],
        "location_labels": ["rack", "host"]
    },
    {
        "group_id": "pd",
        "id": "zone3",
        "start_key": "",
        "end_key": "",
        "role": "follower",
        "count": 1,
        "label_constraints": [
            {"key": "zone", "op": "in", "values": ["zone3"]}
        ],
        "location_labels": ["rack", "host"]
    }
]
Scenario 3: Add two TiFlash replicas for a table
Add a separate rule for the row key of the table and limit count to 2. Use label_constraints to ensure that the replicas are generated on the node of engine = tiflash. Note that a separate group_id is used here to ensure that this rule does not overlap or conflict with rules from other sources in the system.
{
  "group_id": "tiflash",
  "id": "learner-replica-table-ttt",
  "start_key": "7480000000000000ff2d5f720000000000fa",
  "end_key": "7480000000000000ff2e00000000000000f8",
  "role": "learner",
  "count": 2,
  "label_constraints": [
    {"key": "engine", "op": "in", "values": ["tiflash"]}
  ],
  "location_labels": ["host"]
}
Scenario 4: Add two follower replicas for a table in the Beijing node with high-performance disks
The following example shows a more complicated label_constraints configuration. In this rule, the replicas must be placed in the bj1 or bj2 machine room, and the disk type must not be hdd.
{
  "group_id": "follower-read",
  "id": "follower-read-table-ttt",
  "start_key": "7480000000000000ff2d00000000000000f8",
  "end_key": "7480000000000000ff2e00000000000000f8",
  "role": "follower",
  "count": 2,
  "label_constraints": [
    {"key": "zone", "op": "in", "values": ["bj1", "bj2"]},
    {"key": "disk", "op": "notIn", "values": ["hdd"]}
  ],
  "location_labels": ["host"]
}
Scenario 5: Migrate a table to the nodes with SSD disks
Different from scenario 3, this scenario is not to add new replica(s) on the basis of the existing configuration, but to forcibly override the other configuration of a data range. So you need to specify an index value large enough and set override to true in the rule group configuration to override the existing rule.
The rule:
{
  "group_id": "ssd-override",
  "id": "ssd-table-45",
  "start_key": "7480000000000000ff2d5f720000000000fa",
  "end_key": "7480000000000000ff2e00000000000000f8",
  "role": "voter",
  "count": 3,
  "label_constraints": [
    {"key": "disk", "op": "in", "values": ["ssd"]}
  ],
  "location_labels": ["rack", "host"]
}
The rule group:
{
  "id": "ssd-override",
  "index": 1024,
  "override": true,
}