- About TiDB
- Quick Start
- Deploy
- Software and Hardware Requirements
- Environment Configuration Checklist
- Topology Patterns
- Install and Start
- Verify Cluster Status
- Migrate
- Overview
- Migrate from MySQL
- Migrate from CSV Files
- Migrate from SQL Files
- Maintain
- Upgrade
- Scale
- Backup and Restore
- Use BR Tool (Recommended)
- Use Dumpling and TiDB Lightning (Recommended)
- Read Historical Data
- Configure Time Zone
- Daily Checklist
- Maintain TiFlash
- Maintain TiDB Using TiUP
- Modify Configuration Online
- Monitor and Alert
- Troubleshoot
- TiDB Troubleshooting Map
- Identify Slow Queries
- Analyze Slow Queries
- SQL Diagnostics
- Identify Expensive Queries
- Statement Summary Tables
- Troubleshoot Hotspot Issues
- Troubleshoot Increased Read and Write Latency
- Troubleshoot Cluster Setup
- Troubleshoot High Disk I/O Usage
- Troubleshoot Lock Conflicts
- Troubleshoot TiFlash
- Troubleshoot Write Conflicts in Optimistic Transactions
- Performance Tuning
- System Tuning
- Software Tuning
- SQL Tuning
- Overview
- Understanding the Query Execution Plan
- SQL Optimization Process
- Overview
- Logic Optimization
- Physical Optimization
- Prepare Execution Plan Cache
- Control Execution Plans
- Tutorials
- TiDB Ecosystem Tools
- Reference
- Cluster Architecture
- Key Monitoring Metrics
- Secure
- Privileges
- SQL
- SQL Language Structure and Syntax
- SQL Statements
ADD COLUMN
ADD INDEX
ADMIN
ADMIN CANCEL DDL
ADMIN CHECKSUM TABLE
ADMIN CHECK [TABLE|INDEX]
ADMIN SHOW DDL [JOBS|QUERIES]
ALTER DATABASE
ALTER INDEX
ALTER INSTANCE
ALTER TABLE
ALTER USER
ANALYZE TABLE
BACKUP
BEGIN
CHANGE COLUMN
COMMIT
CHANGE DRAINER
CHANGE PUMP
CREATE [GLOBAL|SESSION] BINDING
CREATE DATABASE
CREATE INDEX
CREATE ROLE
CREATE SEQUENCE
CREATE TABLE LIKE
CREATE TABLE
CREATE USER
CREATE VIEW
DEALLOCATE
DELETE
DESC
DESCRIBE
DO
DROP [GLOBAL|SESSION] BINDING
DROP COLUMN
DROP DATABASE
DROP INDEX
DROP ROLE
DROP SEQUENCE
DROP STATS
DROP TABLE
DROP USER
DROP VIEW
EXECUTE
EXPLAIN ANALYZE
EXPLAIN
FLASHBACK TABLE
FLUSH PRIVILEGES
FLUSH STATUS
FLUSH TABLES
GRANT <privileges>
GRANT <role>
INSERT
KILL [TIDB]
LOAD DATA
LOAD STATS
MODIFY COLUMN
PREPARE
RECOVER TABLE
RENAME INDEX
RENAME TABLE
REPLACE
RESTORE
REVOKE <privileges>
REVOKE <role>
ROLLBACK
SELECT
SET DEFAULT ROLE
SET [NAMES|CHARACTER SET]
SET PASSWORD
SET ROLE
SET TRANSACTION
SET [GLOBAL|SESSION] <variable>
SHOW ANALYZE STATUS
SHOW [BACKUPS|RESTORES]
SHOW [GLOBAL|SESSION] BINDINGS
SHOW BUILTINS
SHOW CHARACTER SET
SHOW COLLATION
SHOW [FULL] COLUMNS FROM
SHOW CONFIG
SHOW CREATE SEQUENCE
SHOW CREATE TABLE
SHOW CREATE USER
SHOW DATABASES
SHOW DRAINER STATUS
SHOW ENGINES
SHOW ERRORS
SHOW [FULL] FIELDS FROM
SHOW GRANTS
SHOW INDEX [FROM|IN]
SHOW INDEXES [FROM|IN]
SHOW KEYS [FROM|IN]
SHOW MASTER STATUS
SHOW PLUGINS
SHOW PRIVILEGES
SHOW [FULL] PROCESSSLIST
SHOW PROFILES
SHOW PUMP STATUS
SHOW SCHEMAS
SHOW STATS_HEALTHY
SHOW STATS_HISTOGRAMS
SHOW STATS_META
SHOW STATUS
SHOW TABLE NEXT_ROW_ID
SHOW TABLE REGIONS
SHOW TABLE STATUS
SHOW [FULL] TABLES
SHOW [GLOBAL|SESSION] VARIABLES
SHOW WARNINGS
SHUTDOWN
SPLIT REGION
START TRANSACTION
TRACE
TRUNCATE
UPDATE
USE
- Data Types
- Functions and Operators
- Overview
- Type Conversion in Expression Evaluation
- Operators
- Control Flow Functions
- String Functions
- Numeric Functions and Operators
- Date and Time Functions
- Bit Functions and Operators
- Cast Functions and Operators
- Encryption and Compression Functions
- Information Functions
- JSON Functions
- Aggregate (GROUP BY) Functions
- Window Functions
- Miscellaneous Functions
- Precision Math
- Set Operations
- List of Expressions for Pushdown
- Clustered Indexes
- Constraints
- Generated Columns
- SQL Mode
- Transactions
- Garbage Collection (GC)
- Views
- Partitioning
- Character Set and Collation
- System Tables
mysql
- INFORMATION_SCHEMA
- Overview
ANALYZE_STATUS
CHARACTER_SETS
CLUSTER_CONFIG
CLUSTER_HARDWARE
CLUSTER_INFO
CLUSTER_LOAD
CLUSTER_LOG
CLUSTER_SYSTEMINFO
COLLATIONS
COLLATION_CHARACTER_SET_APPLICABILITY
COLUMNS
DDL_JOBS
ENGINES
INSPECTION_RESULT
INSPECTION_RULES
INSPECTION_SUMMARY
KEY_COLUMN_USAGE
METRICS_SUMMARY
METRICS_TABLES
PARTITIONS
PROCESSLIST
SCHEMATA
SEQUENCES
SESSION_VARIABLES
SLOW_QUERY
STATISTICS
TABLES
TABLE_CONSTRAINTS
TABLE_STORAGE_STATS
TIDB_HOT_REGIONS
TIDB_INDEXES
TIDB_SERVERS_INFO
TIFLASH_REPLICA
TIKV_REGION_PEERS
TIKV_REGION_STATUS
TIKV_STORE_STATUS
USER_PRIVILEGES
VIEWS
METRICS_SCHEMA
- UI
- TiDB Dashboard
- Overview
- Maintain
- Access
- Overview Page
- Cluster Info Page
- Key Visualizer Page
- Metrics Relation Graph
- SQL Statements Analysis
- Slow Queries Page
- Cluster Diagnostics
- Search Logs Page
- Profile Instances Page
- FAQ
- TiDB Dashboard
- CLI
- Command Line Flags
- Configuration File Parameters
- System Variables
- Storage Engines
- TiUP
- Telemetry
- Errors Codes
- Table Filter
- Schedule Replicas by Topology Labels
- FAQs
- Glossary
- Release Notes
- All Releases
- TiDB Roadmap
- v5.0
- v4.0
- v3.1
- v3.0
- v2.1
- v2.0
- v1.0
Use BR to Back up and Restore Data
Backup & Restore (BR) is a command-line tool for distributed backup and restoration of the TiDB cluster data. Compared with dumpling
, BR is more suitable for scenarios of huge data volume. This document describes the BR command line, detailed use examples, best practices, restrictions, and introduces the implementation principles of BR.
Usage restrictions
BR only supports TiDB v3.1 and later versions.
BR supports restore on clusters of different topologies. However, the online applications will be greatly impacted during the restore operation. It is recommended that you perform restore during the off-peak hours or use
rate-limit
to limit the rate.It is recommended that you execute multiple backup operations serially. Otherwise, different backup operations might interfere with each other.
When BR restores data to the upstream cluster of TiCDC/Drainer, TiCDC/Drainer cannot replicate the restored data to the downstream.
BR supports operations only between clusters with the same
new_collations_enabled_on_first_bootstrap
value because BR only backs up KV data. If the cluster to be backed up and the cluster to be restored use different collations, the data validation fails. Therefore, before restoring a cluster, make sure that the switch value from the query result of theselect VARIABLE_VALUE from mysql.tidb where VARIABLE_NAME='new_collation_enabled';
statement is consistent with that during the backup process.For v3.1 clusters, the new collation framework is not supported, so you can see it as disabled.
For v4.0 clusters, check whether the new collation is enabled by executing
SELECT VARIABLE_VALUE FROM mysql.tidb WHERE VARIABLE_NAME='new_collation_enabled';
.For example, assume that data is backed up from a v3.1 cluster and will be restored to a v4.0 cluster. The
new_collation_enabled
value of the v4.0 cluster istrue
, which means that the new collation is enabled in the cluster to be restored when this cluster is created. If you perform the restore in this situation, an error might occur.
Recommended deployment configuration
- It is recommended that you deploy BR on the PD node.
- It is recommended that you mount a high-performance SSD to BR nodes and all TiKV nodes. A 10-gigabit network card is recommended. Otherwise, bandwidth is likely to be the performance bottleneck during the backup and restore process.
Note:
If you do not mount a network disk or use other shared storage, the data backed up by BR will be generated on each TiKV node. Because BR only backs up leader replicas, you should estimate the space reserved for each node based on the leader size.
Meanwhile, because TiDB v4.0 uses leader count for load balancing by default, leaders are greatly different in size, resulting in uneven distribution of backup data on each node.
Implementation principles
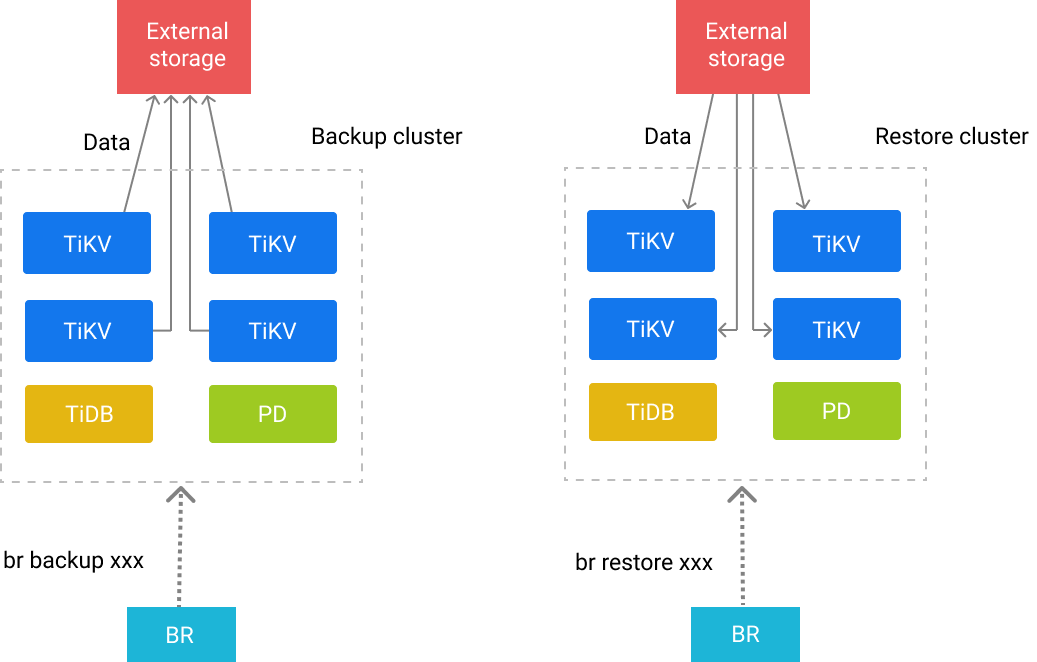
BR sends the backup or restoration commands to each TiKV node. After receiving these commands, TiKV performs the corresponding backup or restoration operations. Each TiKV node has a path in which the backup files generated in the backup operation are stored and from which the stored backup files are read during the restoration.
Backup principle
When BR performs a backup operation, it first obtains the following information from PD:
- The current TS (timestamp) as the time of the backup snapshot
- The TiKV node information of the current cluster
According to these information, BR starts a TiDB instance internally to obtain the database or table information corresponding to the TS, and filters out the system databases (information_schema
, performance_schema
, mysql
) at the same time.
According to the backup sub-command, BR adopts the following two types of backup logic:
- Full backup: BR traverses all the tables and constructs the KV range to be backed up according to each table.
- Single table backup: BR constructs the KV range to be backed up according a single table.
Finally, BR collects the KV range to be backed up and sends the complete backup request to the TiKV node of the cluster.
The structure of the request:
BackupRequest{
ClusterId, // The cluster ID.
StartKey, // The starting key of the backup (backed up).
EndKey, // The ending key of the backup (not backed up).
StartVersion, // The version of the last backup snapshot, used for the incremental backup.
EndVersion, // The backup snapshot time.
StorageBackend, // The path where backup files are stored.
RateLimit, // Backup speed (MB/s).
}
After receiving the backup request, the TiKV node traverses all Region leaders on the node to find the Regions that overlap with the KV ranges in this request. The TiKV node backs up some or all of the data within the range, and generates the corresponding SST file.
After finishing backing up the data of the corresponding Region, the TiKV node returns the metadata to BR. BR collects the metadata and stores it in the backupmeta
file which is used for restoration.
If StartVersion
is not 0
, the backup is seen as an incremental backup. In addition to KVs, BR also collects DDLs between [StartVersion, EndVersion)
. During data restoration, these DDLs are restored first.
If checksum is enabled when you execute the backup command, BR calculates the checksum of each backed up table for data check.
Types of backup files
Two types of backup files are generated in the path where backup files are stored:
- The SST file: stores the data that the TiKV node backed up.
- The
backupmeta
file: stores the metadata of this backup operation, including the number, the key range, the size, and the Hash (sha256) value of the backup files.
The format of the SST file name
The SST file is named in the format of storeID_regionID_regionEpoch_keyHash_cf
, where
storeID
is the TiKV node ID;regionID
is the Region ID;regionEpoch
is the version number of the Region;keyHash
is the Hash (sha256) value of the startKey of a range, which ensures the uniqueness of a key;cf
indicates the Column Family of RocksDB (default
orwrite
by default).
Restoration principle
During the data restoration process, BR performs the following tasks in order:
It parses the
backupmeta
file in the backup path, and then starts a TiDB instance internally to create the corresponding databases and tables based on the parsed information.It aggregates the parsed SST files according to the tables.
It pre-splits Regions according to the key range of the SST file so that every Region corresponds to at least one SST file.
It traverses each table to be restored and the SST file corresponding to each tables.
It finds the Region corresponding to the SST file and sends a request to the corresponding TiKV node for downloading the file. Then it sends a request for loading the file after the file is successfully downloaded.
After TiKV receives the request to load the SST file, TiKV uses the Raft mechanism to ensure the strong consistency of the SST data. After the downloaded SST file is loaded successfully, the file is deleted asynchronously.
After the restoration operation is completed, BR performs a checksum calculation on the restored data to compare the stored data with the backed up data.
How to use BR
Currently, you can use SQL statements or the command-line tool to back up and restore data.
Use SQL statements
TiDB v4.0.2 and later versions support backup and restore operations using SQL statements. For details, see the Backup syntax and the Restore syntax.
Use the command-line tool
Also, you can use the command-line tool to perform backup and restore. First, you need to download the binary file of the BR tool. For details, see download link.
The following section takes the command-line tool as an example to introduce how to perform backup and restore operations.
Command-line description
A br
command consists of sub-commands, options, and parameters.
- Sub-command: the characters without
-
or--
. - Option: the characters that start with
-
or--
. - Parameter: the characters that immediately follow behind and are passed to the sub-command or the option.
This is a complete br
command:
br backup full --pd "${PDIP}:2379" -s "local:///tmp/backup"
Explanations for the above command are as follows:
backup
: the sub-command ofbr
.full
: the sub-command ofbackup
.-s
(or--storage
): the option that specifies the path where the backup files are stored."local:///tmp/backup"
: the parameter of-s
./tmp/backup
is the path in the local disk where the backed up files of each TiKV node are stored.--pd
: the option that specifies the Placement Driver (PD) service address."${PDIP}:2379"
: the parameter of--pd
.
Note:
When the
local
storage is used, the backup data are scattered in the local file system of each node.It is not recommended to back up to a local disk in the production environment because you have to manually aggregate these data to complete the data restoration. For more information, see Restore Cluster Data.
Aggregating these backup data might cause redundancy and bring troubles to operation and maintenance. Even worse, if restoring data without aggregating these data, you can receive a rather confusing error message
SST file not found
.It is recommended to mount the NFS disk on each node, or back up to the
S3
object storage.
Sub-commands
A br
command consists of multiple layers of sub-commands. Currently, BR has the following three sub-commands:
br backup
: used to back up the data of the TiDB cluster.br restore
: used to restore the data of the TiDB cluster.
Each of the above three sub-commands might still include the following three sub-commands to specify the scope of an operation:
full
: used to back up or restore all the cluster data.db
: used to back up or restore the specified database of the cluster.table
: used to back up or restore a single table in the specified database of the cluster.
Common options
--pd
: used for connection, specifying the PD server address. For example,"${PDIP}:2379"
.-h
(or--help
): used to get help on all sub-commands. For example,br backup --help
.-V
(or--version
): used to check the version of BR.--ca
: specifies the path to the trusted CA certificate in the PEM format.--cert
: specifies the path to the SSL certificate in the PEM format.--key
: specifies the path to the SSL certificate key in the PEM format.--status-addr
: specifies the listening address through which BR provides statistics to Prometheus.
Back up cluster data
To back up the cluster data, use the br backup
command. You can add the full
or table
sub-command to specify the scope of your backup operation: the whole cluster or a single table.
If the BR version is earlier than v4.0.3, and the backup duration might exceed the tikv_gc_life_time
configuration which is 10m0s
by default (10m0s
means 10 minutes), increase the value of this configuration item.
For example, set tikv_gc_life_time
to 720h
:
mysql -h${TiDBIP} -P4000 -u${TIDB_USER} ${password_str} -Nse \
"update mysql.tidb set variable_value='720h' where variable_name='tikv_gc_life_time'";
Since v4.0.3, BR automatically adapts to GC and you do not need to manually adjust the tikv_gc_life_time
value.
Back up all the cluster data
To back up all the cluster data, execute the br backup full
command. To get help on this command, execute br backup full -h
or br backup full --help
.
Usage example:
Back up all the cluster data to the /tmp/backup
path of each TiKV node and write the backupmeta
file to this path.
Note:
If the backup disk and the service disk are different, it has been tested that online backup reduces QPS of the read-only online service by about 15%-25% in case of full-speed backup. If you want to reduce the impact on QPS, use
--ratelimit
to limit the rate.If the backup disk and the service disk are the same, the backup competes with the service for I/O resources. This might decrease the QPS of the read-only online service by more than half. Therefore, it is highly not recommended to back up the online service data to the TiKV data disk.
br backup full \
--pd "${PDIP}:2379" \
--storage "local:///tmp/backup" \
--ratelimit 120 \
--log-file backupfull.log
Explanations for some options in the above command are as follows:
--ratelimit
: specifies the maximum speed at which a backup operation is performed (MiB/s) on each TiKV node.--log-file
: specifies writing the BR log to thebackupfull.log
file.
A progress bar is displayed in the terminal during the backup. When the progress bar advances to 100%, the backup is complete. Then the BR also checks the backup data to ensure data safety. The progress bar is displayed as follows:
br backup full \
--pd "${PDIP}:2379" \
--storage "local:///tmp/backup" \
--ratelimit 120 \
--log-file backupfull.log
Full Backup <---------/................................................> 17.12%.
Back up a database
To back up a database in the cluster, execute the br backup db
command. To get help on this command, execute br backup db -h
or br backup db --help
.
Usage example:
Back up the data of the test
database to the /tmp/backup
path on each TiKV node and write the backupmeta
file to this path.
br backup db \
--pd "${PDIP}:2379" \
--db test \
--storage "local:///tmp/backup" \
--ratelimit 120 \
--log-file backuptable.log
In the above command, --db
specifies the name of the database to be backed up. For descriptions of other options, see Back up all the cluster data.
A progress bar is displayed in the terminal during the backup. When the progress bar advances to 100%, the backup is complete. Then the BR also checks the backup data to ensure data safety.
Back up a table
To back up the data of a single table in the cluster, execute the br backup table
command. To get help on this command, execute br backup table -h
or br backup table --help
.
Usage example:
Back up the data of the test.usertable
table to the /tmp/backup
path on each TiKV node and write the backupmeta
file to this path.
br backup table \
--pd "${PDIP}:2379" \
--db test \
--table usertable \
--storage "local:///tmp/backup" \
--ratelimit 120 \
--log-file backuptable.log
The table
sub-command has two options:
--db
: specifies the database name--table
: specifies the table name.
For descriptions of other options, see Back up all cluster data.
A progress bar is displayed in the terminal during the backup operation. When the progress bar advances to 100%, the backup is complete. Then the BR also checks the backup data to ensure data safety.
Back up with table filter
To back up multiple tables with more complex criteria, execute the br backup full
command and specify the table filters with --filter
or -f
.
Usage example:
The following command backs up the data of all tables in the form db*.tbl*
to the /tmp/backup
path on each TiKV node and writes the backupmeta
file to this path.
br backup full \
--pd "${PDIP}:2379" \
--filter 'db*.tbl*' \
--storage "local:///tmp/backup" \
--ratelimit 120 \
--log-file backupfull.log
Back up data to Amazon S3 backend
If you back up the data to the Amazon S3 backend, instead of local
storage, you need to specify the S3 storage path in the storage
sub-command, and allow the BR node and the TiKV node to access Amazon S3.
You can refer to the AWS Official Document to create an S3 Bucket
in the specified Region
. You can also refer to another AWS Official Document to create a Folder
in the Bucket
.
Pass SecretKey
and AccessKey
of the account that has privilege to access the S3 backend to the BR node. Here SecretKey
and AccessKey
are passed as environment variables. Then pass the privilege to the TiKV node through BR.
export AWS_ACCESS_KEY_ID=${AccessKey}
export AWS_SECRET_ACCESS_KEY=${SecretKey}
When backing up using BR, explicitly specify the parameters --s3.region
and --send-credentials-to-tikv
. --s3.region
indicates the region where S3 is located, and --send-credentials-to-tikv
means passing the privilege to access S3 to the TiKV node.
br backup full \
--pd "${PDIP}:2379" \
--storage "s3://${Bucket}/${Folder}" \
--s3.region "${region}" \
--send-credentials-to-tikv=true \
--log-file backuptable.log
Back up incremental data
If you want to back up incrementally, you only need to specify the last backup timestamp --lastbackupts
.
The incremental backup has two limitations:
- The incremental backup needs to be under a different path from the previous full backup.
- GC (Garbage Collection) safepoint must be before the
lastbackupts
.
To back up the incremental data between (LAST_BACKUP_TS, current PD timestamp]
, execute the following command:
br backup full\
--pd ${PDIP}:2379 \
-s local:///home/tidb/backupdata/incr \
--lastbackupts ${LAST_BACKUP_TS}
To get the timestamp of the last backup, execute the validate
command. For example:
LAST_BACKUP_TS=`br validate decode --field="end-version" -s local:///home/tidb/backupdata`
In the above example, for the incremental backup data, BR records the data changes and the DDL operations during (LAST_BACKUP_TS, current PD timestamp]
. When restoring data, BR first restores DDL operations and then the data.
Back up Raw KV (experimental feature)
Warning:
This feature is experimental and not thoroughly tested. It is highly not recommended to use this feature in the production environment.
In some scenarios, TiKV might run independently of TiDB. Given that, BR also supports bypassing the TiDB layer and backing up data in TiKV.
For example, you can execute the following command to back up all keys between [0x31, 0x3130303030303030)
in the default CF to $BACKUP_DIR
:
br backup raw --pd $PD_ADDR \
-s "local://$BACKUP_DIR" \
--start 31 \
--end 3130303030303030 \
--format hex \
--cf default
Here, the parameters of --start
and --end
are decoded using the method specified by --format
before being sent to TiKV. Currently, the following methods are available:
- "raw": The input string is directly encoded as a key in binary format.
- "hex": The default encoding method. The input string is treated as a hexadecimal number.
- "escape": First escape the input string, and then encode it into binary format.
Restore cluster data
To restore the cluster data, use the br restore
command. You can add the full
, db
or table
sub-command to specify the scope of your restoration: the whole cluster, a database or a single table.
Note:
If you use the local storage, you must copy all back up SST files to every TiKV node in the path specified by
--storage
.Even if each TiKV node eventually only need to read a part of the all SST files, they all need full access to the complete archive because:
- Data are replicated into multiple peers. When ingesting SSTs, these files have to be present on all peers. This is unlike back up where reading from a single node is enough.
- Where each peer is scattered to during restore is random. We don't know in advance which node will read which file.
These can be avoided using shared storage, for example mounting an NFS on the local path, or using S3. With network storage, every node can automatically read every SST file, so these caveats no longer apply.
Restore all the backup data
To restore all the backup data to the cluster, execute the br restore full
command. To get help on this command, execute br restore full -h
or br restore full --help
.
Usage example:
Restore all the backup data in the /tmp/backup
path to the cluster.
br restore full \
--pd "${PDIP}:2379" \
--storage "local:///tmp/backup" \
--ratelimit 128 \
--log-file restorefull.log
Explanations for some options in the above command are as follows:
--ratelimit
: specifies the maximum speed at which a restoration operation is performed (MiB/s) on each TiKV node.--log-file
: specifies writing the BR log to therestorefull.log
file.
A progress bar is displayed in the terminal during the restoration. When the progress bar advances to 100%, the restoration is complete. Then the BR also checks the backup data to ensure data safety.
br restore full \
--pd "${PDIP}:2379" \
--storage "local:///tmp/backup" \
--log-file restorefull.log
Full Restore <---------/...............................................> 17.12%.
Restore a database
To restore a database to the cluster, execute the br restore db
command. To get help on this command, execute br restore db -h
or br restore db --help
.
Usage example:
Restore a database backed up in the /tmp/backup
path to the cluster.
br restore db \
--pd "${PDIP}:2379" \
--db "test" \
--storage "local:///tmp/backup" \
--log-file restorefull.log
In the above command, --db
specifies the name of the database to be restored. For descriptions of other options, see Restore all backup data).
Restore a table
To restore a single table to the cluster, execute the br restore table
command. To get help on this command, execute br restore table -h
or br restore table --help
.
Usage example:
Restore a table backed up in the /tmp/backup
path to the cluster.
br restore table \
--pd "${PDIP}:2379" \
--db "test" \
--table "usertable" \
--storage "local:///tmp/backup" \
--log-file restorefull.log
In the above command, --table
specifies the name of the table to be restored. For descriptions of other options, see Restore all backup data and Restore a database.
Restore with table filter
To restore multiple tables with more complex criteria, execute the br restore full
command and specify the table filters with --filter
or -f
.
Usage example:
The following command restores a subset of tables backed up in the /tmp/backup
path to the cluster.
br restore full \
--pd "${PDIP}:2379" \
--filter 'db*.tbl*' \
--storage "local:///tmp/backup" \
--log-file restorefull.log
Restore data from Amazon S3 backend
If you restore data from the Amazon S3 backend, instead of local
storage, you need to specify the S3 storage path in the storage
sub-command, and allow the BR node and the TiKV node to access Amazon S3.
Pass SecretKey
and AccessKey
of the account that has privilege to access the S3 backend to the BR node. Here SecretKey
and AccessKey
are passed as environment variables. Then pass the privilege to the TiKV node through BR.
export AWS_ACCESS_KEY_ID=${AccessKey}
export AWS_SECRET_ACCESS_KEY=${SecretKey}
When restoring data using BR, explicitly specify the parameters --s3.region
and --send-credentials-to-tikv
. --s3.region
indicates the region where S3 is located, and --send-credentials-to-tikv
means passing the privilege to access S3 to the TiKV node.
Bucket
and Folder
in the --storage
parameter represent the S3 bucket and the folder where the data to be restored is located.
br restore full \
--pd "${PDIP}:2379" \
--storage "s3://${Bucket}/${Folder}" \
--s3.region "${region}" \
--send-credentials-to-tikv=true \
--log-file restorefull.log
In the above command, --table
specifies the name of the table to be restored. For descriptions of other options, see Restore a database.
Restore incremental data
Restoring incremental data is similar to restoring full data using BR. Note that when restoring incremental data, make sure that all the data backed up before last backup ts
has been restored to the target cluster.
Restore Raw KV (experimental feature)
Warning:
This feature is in the experiment, without being thoroughly tested. It is highly not recommended to use this feature in the production environment.
Similar to backing up Raw KV, you can execute the following command to restore Raw KV:
br restore raw --pd $PD_ADDR \
-s "local://$BACKUP_DIR" \
--start 31 \
--end 3130303030303030 \
--format hex \
--cf default
In the above example, all the backed up keys in the range [0x31, 0x3130303030303030)
are restored to the TiKV cluster. The coding methods of these keys are identical to that of keys during the backup process
Online restore (experimental feature)
Warning:
This feature is in the experiment, without being thoroughly tested. It also relies on the unstable
Placement Rules
feature of PD. It is highly not recommended to use this feature in the production environment.
During data restoration, writing too much data affects the performance of the online cluster. To avoid this effect as much as possible, BR supports Placement rules to isolate resources. In this case, downloading and importing SST are only performed on a few specified nodes (or "restore nodes" for short). To complete the online restore, take the following steps.
Configure PD, and start Placement rules:
echo "config set enable-placement-rules true" | pd-ctl
Edit the configuration file of the "restore node" in TiKV, and specify "restore" to the
server
configuration item:[server] labels = { exclusive = "restore" }
Start TiKV of the "restore node" and restore the backed up files using BR. Compared with the offline restore, you only need to add the
--online
flag:br restore full \ -s "local://$BACKUP_DIR" \ --pd $PD_ADDR \ --online
Best practices
- It is recommended that you mount a shared storage (for example, NFS) on the backup path specified by
-s
, to make it easier to collect and manage backup files. - It is recommended that you use a storage hardware with high throughput, because the throughput of a storage hardware limits the backup and restoration speed.
- It is recommended that you perform the backup operation during off-peak hours to minimize the impact on applications.
For more recommended practices of using BR, refer to BR Use Cases.
Examples
This section shows how to back up and restore the data of an existing cluster. You can estimate the performance of backup and restoration based on machine performance, configuration and data volume.
Data volume and machine configuration
Suppose that the backup and restoration operations are performed on 10 tables in the TiKV cluster, each table with 5 million rows of data. The total data volume is 35 GB.
MySQL [sbtest]> show tables;
+------------------+
| Tables_in_sbtest |
+------------------+
| sbtest1 |
| sbtest10 |
| sbtest2 |
| sbtest3 |
| sbtest4 |
| sbtest5 |
| sbtest6 |
| sbtest7 |
| sbtest8 |
| sbtest9 |
+------------------+
MySQL [sbtest]> select count(*) from sbtest1;
+----------+
| count(*) |
+----------+
| 5000000 |
+----------+
1 row in set (1.04 sec)
The table structure is as follows:
CREATE TABLE `sbtest1` (
`id` int(11) NOT NULL AUTO_INCREMENT,
`k` int(11) NOT NULL DEFAULT '0',
`c` char(120) NOT NULL DEFAULT '',
`pad` char(60) NOT NULL DEFAULT '',
PRIMARY KEY (`id`),
KEY `k_1` (`k`)
) ENGINE=InnoDB DEFAULT CHARSET=utf8mb4 COLLATE=utf8mb4_bin AUTO_INCREMENT=5138499
Suppose that 4 TiKV nodes is used, each with the following configuration:
CPU | Memory | Disk | Number of replicas |
---|---|---|---|
16 cores | 32 GB | SSD | 3 |
Backup
Before the backup operation, check the following two items:
- You have set
tikv_gc_life_time
set to a larger value so that the backup operation will not be interrupted because of data loss. - No DDL statement is being executed on the TiDB cluster.
Then execute the following command to back up all the cluster data:
bin/br backup full -s local:///tmp/backup --pd "${PDIP}:2379" --log-file backup.log
[INFO] [collector.go:165] ["Full backup summary: total backup ranges: 2, total success: 2, total failed: 0, total take(s): 0.00, total kv: 4, total size(Byte): 133, avg speed(Byte/s): 27293.78"] ["backup total regions"=2] ["backup checksum"=1.640969ms] ["backup fast checksum"=227.885µs]
Restoration
Before the restoration, make sure that the TiKV cluster to be restored is a new cluster.
Then execute the following command to restore all the cluster data:
bin/br restore full -s local:///tmp/backup --pd "${PDIP}:2379" --log-file restore.log
[INFO] [collector.go:165] ["Full Restore summary: total restore tables: 1, total success: 1, total failed: 0, total take(s): 0.26, total kv: 20000, total size(MB): 10.98, avg speed(MB/s): 41.95"] ["restore files"=3] ["restore ranges"=2] ["split region"=0.562369381s] ["restore checksum"=36.072769ms]