Best Practices for Using HAProxy in TiDB
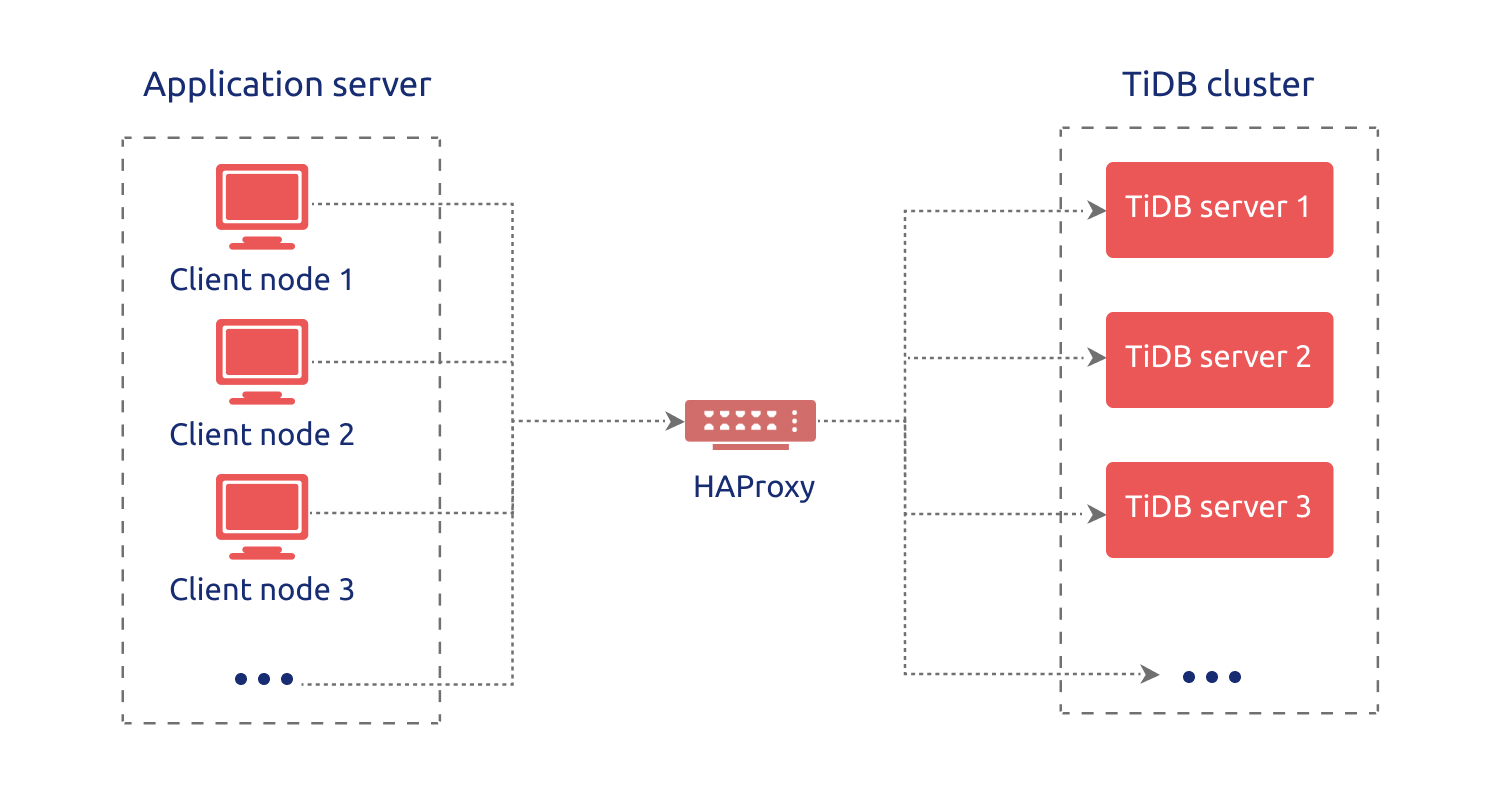
This document describes best practices for configuration and usage of HAProxy in TiDB. HAProxy provides load balancing for TCP-based applications. From TiDB clients, you can manipulate data just by connecting to the floating virtual IP address provided by HAProxy, which helps to achieve load balance in the TiDB server layer.
HAProxy overview
HAProxy is free, open-source software written in C language that provides a high availability load balancer and proxy server for TCP and HTTP-based applications. Because of its fast and efficient use of CPU and memory, HAProxy is now widely used by many well-known websites such as GitHub, Bitbucket, Stack Overflow, Reddit, Tumblr, Twitter, Tuenti, and AWS (Amazon Web Services).
HAProxy is written in the year 2000 by Willy Tarreau, the core contributor to the Linux kernel, who is still responsible for the maintenance of the project and provides free software updates in the open-source community. The latest stable version 2.0.0 was released on August 16, 2019, bringing more excellent features.
Basic features
- High Availability: HAProxy provides high availability with support for a graceful shutdown and a seamless switchover;
- Load Balancing: Two major proxy modes are supported: TCP, also known as layer 4, and HTTP, also known as layer 7. No less than 9 load balancing algorithms are supported, such as roundrobin, leastconn and random;
- Health Check: HAProxy periodically checks the status of HTTP or TCP mode of the server;
- Sticky Session: HAProxy can stick a client to a specific server for the duration when the application does not support sticky sessions;
- SSL: HTTPS communication and resolution are supported;
- Monitoring and Statistics: Through the web page, you can monitor the service state and traffic flow in real time.
Before you begin
Before you deploy HAProxy, make sure that you meet the hardware and software requirements.
Hardware requirements
For your server, it is recommended to meet the following hardware requirements. You can also improve server specifications according to the load balancing environment.
| Hardware resource | Minimum specification |
|---|---|
| CPU | 2 cores, 3.5 GHz |
| Memory | 16 GB |
| Storage | 50 GB (SATA) |
| Network Interface Card | 10G Network Card |
Software requirements
You can use the following operating systems and make sure the required dependencies are installed. If you use yum to install HAProxy, the dependencies are installed along with it and you do not need to separately install them again.
Operating systems
| Operating system version | Architecture |
|---|---|
| Linux 2.4 | x86, x86_64, Alpha, SPARC, MIPS, and PA-RISC |
| Linux 2.6 or 3.x | x86, x86_64, ARM, SPARC, and PPC64 |
| Solaris 8 or 9 | UltraSPARC II and III |
| Solaris 10 | Opteron and UltraSPARC |
| FreeBSD 4.10 ~ 10 | x86 |
| OpenBSD 3.1 or later versions | i386, AMD64, macppc, Alpha, and SPARC64 |
| AIX 5.1 ~ 5.3 | Power™ |
Dependencies
- epel-release
- gcc
- systemd-devel
To install the dependencies above, run the following command:
yum -y install epel-release gcc systemd-devel
Deploy HAProxy
You can easily use HAProxy to configure and set up a load-balanced database environment. This section shows general deployment operations. You can customize the configuration file based on your actual scenario.
Install HAProxy
Use yum to install HAProxy:
yum -y install haproxyCheck whether the installation is successful:
which haproxy/usr/sbin/haproxy
HAProxy commands
Execute the following command to print a list of keywords and their basic usage:
haproxy --help
| Option | Description |
|---|---|
-v | Reports the version and build date. |
-vv | Displays the version, build options, libraries versions and usable pollers. |
-d | Enables debug mode. |
-db | Disables background mode and multi-process mode. |
-dM [<byte>] | Forces memory poisoning, which means that each and every memory region allocated with malloc() or pool_alloc2() will be filled with <byte> before being passed to the caller. |
-V | Enables verbose mode (disables quiet mode). |
-D | Starts as a daemon. |
-C <dir> | Changes to directory <dir> before loading configuration files. |
-W | Master-worker mode. |
-q | Sets "quiet" mode: This disables some messages during the configuration parsing and during startup. |
-c | Only performs a check of the configuration files and exits before trying to bind. |
-n <limit> | Limits the per-process connection limit to <limit>. |
-m <limit> | Limits the total allocatable memory to <limit> megabytes across all processes. |
-N <limit> | Sets the default per-proxy maxconn to <limit> instead of the builtin default value (usually 2000). |
-L <name> | Changes the local peer name to <name>, which defaults to the local hostname. |
-p <file> | Writes all processes' PIDs into <file> during startup. |
-de | Disables the use of epoll(7). epoll(7) is available only on Linux 2.6 and some custom Linux 2.4 systems. |
-dp | Disables the use of poll(2). select(2) might be used instead. |
-dS | Disables the use of splice(2), which is broken on older kernels. |
-dR | Disables SO_REUSEPORT usage. |
-dr | Ignores server address resolution failures. |
-dV | Disables SSL verify on the server side. |
-sf <pidlist> | Sends the "finish" signal to the PIDs in pidlist after startup. The processes which receive this signal wait for all sessions to finish before exiting. This option must be specified last, followed by any number of PIDs. Technically speaking, SIGTTOU and SIGUSR1 are sent. |
-st <pidlist> | Sends the "terminate" signal to the PIDs in pidlist after startup. The processes which receive this signal terminate immediately, closing all active sessions. This option must be specified last, followed by any number of PIDs. Technically speaking, SIGTTOU and SIGTERM are sent. |
-x <unix_socket> | Connects to the specified socket and retrieves all the listening sockets from the old process. Then, these sockets are used instead of binding new ones. |
-S <bind>[,<bind_options>...] | In master-worker mode, creates a master CLI. This CLI enables access to the CLI of every worker. Useful for debugging, it's a convenient way of accessing a leaving process. |
For more details on HAProxy command line options, refer to Management Guide of HAProxy and General Commands Manual of HAProxy.
Configure HAProxy
A configuration template is generated when you use yum to install HAProxy. You can also customize the following configuration items according to your scenario.
global                                     # Global configuration.
   log         127.0.0.1 local2            # Global syslog servers (up to two).
   chroot      /var/lib/haproxy            # Changes the current directory and sets superuser privileges for the startup process to improve security.
   pidfile     /var/run/haproxy.pid        # Writes the PIDs of HAProxy processes into this file.
   maxconn     4000                        # The maximum number of concurrent connections for a single HAProxy process.
   user        haproxy                     # Same with the UID parameter.
   group       haproxy                     # Same with the GID parameter. A dedicated user group is recommended.
   nbproc      40                          # The number of processes created when going daemon. When starting multiple processes to forward requests, make sure the value is large enough so that HAProxy does not block processes.
   daemon                                  # Makes the process fork into background. It is equivalent to the command line "-D" argument. It can be disabled by the command line "-db" argument.
   stats socket /var/lib/haproxy/stats     # The directory where statistics output is saved.

defaults                                   # Default configuration.
   log global                              # Inherits the settings of the global configuration.
   retries 2                               # The maximum number of retries to connect to an upstream server. If the number of connection attempts exceeds the value, the backend server is considered unavailable.
   timeout connect  2s                     # The maximum time to wait for a connection attempt to a backend server to succeed. It should be set to a shorter time if the server is located on the same LAN as HAProxy.
   timeout client 30000s                   # The maximum inactivity time on the client side.
   timeout server 30000s                   # The maximum inactivity time on the server side.

listen admin_stats                         # The name of the Stats page reporting information from frontend and backend. You can customize the name according to your needs.
   bind 0.0.0.0:8080                       # The listening port.
   mode http                               # The monitoring mode.
   option httplog                          # Enables HTTP logging.
   maxconn 10                              # The maximum number of concurrent connections.
   stats refresh 30s                       # Automatically refreshes the Stats page every 30 seconds.
   stats uri /haproxy                      # The URL of the Stats page.
   stats realm HAProxy                     # The authentication realm of the Stats page.
   stats auth admin:pingcap123             # User name and password in the Stats page. You can have multiple user names.
   stats hide-version                      # Hides the version information of HAProxy on the Stats page.
   stats admin if TRUE                     # Manually enables or disables the backend server (supported in HAProxy 1.4.9 or later versions).

listen tidb-cluster                        # Database load balancing.
   bind 0.0.0.0:3390                       # The Floating IP address and listening port.
   mode tcp                                # HAProxy uses layer 4, the transport layer.
   balance leastconn                       # The server with the smallest number of connections receives the connection. `leastconn' is recommended where long sessions are expected, such as LDAP, SQL and TSE, rather than protocols using short sessions, such as HTTP. The algorithm is dynamic, which means that server weights might be adjusted on the fly for slow starts for instance.
   server tidb-1 10.9.18.229:4000 check inter 2000 rise 2 fall 3       # Detects port 4000 at a frequency of once every 2000 milliseconds. If it is detected as successful twice, the server is considered available; if it is detected as failed three times, the server is considered unavailable.
   server tidb-2 10.9.39.208:4000 check inter 2000 rise 2 fall 3
   server tidb-3 10.9.64.166:4000 check inter 2000 rise 2 fall 3
Start HAProxy
There are two methods to start HAProxy.
Method 1: Execute haproxy. /etc/haproxy/haproxy.cfg is read by default (recommended).
haproxy -f /etc/haproxy/haproxy.cfg
Method 2: Use systemd to start HAProxy.
systemctl start haproxy.service
Stop HAProxy
There are two methods to stop HAProxy.
Method 1: Use kill -9.
Run the following command:
ps -ef | grep haproxyTerminate the process of HAProxy:
kill -9 ${haproxy.pid}
Method 2: Use systemd.
systemctl stop haproxy.service