TiDB Lightning Tutorial
TiDB Lightning is a tool used for fast full import of large amounts of data into a TiDB cluster. Currently, TiDB Lightning supports reading SQL dump exported via Mydumper or CSV data source. You can use it in the following two scenarios:
- Import large amounts of new data quickly
- Back up and restore all the data
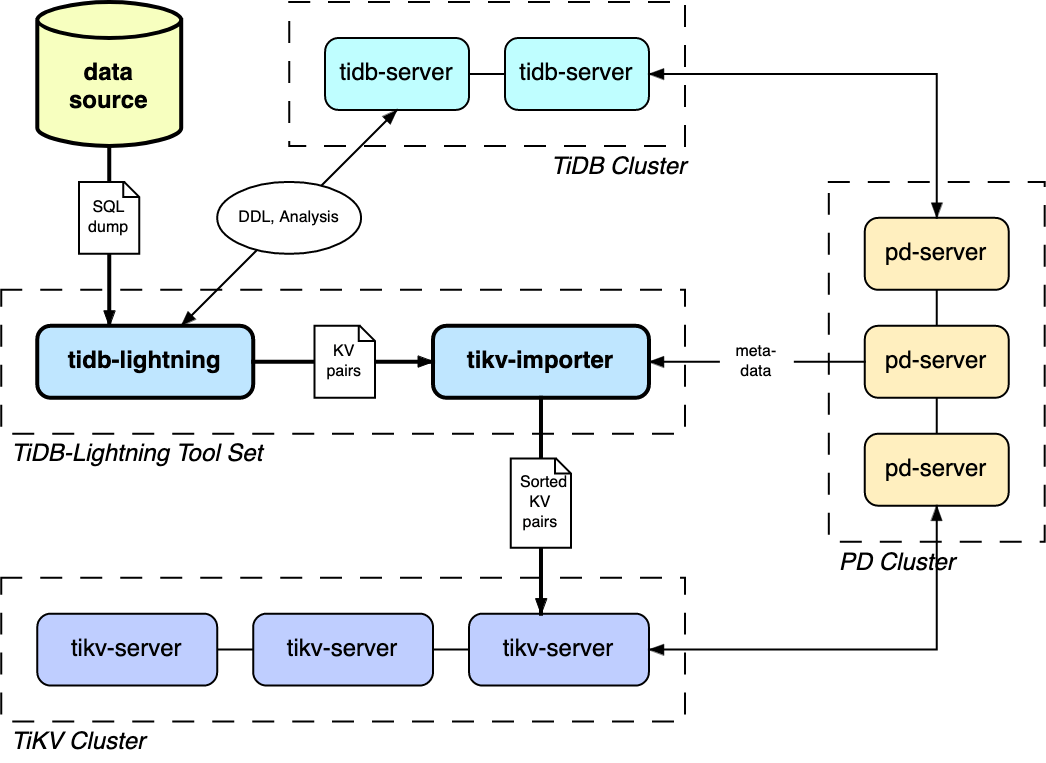
The TiDB Lightning tool set consists of two components:
tidb-lightning(the "front end") reads the data source and imports the database structure into the TiDB cluster, and also transforms the data into Key-Value (KV) pairs and sends them totikv-importer.tikv-importer(the "back end") combines and sorts the KV pairs and then imports these sorted pairs as a whole into the TiKV cluster.
Prerequisites
This tutorial assumes you use several new and clean CentOS 7 instances. You can use VMware, VirtualBox or other tools to deploy a virtual machine locally or a small cloud virtual machine on a vendor-supplied platform. Because TiDB Lightning consumes a large amount of computer resources, it is recommended that you allocate at least 4 GB memory for running it.
Prepare full backup data
First, use mydumper to export data from MySQL:
./bin/mydumper -h 127.0.0.1 -P 3306 -u root -t 16 -F 256 -B test -T t1,t2 --skip-tz-utc -o /data/my_database/
In the above command:
-B test: means the data is exported from thetestdatabase.-T t1,t2: means only thet1andt2tables are exported.-t 16: means 16 threads are used to export the data.-F 256: means a table is partitioned into chunks and one chunk is 256 MB.--skip-tz-utc: the purpose of adding this parameter is to ignore the inconsistency of time zone setting between MySQL and the data exporting machine and to disable automatic conversion.
After executing this command, the full backup data is exported to the /data/my_database directory.
Deploy TiDB Lightning
Step 1: Deploy TiDB cluster
Before the data import, you need to deploy a TiDB cluster (later than v2.0.9). In this tutorial, TiDB v3.0.4 is used. For the deployment method, refer to TiDB Introduction.
Step 2: Download TiDB Lightning installation package
Download the TiDB Lightning installation package from the following link:
Step 3: Start tikv-importer
Upload
bin/tikv-importerin the package to the server where TiDB Lightning is deployed.Configure
tikv-importer.toml.# The template of the tikv-importer configuration file # Log file log-file = "tikv-importer.log" # Log level: "trace", "debug", "info", "warn", "error" or "off" log-level = "info" [server] # The listening address of tikv-importer. tidb-lightning connects to this address for data write. addr = "192.168.20.10:8287" [import] # The directory of the engine file. import-dir = "/mnt/ssd/data.import/"Run
tikv-importer:nohup ./tikv-importer -C tikv-importer.toml > nohup.out &
Step 4: Start tidb-lightning
Upload
bin/tidb-lightningandbin/tidb-lightning-ctlin the installation package to the server where TiDB Lightning is deployed.Upload the prepared data source to the server.
After configuring the parameters properly, use a
nohupcommand to start thetidb-lightningprocess. If you directly run the command in the command-line, the process might exit because of the SIGHUP signal received. Instead, it's preferable to run a bash script that contains thenohupcommand:#!/bin/bash nohup ./tidb-lightning \ --importer 172.16.31.10:8287 \ -d /data/my_database/ \ --tidb-host 172.16.31.2 \ --tidb-user root \ --log-file tidb-lightning.log \ > nohup.out &
Step 5: Check data integrity
After the import is completed, TiDB Lightning exits automatically. If the import is successful, you can find tidb lightning exit in the last line of the log file.
If any error occurs, refer to TiDB Lightning FAQs.
Summary
This tutorial briefly introduces what TiDB Lightning is and how to quickly deploy a TiDB Lightning cluster to import full backup data to the TiDB cluster.
For detailed features and usage about TiDB Lightning, refer to TiDB Lightning Overview.