Syncer User Guide
About Syncer
Syncer is a tool used to import data incrementally. It is a part of the TiDB enterprise toolset.
It can be downloaded as part of the Enterprise Tools package.
Syncer architecture
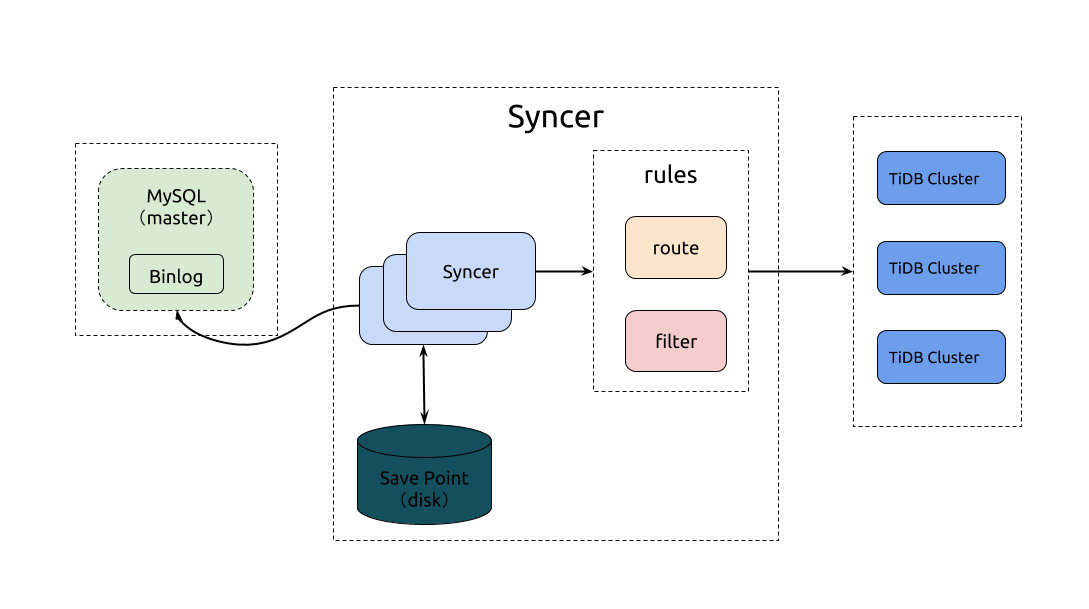
Where to deploy Syncer
You can deploy Syncer to any of the machines that can connect to MySQL or the TiDB cluster. But it is recommended to deploy Syncer to the TiDB cluster.
Use Syncer to import data incrementally
Before importing data, read Check before importing data using Syncer.
1. Set the position to replicate
Edit the meta file of Syncer, assuming the meta file is syncer.meta:
# cat syncer.meta
binlog-name = "mysql-bin.000003"
binlog-pos = 930143241
binlog-gtid = "2bfabd22-fff7-11e6-97f7-f02fa73bcb01:1-23,61ccbb5d-c82d-11e6-ac2e-487b6bd31bf7:1-4"
2. Start Syncer
Description of Syncer command line options:
Usage of syncer:
  -L string
        log level: debug, info, warn, error, fatal (default "info")
  -V    to print Syncer version info (default false)
  -b int
        the size of batch transactions (default 100)
  -c int
        the number of batch threads that Syncer processes (default 16)
  -config string
        to specify the corresponding configuration file when starting Syncer; for example, `--config config.toml`
  -enable-ansi-quotes
        to enable ANSI_QUOTES sql_mode
  -enable-gtid
        to start Syncer using the mode; default false; before enabling this option, you need to enable GTID in the upstream MySQL
  -flavor string
        use flavor for different MySQL source versions; support "mysql", "mariadb" now; if you replicate data from MariaDB, set it to "mariadb" (default "mysql")
  -log-file string
        to specify the log file directory, such as `--log-file ./syncer.log`
  -log-rotate string
        to specify the log file rotating cycle, hour/day (default "day")
  -max-retry int
        to specify the maximum times an SQL statement should be retried. One common cause of statement retries is network interruption (default 100)
  -meta string
        to specify the meta file of the upstream of Syncer (in the same directory with the configuration file, "syncer.meta" by default)
  -persistent-dir string
        to specify the persistent file (historical reason: it is not a directory) of Syncer history table schemas; if you set it to a non-empty string, the history table schema is chosen according to the column length when you construct DML statements
  -safe-mode
        to specify and enable the safe mode to make Syncer reentrant
  -server-id int
        to specify MySQL replica sever-id (default 101)
  -status-addr string
        to specify Syncer metrics (default :8271), such as `--status-addr 127:0.0.1:8271`
  -timezone string
        the time zone used by the target database; it is required to use the IANA time zone identifier such as `Asia/Shanghai`
The config.toml configuration file of Syncer:
log-level = "info"
log-file = "syncer.log"
log-rotate = "day"

server-id = 101

# The file path for meta:
meta = "./syncer.meta"
worker-count = 16
batch = 100
flavor = "mysql"

# It can be used by Prometheus to pull Syncer metrics, and is also the pprof address of Syncer.
status-addr = ":8271"

# If you set its value to true, Syncer stops and exits when it encounters the DDL operation.
stop-on-ddl = false

# The maximum number of times an SQL statement should be retried. One common cause of statement retries is network interruption.
max-retry = 100

# Specify the time zone used by the target database; all timestamp fields in binlog are converted according to the time zone; the local time zone of Syncer is used by default.
# timezone = "Asia/Shanghai"

# Skip the DDL statement; the format is **prefix exact match**, for example, you need to fill at least `DROP TABLE` in to skip `DROP TABLE ABC`.
# skip-ddls = ["ALTER USER", "CREATE USER"]

# After Syncer uses `route-rules` to map the upstream schema and table into `target-schema` and `target-table`,
# Syncer matches the mapped `target-schema` and `target-table` with do/ignore rules,
# and the matching sequence is: replicate-do-db --> replicate-do-table --> replicate-ignore-db --> replicate-ignore-table.
# Specify the database name to be replicated. Support regular expressions. Start with '~' to use regular expressions.
# replicate-do-db = ["~^b.*","s1"]

# Specify the database you want to ignore in replication. Support regular expressions. Start with '~' to use regular expressions.
# replicate-ignore-db = ["~^b.*","s1"]

# skip-dmls skips the DML binlog events. The type value can be 'insert', 'update' and 'delete'.
# The 'delete' statements that skip-dmls skips in the foo.bar table:
# [[skip-dmls]]
# db-name = "foo"
# tbl-name = "bar"
# type = "delete"
#
# The 'delete' statements that skip-dmls skips in all tables:
# [[skip-dmls]]
# type = "delete"
#
# The 'delete' statements that skip-dmls skips in all foo.* tables:
# [[skip-dmls]]
# db-name = "foo"
# type = "delete"

# Specify the db.table to be replicated.
# db-name and tbl-name do not support the `db-name ="dbname, dbname2"` format.
# [[replicate-do-table]]
# db-name ="dbname"
# tbl-name = "table-name"

# [[replicate-do-table]]
# db-name ="dbname1"
# tbl-name = "table-name1"

# Specify the db.table to be replicated. Support regular expressions. Start with '~' to use regular expressions.
# [[replicate-do-table]]
# db-name ="test"
# tbl-name = "~^a.*"

# Specify the database table you want to ignore in replication.
# db-name and tbl-name do not support the `db-name ="dbname, dbname2"` format.
# [[replicate-ignore-table]]
# db-name = "your_db"
# tbl-name = "your_table"

# Specify the database table you want to ignore in replication. Support regular expressions. Start with '~' to use regular expressions.
# [[replicate-ignore-table]]
# db-name ="test"
# tbl-name = "~^a.*"

# The sharding replicating rules support wildcharacter.
# 1. The asterisk character ("*", also called "star") matches zero or more characters,
#    For example, "doc*" matches "doc" and "document" but not "dodo";
#    The asterisk character must be in the end of the wildcard word,
#    and there is only one asterisk in one wildcard word.
# 2. The question mark ("?") matches any single character.
# [[route-rules]]
# pattern-schema = "route_*"
# pattern-table = "abc_*"
# target-schema = "route"
# target-table = "abc"

# [[route-rules]]
# pattern-schema = "route_*"
# pattern-table = "xyz_*"
# target-schema = "route"
# target-table = "xyz"

[from]
host = "127.0.0.1"
user = "root"
password = ""
port = 3306

[to]
host = "127.0.0.1"
user = "root"
password = ""
port = 4000
Start Syncer:
./bin/syncer -config config.toml

2016/10/27 15:22:01 binlogsyncer.go:226: [info] begin to sync binlog from position (mysql-bin.000003, 1280)
2016/10/27 15:22:01 binlogsyncer.go:130: [info] register slave for master server 127.0.0.1:3306
2016/10/27 15:22:01 binlogsyncer.go:552: [info] rotate to (mysql-bin.000003, 1280)
2016/10/27 15:22:01 syncer.go:549: [info] rotate binlog to (mysql-bin.000003, 1280)
3. Insert data into MySQL
INSERT INTO t1 VALUES (4, 4), (5, 5);
4. Log in to TiDB and view the data
mysql -h127.0.0.1 -P4000 -uroot -p
mysql> select * from t1;
+----+------+
| id | age  |
+----+------+
|  1 |    1 |
|  2 |    2 |
|  3 |    3 |
|  4 |    4 |
|  5 |    5 |
+----+------+
Syncer outputs the current replicated data statistics every 30 seconds:
2017/06/08 01:18:51 syncer.go:934: [info] [syncer]total events = 15, total tps = 130, recent tps = 4,
master-binlog = (ON.000001, 11992), master-binlog-gtid=53ea0ed1-9bf8-11e6-8bea-64006a897c73:1-74,
syncer-binlog = (ON.000001, 2504), syncer-binlog-gtid = 53ea0ed1-9bf8-11e6-8bea-64006a897c73:1-17
2017/06/08 01:19:21 syncer.go:934: [info] [syncer]total events = 15, total tps = 191, recent tps = 2,
master-binlog = (ON.000001, 11992), master-binlog-gtid=53ea0ed1-9bf8-11e6-8bea-64006a897c73:1-74,
syncer-binlog = (ON.000001, 2504), syncer-binlog-gtid = 53ea0ed1-9bf8-11e6-8bea-64006a897c73:1-35
The update in MySQL is automatically replicated in TiDB.
Description of Syncer configuration
Specify the database to be replicated
This section describes the priority of parameters when you use Syncer to replicate the database.
- To use the route-rules, see Support for replicating data from sharded tables.
- Priority: replicate-do-db --> replicate-do-table --> replicate-ignore-db --> replicate-ignore-table
# Specify the ops database to be replicated.
# Specify to replicate the database starting with ti.
replicate-do-db = ["ops","~^ti.*"]

# The "china" database includes multiple tables such as guangzhou, shanghai and beijing. You only need to replicate the shanghai and beijing tables.
# Specify to replicate the shanghai table in the "china" database.
[[replicate-do-table]]
db-name ="china"
tbl-name = "shanghai"

# Specify to replicate the beijing table in the "china" database.
[[replicate-do-table]]
db-name ="china"
tbl-name = "beijing"

# The "ops" database includes multiple tables such as ops_user, ops_admin, weekly. You only need to replicate the ops_user table.
# Because replicate-do-db has a higher priority than replicate-do-table, it is invalid if you only set to replicate the ops_user table. In fact, the whole "ops" database is replicated.
[[replicate-do-table]]
db-name ="ops"
tbl-name = "ops_user"

# The "history" database includes multiple tables such as 2017_01 2017_02 ... 2017_12/2016_01  2016_02 ... 2016_12. You only need to replicate the tables of 2017.
[[replicate-do-table]]
db-name ="history"
tbl-name = "~^2017_.*"

# Ignore the "ops" and "fault" databases in replication
# Ignore the databases starting with "www" in replication
# Because replicate-do-db has a higher priority than replicate-ignore-db, it is invalid to ignore the "ops" database here in replication.
replicate-ignore-db = ["ops","fault","~^www"]

# The "fault" database includes multiple tables such as faults, user_feedback, ticket.
# Ignore the user_feedback table in replication.
# Because replicate-ignore-db has a higher priority than replicate-ignore-table, it is invalid to only ignore the user_feedback table in replication. In fact, the whole "fault" database is ignored in replication.
[[replicate-ignore-table]]
db-name = "fault"
tbl-name = "user_feedback"

# The "order" database includes multiple tables such as 2017_01 2017_02 ... 2017_12/2016_01  2016_02 ... 2016_12. You need to ignore the tables of 2016.
[[replicate-ignore-table]]
db-name ="order"
tbl-name = "~^2016_.*"
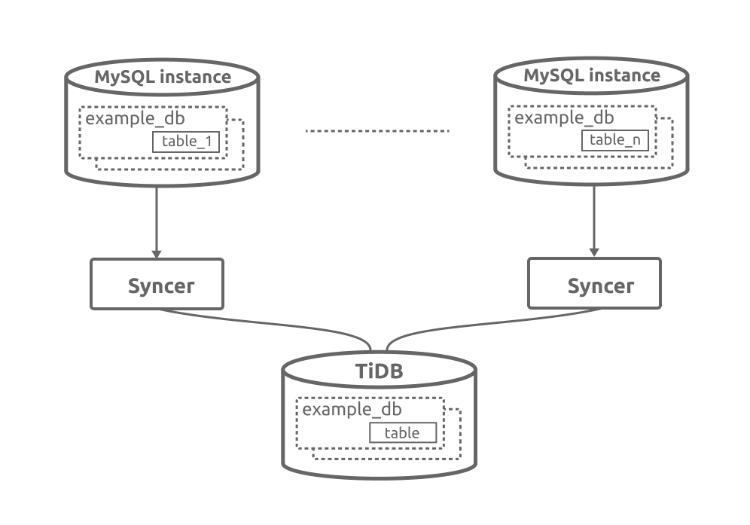
Support for replicating data from sharded tables
You can use Syncer to import data from sharded tables into one table within one database according to the route-rules. But before replicating, you need to check:
- Whether the sharding rules can be represented using the
route-rulessyntax. - Whether the sharded tables contain unique increasing primary keys, or whether conflicts exist in the unique indexes or the primary keys after the combination.
Currently, the support for DDL is still in progress.
Usage of replicating data from sharded tables
- Start Syncer in all MySQL instances and configure the route-rules.
- In scenarios using replicate-do-db & replicate-ignore-db and route-rules at the same time, you need to specify the target-schema & target-table content in route-rules.
# The scenarios are as follows:
# Database A includes multiple databases such as order_2016 and history_2016.
# Database B includes multiple databases such as order_2017 and history_2017.
# Specify to replicate order_2016 in database A; the data tables are 2016_01 2016_02 ... 2016_12
# Specify to replicate order_2017 in database B; the data tables are 2017_01 2017_02 ... 2017_12
# Use order_id as the primary key in the table, and the primary keys among data do not conflict.
# Ignore the history_2016 and history_2017 databases in replication
# The target database is "order" and the target data tables are order_2017 and order_2016.

# When Syncer finds that the route-rules is enabled after Syncer gets the upstream data, it first combines databases and tables, and then determines do-db & do-table.
# You need to configure the database to be replicated, which is required when you determine the target-schema & target-table.
[[replicate-do-table]]
db-name ="order"
tbl-name = "order_2016"

[[replicate-do-table]]
db-name ="order"
tbl-name = "order_2017"

[[route-rules]]
pattern-schema = "order_2016"
pattern-table = "2016_??"
target-schema = "order"
target-table = "order_2016"

[[route-rules]]
pattern-schema = "order_2017"
pattern-table = "2017_??"
target-schema = "order"
target-table = "order_2017"
Check before replicating data using Syncer
Before replicating data using Syncer, check the following items:
Check the database version.
Use the
select @@version;command to check your database version. Currently, Syncer supports the following versions:5.5 < MySQL version < 8.0
MariaDB version >= 10.1.2
In earlier versions of MariaDB, the format of some binlog field types is inconsistent with that in MySQL.
Check the
server-idof the source database.Check the
server-idusing the following command:mysql> show global variables like 'server_id'; +---------------+------- | Variable_name | Value | +---------------+-------+ | server_id | 1 | +---------------+-------+ 1 row in set (0.01 sec)- If the result is null or 0, Syncer cannot replicate data.
- Syncer
server-idmust be different from the MySQLserver-id, and must be unique in the MySQL cluster.
Check binlog related parameters.
Check whether the binlog is enabled in MySQL using the following command:
mysql> show global variables like 'log_bin';
+--------------------+---------+
| Variable_name      | Value   |
+--------------------+---------+
| log_bin            | ON      |
+--------------------+---------+
1 row in set (0.00 sec)
If the result is
log_bin = OFF, you need to enable the binlog. See the document about enabling the binlog.The binlog format must be
ROWand the binary log must be written withFULLrow images. Check both of these variables:mysql> select variable_name, variable_value from information_schema.global_variables where variable_name in ('binlog_format','binlog_row_image'); +------------------+----------------+ | variable_name | variable_value | +------------------+----------------+ | BINLOG_FORMAT | ROW | | BINLOG_ROW_IMAGE | FULL | +------------------+----------------+ 2 rows in set (0.001 sec)- If one of the settings is not correct, you should change the configuration file on disk and restart the MySQL service.
- It's important to persist any configuration changes to disk, so that they're reflected if the MySQL service restarts.
- Because existing connections will keep old values of global variables, you should not use the
SETstatement to dynamically change these settings.
Check user privileges.
Check the user privileges required by Mydumper for full data export.
- To export the full data using Mydumper, the user must have the privileges of
selectandreload. - You can add the
--no-locksoption when the operation object is RDS, to avoid applying for thereloadprivilege.
- To export the full data using Mydumper, the user must have the privileges of
Check the upstream MySQL or MariaDB user privileges required by Syncer for incremental replication.
The upstream MySQL user must have the following privileges at least:
select, replication slave, replication clientCheck the downstream user privileges required by TiDB.
Privileges Scope SELECTTables INSERTTables UPDATETables DELETETables CREATEDatabases, tables DROPDatabases, tables ALTERTables INDEXTables Execute the following
GRANTstatement for the databases or tables that you need to replicate:GRANT SELECT,INSERT,UPDATE,DELETE,CREATE,DROP,ALTER,INDEX ON db.table TO 'your_user'@'your_wildcard_of_host';
Check the SQL mode.
Make sure that the upstream SQL mode is consistent with the downstream SQL mode. Otherwise, the data replication error might occur.
mysql> show variables like '%sql_mode%';
+---------------+-----------------------------------------------------------------------------------+
| Variable_name | Value                                                                             |
+---------------+-----------------------------------------------------------------------------------+
| sql_mode      | ONLY_FULL_GROUP_BY,STRICT_TRANS_TABLES,NO_AUTO_CREATE_USER,NO_ENGINE_SUBSTITUTION |
+---------------+-----------------------------------------------------------------------------------+
1 row in set (0.01 sec)
Check the Character Set.
TiDB differs from MySQL in Character Set.
Check whether the table to be replicated has a primary key or a unique index.
If the table does not have a primary key or a unique index, idempotent operations cannot be achieved. In this situation, a full table scan is performed every time an entry of data is updated in the downstream, which might slow down the replication task. Therefore, it is recommended that you add a primary key to every table to be replicated.
Syncer monitoring solution
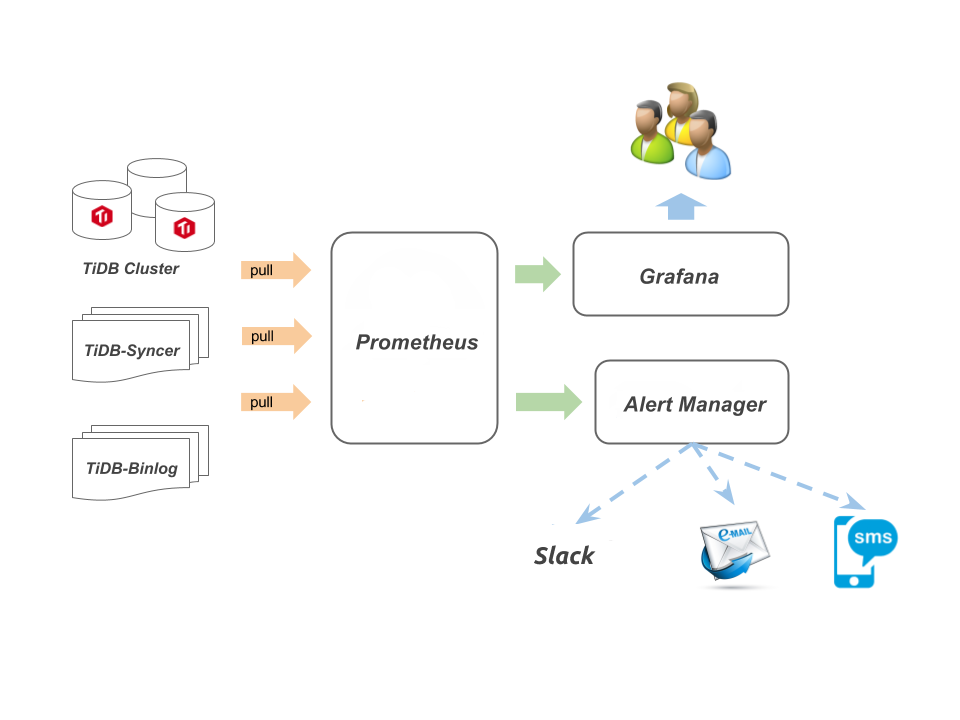
The syncer monitoring solution contains the following components:
- Prometheus, an open source time series database, used to store the monitoring and performance metrics
- Grafana, an open source project for analyzing and visualizing metrics, used to display the performance metrics
- Alertmanager, combined with Grafana to implement the alerting mechanism
See the following diagram:
Configure Syncer monitor and alert
Syncer provides the metric interface, and requires Prometheus to actively obtain data. Take the following steps to configure Syncer monitor and alert:
To add the Syncer job information to Prometheus, flush the following content to the configuration file of Prometheus. The monitor is enabled when you restart Prometheus.
    - job_name: 'syncer_ops' // name of the job, to distinguish the reported data
      static_configs:
        - targets: ['10.1.1.4:10086'] // Syncer monitoring address and port; to inform Prometheus of obtaining the monitoring data of Syncer
To configure Prometheus alert, flush the following content to the
alert.ruleconfiguration file. The alert is enabled when you restart Prometheus.# syncer ALERT syncer_status IF syncer_binlog_file{node='master'} - ON(instance, job) syncer_binlog_file{node='syncer'} > 1 FOR 1m LABELS {channels="alerts", env="test-cluster"} ANNOTATIONS { summary = "syncer status error", description="alert: syncer_binlog_file{node='master'} - ON(instance, job) syncer_binlog_file{node='syncer'} > 1 instance: {{ $labels.instance }} values: {{ $value }}", }
Configure Grafana
Log in to the Grafana Web interface.
- The default address is: http://localhost:3000
- The default account name: admin
- The password for the default account: admin
Import the configuration file of Grafana dashboard.
Click the Grafana Logo -> click Dashboards -> click Import -> choose and import the dashboard configuration file -> choose the corresponding data source.
Description of Grafana Syncer metrics
title: binlog events
- metrics:
rate(syncer_binlog_event_count[1m]) - info: QPS of the binlog event that has been received by Syncer
title: binlog event transform
- metrics:
histogram_quantile(0.8, sum(rate(syncer_binlog_event_bucket[1m])) by (le)) - info: the cost of transforming the binlog event to SQL statements by Syncer
title: transaction latency
- metrics:
histogram_quantile(0.95, sum(rate(syncer_txn_cost_in_second_bucket[1m])) by (le)) - info: the cost of executing a transaction on TiDB
title: transaction tps
- metrics:
rate(syncer_txn_cost_in_second_count[1m]) - info: TPS of executing a transaction on TiDB
title: binlog file gap
- metrics:
syncer_binlog_file{node="master"} - ON(instance, job) syncer_binlog_file{node="syncer"} - info: the number of different binlog files between the upstream and the downstream in the process of replication; the normal value is 0, which indicates real-time replication; a larger value indicates a larger number of binlog files discrepancy
title: binlog skipped events
- metrics:
rate(syncer_binlog_skipped_events_total[1m]) - info: the total number of SQL statements that Syncer skips when the upstream replicates binlog files with the downstream; you can configure the format of SQL statements skipped by Syncer using the
skip-ddlsandskip-dmlsparameters in thesyncer.tomlfile.
title: position binlog position
- metrics:
syncer_binlog_pos{node="syncer"}andsyncer_binlog_pos{node="master"} - info: it works with
file number of binlog position.syncer_binlog_pos{node="master"}indicates the position of latest binlog position fetched from MySQL, andsyncer_binlog_pos{node="syncer"}indicates the position of the binlog position that Syncer has replicated.
title: file number of binlog position
- metrics:
syncer_binlog_file{node="syncer"}andsyncer_binlog_file{node="master"} - info: it works with
position of binlog position.syncer_binlog_file{node="master"}indicates the file number of the latest binlog position fetched from MySQL, andsyncer_binlog_file{node="syncer"}indicates the file number of the binlog position that Syncer has replicated.
title: execution jobs
- metrics:
sum(rate(syncer_add_jobs_total[1m])) by (queueNo) - info: the count of jobs that have been added into the execution queue
title: pending jobs
- metrics:
sum(rate(syncer_add_jobs_total[1m]) - rate(syncer_finished_jobs_total[1m])) by (queueNo) - info: the count of jobs that have been applied into TiDB