Access TiDB Dashboard
TiDB Dashboard is a visualized tool introduced since TiDB v4.0 and is used to monitor and diagnose TiDB clusters. For details, see TiDB Dashboard.
This document describes how to access TiDB Dashboard on Kubernetes.
- In a test environment, you can access TiDB Dashboard by port forward.
- In a production environment, it is recommended to access TiDB Dashboard by Ingress. You can also enable the TLS transfer. See Use Ingress with TLS for details.
- To access TiDB Dashboard without a domain name, you can use NodePort Service.
In this document, you can use the Discovery service to access TiDB Dashboard. TiDB Operator starts a Discovery service for each TiDB cluster. The Discovery service can return the corresponding startup parameters for each PD Pod to support the startup of the PD cluster. The Discovery service can also send proxy requests to the TiDB Dashboard.
Prerequisites: Determine the TiDB Dashboard service
This section describes how to determine the TiDB Dashboard service and HTTP path in different deployment methods of TiDB Dashboard. You can fill in the service and HTTP path obtained in this section in the target configuration file to access TiDB Dashboard.
TiDB supports two methods to deploy TiDB Dashboard. You can choose one of the two methods to access TiDB Dashboard:
- Deployed as an independent service. In this deployment method, TiDB Dashboard is an independent StatefulSet and has a dedicated service. The Web server path can be configured through
TidbDashboard.spec.pathPrefix. - Built in PD. The TiDB Dashboard deployed in this method is available in the
/dashboardpath of the PD. Other paths outside of this might not have access control. Note that this deployment method will be removed in future TiDB releases. Therefore, it is recommended to deploy TiDB Dashboard as an independent service.
Access TiDB Dashboard built in PD
To access TiDB Dashboard built in PD, you need to use TiDB Operator v1.1.1 (or later versions) and the TiDB cluster v4.0.1 (or later versions).
You need to configure the TidbCluster object file as follows to enable quick access to TiDB Dashboard:
apiVersion: pingcap.com/v1alpha1
kind: TidbCluster
metadata:
  name: basic
spec:
  pd:
    enableDashboardInternalProxy: true
In this deployment method, the service, port, and HTTP paths of TiDB Dashboard are as follows:
export SERVICE_NAME=${cluster_name}-discovery && \
export PORT=10262 && \
export HTTP_PATH=/dashboard
Access independently deployed TiDB Dashboard
To access an independently deployed TiDB Dashboard, you need to use TiDB Operator v1.4.0 (or later versions) and the TiDB cluster v4.0.1 (or later versions).
Before accessing TiDB Dashboard, ensure that you have deployed an independent TiDB Dashboard.
In this deployment method, the service, port, and HTTP paths of TiDB Dashboard are as follows (default values):
export SERVICE_NAME=${cluster_name}-tidb-dashboard-exposed && \
export PORT=12333 && \
export HTTP_PATH=""
Method 1. Access TiDB Dashboard by port forward
TiDB Dashboard is built in the PD component in TiDB 4.0 and later versions. You can refer to the following example to quickly deploy a TiDB cluster on Kubernetes.
kubectl port-forward svc/${SERVICE_NAME} -n ${namespace} ${PORT}:${PORT}
In the preceding command:
${namespace}isTidbCluster.namespace.port-forwardbinds to the IP address 127.0.0.1 by default. If you need to use another IP address to access the machine running theport-forwardcommand, you can add the--addressoption and specify the IP address to be bound.
Visit http://localhost:${PORT}${HTTP_PATH} in your browser to access TiDB Dashboard.
Method 2. Access TiDB Dashboard by Ingress
In important production environments, it is recommended to expose the TiDB Dashboard service using Ingress.
Prerequisites
Before using Ingress, install the Ingress controller in your Kubernetes cluster. Otherwise, simply creating Ingress resources does not take effect.
To deploy the Ingress controller, refer to ingress-nginx. You can also choose from various Ingress controllers.
Use Ingress
You can expose the TiDB Dashboard service outside the Kubernetes cluster by using Ingress. In this way, the service can be accessed outside Kubernetes via http/https. For more details, see Ingress.
The following is an .yaml example of accessing TiDB Dashboard using Ingress:
Deploy the following
.yamlfile to the Kubernetes cluster by running thekubectl apply -fcommand:apiVersion: extensions/v1beta1 kind: Ingress metadata: name: access-dashboard namespace: ${namespace} spec: rules: - host: ${host} http: paths: - backend: serviceName: ${SERVICE_NAME} servicePort: ${PORT} path: ${HTTP_PATH}After Ingress is deployed, you can access TiDB Dashboard via
http://${host}${path}outside the Kubernetes cluster.
Use Ingress with TLS
Ingress supports TLS. See Ingress TLS. The following example shows how to use Ingress TLS:
apiVersion: extensions/v1beta1
kind: Ingress
metadata:
  name: access-dashboard
  namespace: ${namespace}
spec:
  tls:
  - hosts:
    - ${host}
    secretName: testsecret-tls
  rules:
    - host: ${host}
      http:
        paths:
          - backend:
              serviceName: ${SERVICE_NAME}
              servicePort: ${PORT}
            path: ${HTTP_PATH}
In the above file, testsecret-tls contains tls.crt and tls.key needed for example.com.
This is an example of testsecret-tls:
apiVersion: v1
kind: Secret
metadata:
  name: testsecret-tls
  namespace: default
data:
  tls.crt: base64 encoded cert
  tls.key: base64 encoded key
type: kubernetes.io/tls
After Ingress is deployed, visit https://${host}${path} to access TiDB Dashboard.
Method 3. Use NodePort Service
Because ingress can only be accessed with a domain name, it might be difficult to use ingress in some scenarios. In this case, to access and use TiDB Dashboard, you can add a Service of NodePort type.
Access TiDB Dashboard built in PD
To access TiDB Dashboard built in PD, you need to create a NodePort service for PD.
The following is an .yaml example using the Service of NodePort type to access the TiDB Dashboard. To deploy the following .yaml file into the Kubernetes cluster, you can run the kubectl apply -f command:
apiVersion: v1
kind: Service
metadata:
  name: access-dashboard
  namespace: ${namespace}
spec:
  ports:
  - name: dashboard
    port: 10262
    protocol: TCP
    targetPort: 10262
  type: NodePort
  selector:
    app.kubernetes.io/component: discovery
    app.kubernetes.io/instance: ${cluster_name}
    app.kubernetes.io/name: tidb-cluster
After deploying the Service, you can access TiDB Dashboard via https://{nodeIP}:{nodePort}/dashboard. By default, nodePort is randomly assigned by Kubernetes. You can also specify an available port in the .yaml file.
Note that if there is more than one PD Pod in the cluster, you need to set spec.pd.enableDashboardInternalProxy: true in the TidbCluster CR to ensure normal access to TiDB Dashboard.
Access independently deployed TiDB Dashboard
After deploying TiDB Dashboard independently, you can get the nodePort of ${cluster_name}-tidb-dashboard-exposed by running the kubectl get svc command, and then access TiDB Dashboard via https://{nodeIP}:{nodePort}>.
Enable Continuous Profiling
With Continuous Profiling, you can collect continuous performance data of TiDB, PD, TiKV, and TiFlash instances, and have the nodes monitored day and night without restarting any of them. The data collected can be displayed in various forms, for example, on a flame graph or a directed acyclic graph. The data displayed visually shows what internal operations are performed on the instances during the performance profiling period and the corresponding proportions. With such data, you can quickly learn the CPU resource consumption of these instances.
To enable this feature, you need to deploy TidbNGMonitoring CR using TiDB Operator v1.3.0 or later versions.
Deploy TidbMonitor CR.
If your TiDB cluster is earlier than v5.4.0, see Deploy Monitoring and Alerts for a TiDB Cluster to deploy TidbMonitor CR.
If your TiDB cluster is v5.4.0 or later, skip this step.
Deploy TidbNGMonitoring CR.
Run the following command to deploy TidbNGMonitoring CR. In this command,
${cluster_name}is the name of the TidbCluster CR and${cluster_ns}is the namespace of this CR.cat << EOF | kubectl apply -n ${ns} -f - apiVersion: pingcap.com/v1alpha1 kind: TidbNGMonitoring metadata: name: ${name} spec: clusters: - name: ${cluster_name} namespace: ${cluster_ns} ngMonitoring: requests: storage: 10Gi version: v8.5.2 # storageClassName: default baseImage: pingcap/ng-monitoring EOFFor more configuration items of the TidbNGMonitoring CR, see example in tidb-operator.
Enable Continuous Profiling.
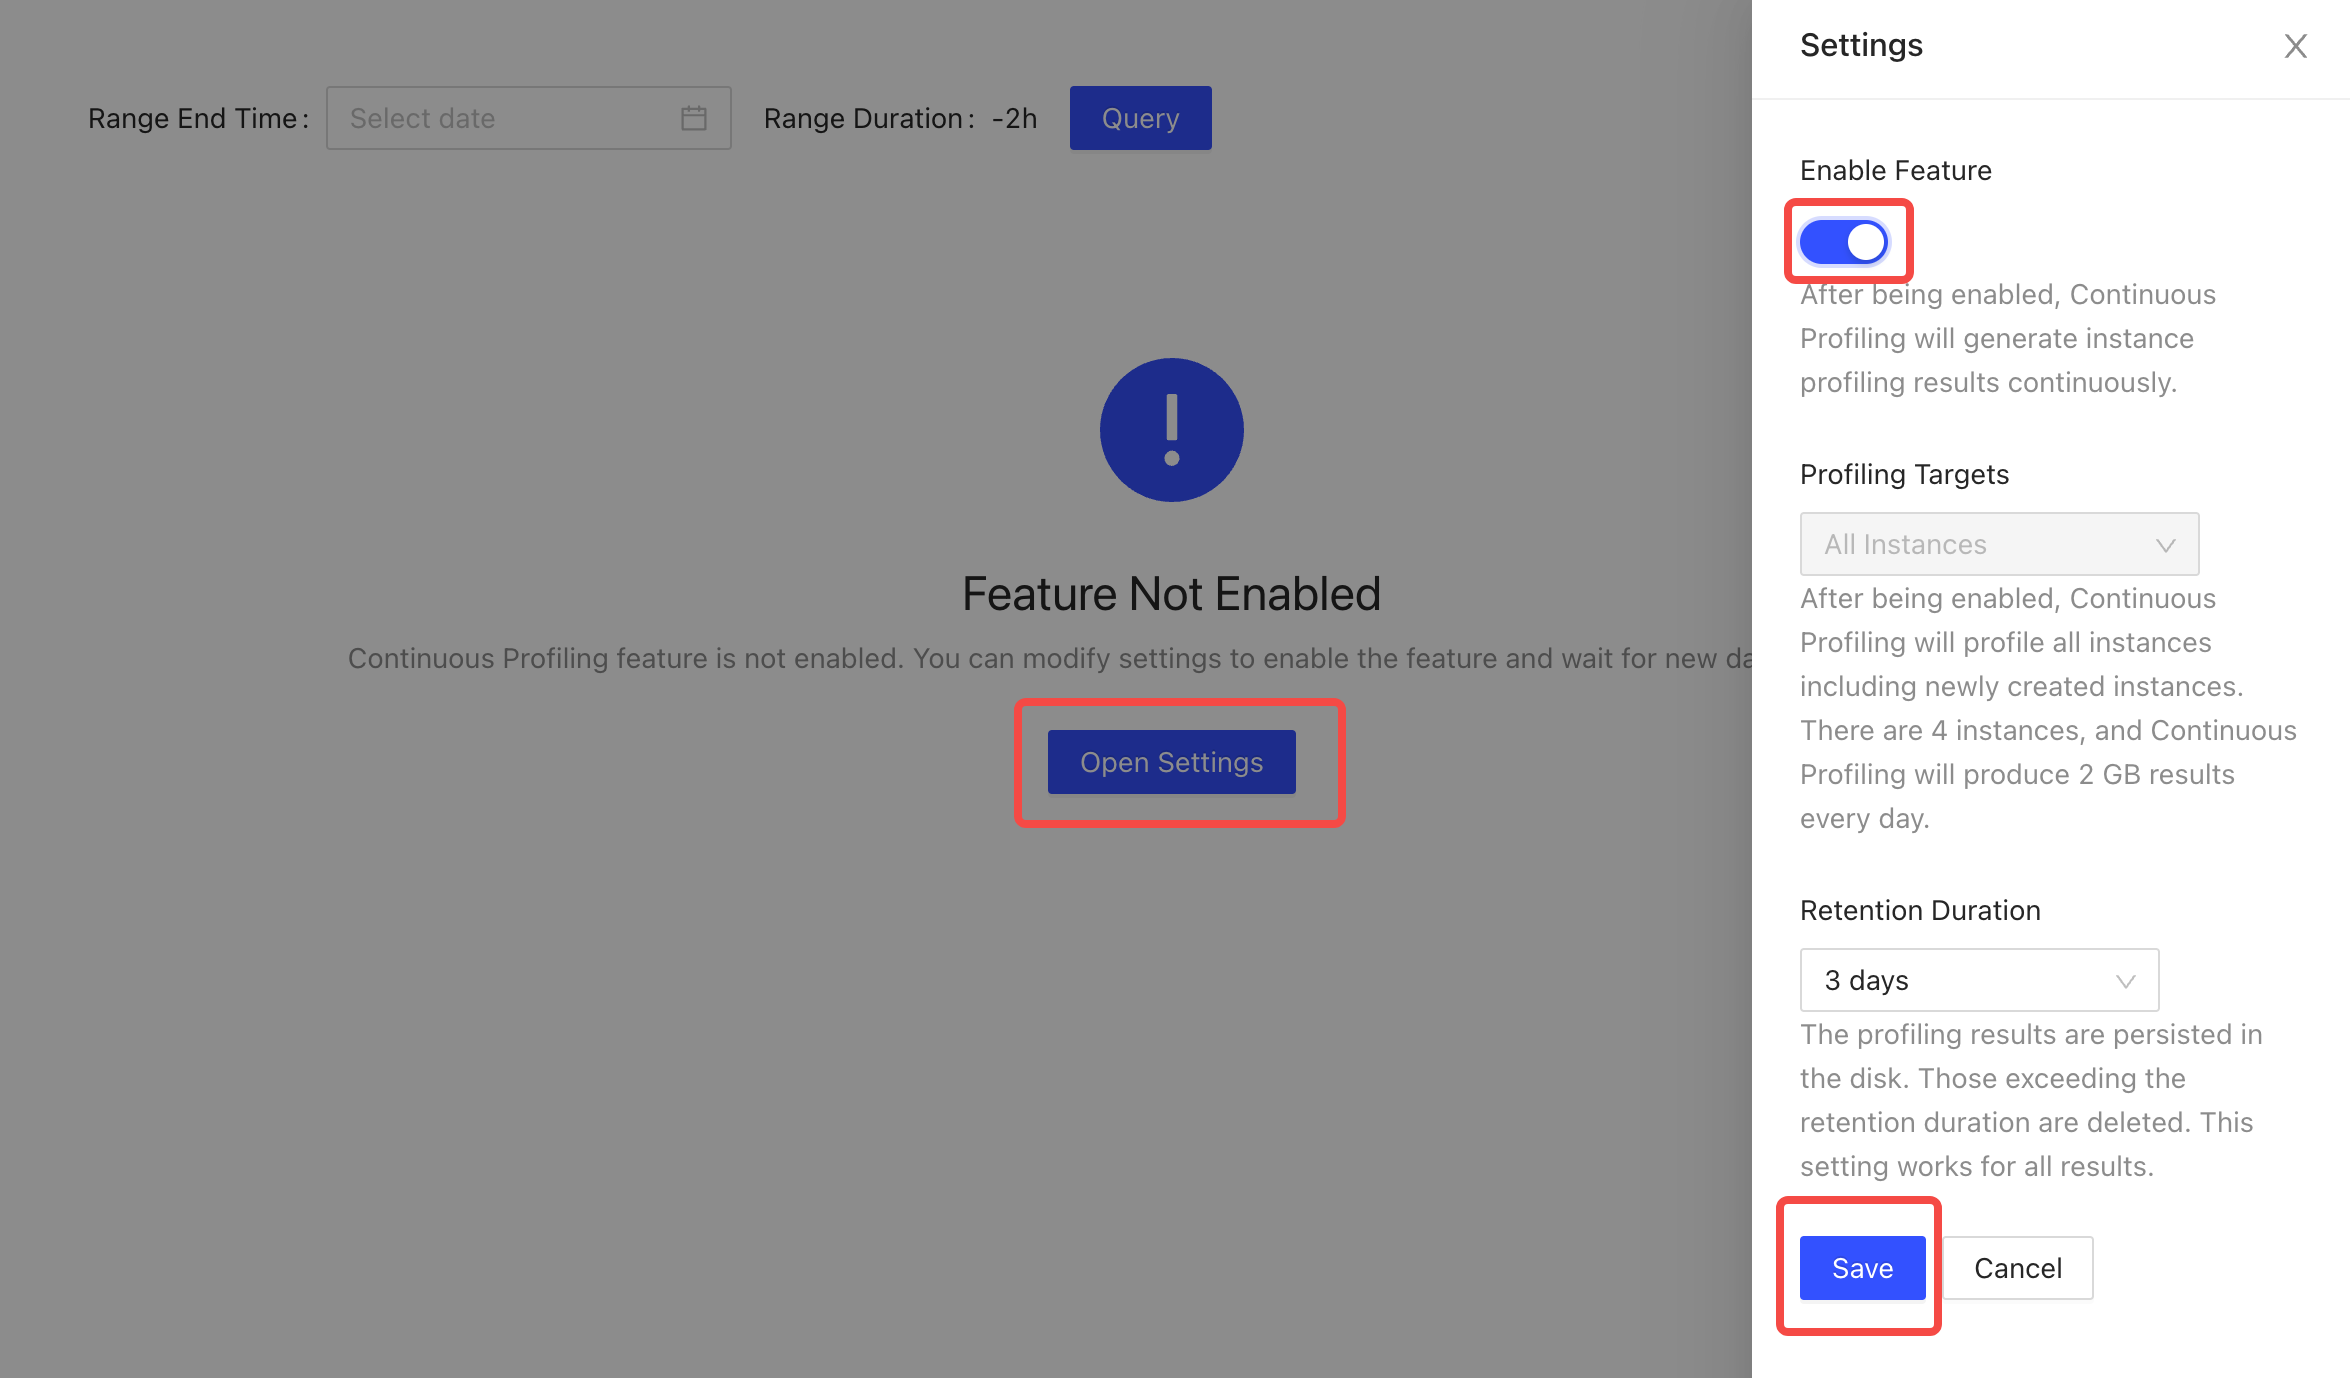
On TiDB Dashboard, click Advanced Debugging > Profiling Instances > Continuous Profiling.
In the displayed window, click Open Settings. Switch on the button under Enable Feature on the right. Modify the value of Retention Duration as required or retain the default value.
Click Save to enable this feature.
For more operations of the Continuous Profiling function, see TiDB Dashboard Instance Profiling - Continuous Profiling.
Unsupported TiDB Dashboard features
Due to the special environment of Kubernetes, some features of TiDB Dashboard are not supported in TiDB Operator, including:
In Overview -> Monitor & Alert -> View Metrics, the link does not direct to the Grafana monitoring dashboard. If you need to access Grafana, refer to Access the Grafana monitoring dashboard.
The log search feature is unavailable. If you need to view the log of a component, execute
kubectl logs ${pod_name} -n {namespace}. You can also view logs using the log service of the Kubernetes cluster.In Cluster Info -> Hosts, the Disk Usage cannot display correctly. You can view the disk usage of each component by viewing the component dashboards in the TidbMonitor dashboard. You can also view the disk usage of Kubernetes nodes by deploying a Kubernetes host monitoring system.