TiDBBinlogチュートリアル
このチュートリアルは、各コンポーネント(Placement Driver、TiKV Server、TiDB Server、Pump、およびDrainer)の単一ノードを使用して、MariaDBServerインスタンスにデータをプッシュするように設定された単純なTiDBBinlogデプロイメントから始まります。
このチュートリアルは、 TiDBアーキテクチャにある程度精通しているユーザー、すでにTiDBクラスタをセットアップしている可能性がある(必須ではない)ユーザー、およびTiDBBinlogを実際に体験したいユーザーを対象としています。このチュートリアルは、TiDB Binlogの「タイヤを蹴る」ための良い方法であり、そのアーキテクチャの概念に慣れるための良い方法です。
このチュートリアルは、x86-64で最新のLinuxディストリビューションを使用していることを前提としています。このチュートリアルでは、例として、VMwareで実行されている最小限のCentOS7インストールを使用しています。既存の環境の癖に影響されないように、クリーンインストールから開始することをお勧めします。ローカル仮想化を使用したくない場合は、クラウドサービスを使用してCentOS7VMを簡単に起動できます。
TiDBBinlogの概要
TiDB Binlogは、TiDBからバイナリログデータを収集し、リアルタイムのデータバックアップとレプリケーションを提供するソリューションです。 TiDBサーバークラスタからダウンストリームプラットフォームに増分データ更新をプッシュします。
TiDB Binlogを使用して、増分バックアップを行ったり、あるTiDBクラスタから別のクラスターにデータを複製したり、Kafkaを介して選択したダウンストリームプラットフォームにTiDB更新を送信したりできます。
TiDB Binlogは、MySQLまたはMariaDBからTiDBにデータを移行する場合に特に便利です。この場合、TiDB DM(データ移行)プラットフォームを使用してMySQL / MariaDBクラスタからTiDBにデータを取得し、TiDBBinlogを使用してTiDBクラスタと同期した個別のダウンストリームMySQL/MariaDBインスタンス/クラスタ。 TiDB Binlogを使用すると、TiDBへのアプリケーショントラフィックをダウンストリームのMySQLまたはMariaDBインスタンス/クラスタにプッシュできます。これにより、ダウンタイムやデータ損失なしにアプリケーションをMySQLまたはMariaDBに簡単に戻すことができるため、TiDBへの移行のリスクが軽減されます。
詳細については、 TiDBBinlogClusterユーザーガイドを参照してください。
建築
TiDB Binlogは、ポンプとドレイナーの2つのコンポーネントで構成されています。いくつかのポンプノードがポンプクラスタを構成します。各PumpノードはTiDBサーバーインスタンスに接続し、クラスタの各TiDBサーバーインスタンスに対して行われた更新を受信します。 DrainerはPumpクラスタに接続し、受信した更新を特定のダウンストリーム宛先(Kafka、別のTiDBクラスター、MySQL / MariaDBサーバーなど)の正しい形式に変換します。
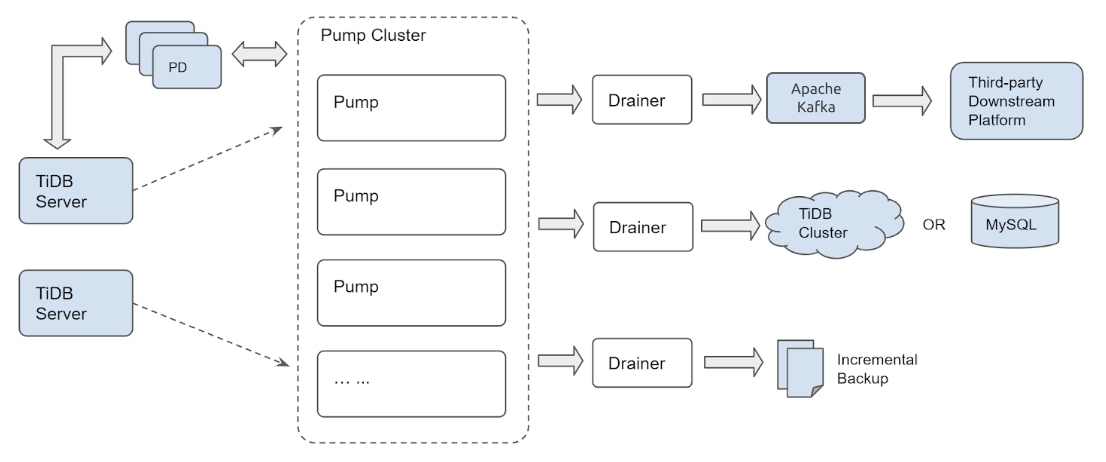
Pumpのクラスター化されたアーキテクチャにより、新しいTiDBサーバーインスタンスがTiDBクラスターに参加または離脱したり、PumpノードがPumpクラスタに参加または離脱したりしても、更新が失われることはありません。
インストール
この場合、MySQLServerの代わりにMariaDBServerを使用しています。これは、RHEL /CentOS7のデフォルトのパッケージリポジトリにMariaDBServerが含まれているためです。後で使用するために、クライアントとサーバーが必要になります。今すぐインストールしましょう:
sudo yum install -y mariadb-server
curl -L https://download.pingcap.org/tidb-latest-linux-amd64.tar.gz | tar xzf -
cd tidb-latest-linux-amd64
期待される出力:
[kolbe@localhost ~]$ curl -LO https://download.pingcap.org/tidb-latest-linux-amd64.tar.gz | tar xzf -
  % Total    % Received % Xferd  Average Speed   Time    Time     Time  Current
                                 Dload  Upload   Total   Spent    Left  Speed
100  368M  100  368M    0     0  8394k      0  0:00:44  0:00:44 --:--:-- 11.1M
[kolbe@localhost ~]$ cd tidb-latest-linux-amd64
[kolbe@localhost tidb-latest-linux-amd64]$
Configuration / コンフィグレーション
次に、 tikv-server 、およびtidb-serverのそれぞれにpd-serverつのインスタンスを使用して、単純なTiDBクラスタを開始します。
以下を使用して構成ファイルにデータを入力します。
printf > pd.toml %s\\n 'log-file="pd.log"' 'data-dir="pd.data"'
printf > tikv.toml %s\\n 'log-file="tikv.log"' '[storage]' 'data-dir="tikv.data"' '[pd]' 'endpoints=["127.0.0.1:2379"]' '[rocksdb]' max-open-files=1024 '[raftdb]' max-open-files=1024
printf > pump.toml %s\\n 'log-file="pump.log"' 'data-dir="pump.data"' 'addr="127.0.0.1:8250"' 'advertise-addr="127.0.0.1:8250"' 'pd-urls="http://127.0.0.1:2379"'
printf > tidb.toml %s\\n 'store="tikv"' 'path="127.0.0.1:2379"' '[log.file]' 'filename="tidb.log"' '[binlog]' 'enable=true'
printf > drainer.toml %s\\n 'log-file="drainer.log"' '[syncer]' 'db-type="mysql"' '[syncer.to]' 'host="127.0.0.1"' 'user="root"' 'password=""' 'port=3306'
次のコマンドを使用して、構成の詳細を確認します。
for f in *.toml; do echo "$f:"; cat "$f"; echo; done
期待される出力:
drainer.toml:
log-file="drainer.log"
[syncer]
db-type="mysql"
[syncer.to]
host="127.0.0.1"
user="root"
password=""
port=3306

pd.toml:
log-file="pd.log"
data-dir="pd.data"

pump.toml:
log-file="pump.log"
data-dir="pump.data"
addr="127.0.0.1:8250"
advertise-addr="127.0.0.1:8250"
pd-urls="http://127.0.0.1:2379"

tidb.toml:
store="tikv"
path="127.0.0.1:2379"
[log.file]
filename="tidb.log"
[binlog]
enable=true

tikv.toml:
log-file="tikv.log"
[storage]
data-dir="tikv.data"
[pd]
endpoints=["127.0.0.1:2379"]
[rocksdb]
max-open-files=1024
[raftdb]
max-open-files=1024
ブートストラップ
これで、各コンポーネントを開始できます。これは特定の順序で行うのが最適です。最初に配置ドライバー(PD)、次にTiKVサーバー、次にポンプ(TiDBはバイナリログを送信するためにポンプサービスに接続する必要があるため)、最後にTiDBサーバーです。
以下を使用してすべてのサービスを開始します。
./bin/pd-server --config=pd.toml &>pd.out &
./bin/tikv-server --config=tikv.toml &>tikv.out &
./bin/pump --config=pump.toml &>pump.out &
sleep 3
./bin/tidb-server --config=tidb.toml &>tidb.out &
期待される出力:
[kolbe@localhost tidb-latest-linux-amd64]$ ./bin/pd-server --config=pd.toml &>pd.out &
[1] 20935
[kolbe@localhost tidb-latest-linux-amd64]$ ./bin/tikv-server --config=tikv.toml &>tikv.out &
[2] 20944
[kolbe@localhost tidb-latest-linux-amd64]$ ./bin/pump --config=pump.toml &>pump.out &
[3] 21050
[kolbe@localhost tidb-latest-linux-amd64]$ sleep 3
[kolbe@localhost tidb-latest-linux-amd64]$ ./bin/tidb-server --config=tidb.toml &>tidb.out &
[4] 21058
jobsを実行すると、実行中のデーモンのリストが表示されます。
[kolbe@localhost tidb-latest-linux-amd64]$ jobs
[1]   Running                 ./bin/pd-server --config=pd.toml &>pd.out &
[2]   Running                 ./bin/tikv-server --config=tikv.toml &>tikv.out &
[3]-  Running                 ./bin/pump --config=pump.toml &>pump.out &
[4]+  Running                 ./bin/tidb-server --config=tidb.toml &>tidb.out &
サービスの1つが開始に失敗した場合(たとえば、「 Running 」ではなく「 Exit 1 」が表示された場合)、その個々のサービスを再起動してみてください。
接続する
これで、TiDBクラスターの4つのコンポーネントすべてが実行され、MariaDB/MySQLコマンドラインクライアントを使用してポート4000でTiDBサーバーに接続できるようになります。
mysql -h 127.0.0.1 -P 4000 -u root -e 'select tidb_version()\G'
期待される出力:
[kolbe@localhost tidb-latest-linux-amd64]$ mysql -h 127.0.0.1 -P 4000 -u root -e 'select tidb_version()\G'
*************************** 1. row ***************************
tidb_version(): Release Version: v3.0.0-beta.1-154-gd5afff70c
Git Commit Hash: d5afff70cdd825d5fab125c8e52e686cc5fb9a6e
Git Branch: master
UTC Build Time: 2019-04-24 03:10:00
GoVersion: go version go1.12 linux/amd64
Race Enabled: false
TiKV Min Version: 2.1.0-alpha.1-ff3dd160846b7d1aed9079c389fc188f7f5ea13e
Check Table Before Drop: false
この時点で、TiDBクラスターが実行されており、クラスタからバイナリログを読み取り、それらをpumpとしてデータディレクトリに保存しています。次のステップは、 drainerが書き込み可能なMariaDBサーバーを起動することです。
以下を使用してdrainerを開始します。
sudo systemctl start mariadb
./bin/drainer --config=drainer.toml &>drainer.out &
MySQLサーバーのインストールを容易にするオペレーティングシステムを使用している場合は、それでも問題ありません。ポート3306でリッスンしていることと、空のパスワードを使用してユーザー「root」として接続できること、または必要に応じてdrainer.tomlを調整できることを確認してください。
mysql -h 127.0.0.1 -P 3306 -u root
show databases;
期待される出力:
[kolbe@localhost ~]$ mysql -h 127.0.0.1 -P 3306 -u root
Welcome to the MariaDB monitor.  Commands end with ; or \g.
Your MariaDB connection id is 20
Server version: 5.5.60-MariaDB MariaDB Server

Copyright (c) 2000, 2018, Oracle, MariaDB Corporation Ab and others.

Type 'help;' or '\h' for help. Type '\c' to clear the current input statement.

MariaDB [(none)]> show databases;
+--------------------+
| Database           |
+--------------------+
| information_schema |
| mysql              |
| performance_schema |
| test               |
| tidb_binlog        |
+--------------------+
5 rows in set (0.01 sec)
ここでは、TiDBクラスタからのバイナリログが適用された時点までを記録するためにdrainerが使用するcheckpointのテーブルを含むtidb_binlogのデータベースをすでに確認できます。
MariaDB [tidb_binlog]> use tidb_binlog;
Database changed
MariaDB [tidb_binlog]> select * from checkpoint;
+---------------------+---------------------------------------------+
| clusterID           | checkPoint                                  |
+---------------------+---------------------------------------------+
| 6678715361817107733 | {"commitTS":407637466476445697,"ts-map":{}} |
+---------------------+---------------------------------------------+
1 row in set (0.00 sec)
次に、TiDBサーバーへの別のクライアント接続を開いて、テーブルを作成し、そこにいくつかの行を挿入できるようにします。 (複数のクライアントを同時に開いたままにできるように、GNU画面でこれを行うことをお勧めします。)
mysql -h 127.0.0.1 -P 4000 --prompt='TiDB [\d]> ' -u root
create database tidbtest;
use tidbtest;
create table t1 (id int unsigned not null AUTO_INCREMENT primary key);
insert into t1 () values (),(),(),(),();
select * from t1;
期待される出力:
TiDB [(none)]> create database tidbtest;
Query OK, 0 rows affected (0.12 sec)

TiDB [(none)]> use tidbtest;
Database changed
TiDB [tidbtest]> create table t1 (id int unsigned not null AUTO_INCREMENT primary key);
Query OK, 0 rows affected (0.11 sec)

TiDB [tidbtest]> insert into t1 () values (),(),(),(),();
Query OK, 5 rows affected (0.01 sec)
Records: 5  Duplicates: 0  Warnings: 0

TiDB [tidbtest]> select * from t1;
+----+
| id |
+----+
|  1 |
|  2 |
|  3 |
|  4 |
|  5 |
+----+
5 rows in set (0.00 sec)
MariaDBクライアントに戻ると、新しいデータベース、新しいテーブル、および新しく挿入された行が見つかります。
use tidbtest;
show tables;
select * from t1;
期待される出力:
MariaDB [(none)]> use tidbtest;
Reading table information for completion of table and column names
You can turn off this feature to get a quicker startup with -A

Database changed
MariaDB [tidbtest]> show tables;
+--------------------+
| Tables_in_tidbtest |
+--------------------+
| t1                 |
+--------------------+
1 row in set (0.00 sec)

MariaDB [tidbtest]> select * from t1;
+----+
| id |
+----+
|  1 |
|  2 |
|  3 |
|  4 |
|  5 |
+----+
5 rows in set (0.00 sec)
MariaDBサーバーにクエリを実行するときにTiDBに挿入したのと同じ行が表示されます。おめでとう! TiDBBinlogを設定しました。
binlogctl
クラスタに参加したポンプとドレイナーに関する情報は、PDに保存されます。 binlogctlツールクエリを使用して、それらの状態に関する情報を操作できます。詳細については、 binlogctlガイドを参照してください。
binlogctlを使用して、クラスタのポンプとドレイナーの現在のステータスを表示します。
./bin/binlogctl -cmd drainers
./bin/binlogctl -cmd pumps
期待される出力:
[kolbe@localhost tidb-latest-linux-amd64]$ ./bin/binlogctl -cmd drainers
[2019/04/11 17:44:10.861 -04:00] [INFO] [nodes.go:47] ["query node"] [type=drainer] [node="{NodeID: localhost.localdomain:8249, Addr: 192.168.236.128:8249, State: online, MaxCommitTS: 407638907719778305, UpdateTime: 2019-04-11 17:44:10 -0400 EDT}"]

[kolbe@localhost tidb-latest-linux-amd64]$ ./bin/binlogctl -cmd pumps
[2019/04/11 17:44:13.904 -04:00] [INFO] [nodes.go:47] ["query node"] [type=pump] [node="{NodeID: localhost.localdomain:8250, Addr: 192.168.236.128:8250, State: online, MaxCommitTS: 407638914024079361, UpdateTime: 2019-04-11 17:44:13 -0400 EDT}"]
Drainerを強制終了すると、クラスタはそれを「一時停止」状態にします。これは、クラスタがDrainerが再び参加することを期待していることを意味します。
pkill drainer
./bin/binlogctl -cmd drainers
期待される出力:
[kolbe@localhost tidb-latest-linux-amd64]$ pkill drainer
[kolbe@localhost tidb-latest-linux-amd64]$ ./bin/binlogctl -cmd drainers
[2019/04/11 17:44:22.640 -04:00] [INFO] [nodes.go:47] ["query node"] [type=drainer] [node="{NodeID: localhost.localdomain:8249, Addr: 192.168.236.128:8249, State: paused, MaxCommitTS: 407638915597467649, UpdateTime: 2019-04-11 17:44:18 -0400 EDT}"]
「NodeIDs」をbinlogctlとすると、個々のノードを制御できます。この場合、ドレイナーのNodeIDは「localhost.localdomain:8249」であり、ポンプのNodeIDは「localhost.localdomain:8250」です。
このチュートリアルでのbinlogctlの主な使用法は、クラスタの再起動の場合である可能性があります。 TiDBクラスタのすべてのプロセスを終了して再起動しようとすると(ダウンストリームのMySQL / MariaDBサーバーまたはDrainerを除く)、PumpはDrainerに接続できず、Drainerがまだ「オンライン」であると信じているため、起動を拒否します。
この問題には3つの解決策があります。
プロセスを強制終了する代わりに、
binlogctlを使用してDrainerを停止します。./bin/binlogctl --pd-urls=http://127.0.0.1:2379 --cmd=drainers ./bin/binlogctl --pd-urls=http://127.0.0.1:2379 --cmd=offline-drainer --node-id=localhost.localdomain:8249ポンプを始動する前にドレイナーを始動してください。
PDを開始した後(ただし、ドレイナーとポンプを開始する前)に
binlogctlを使用して、一時停止したドレイナーの状態を更新します。./bin/binlogctl --pd-urls=http://127.0.0.1:2379 --cmd=update-drainer --node-id=localhost.localdomain:8249 --state=offline
掃除
TiDBクラスタおよびTiDBBinlogプロセスを停止するには、クラスタを形成するすべてのプロセス(pd-server、tikv-server、pump、tidb-server、drainer)を開始したシェルでpkill -P $$を実行できます。各コンポーネントをクリーンにシャットダウンするのに十分な時間を与えるには、特定の順序でコンポーネントを停止すると便利です。
for p in tidb-server drainer pump tikv-server pd-server; do pkill "$p"; sleep 1; done
期待される出力:
kolbe@localhost tidb-latest-linux-amd64]$ for p in tidb-server drainer pump tikv-server pd-server; do pkill "$p"; sleep 1; done
[4]-  Done                    ./bin/tidb-server --config=tidb.toml &>tidb.out
[5]+  Done                    ./bin/drainer --config=drainer.toml &>drainer.out
[3]+  Done                    ./bin/pump --config=pump.toml &>pump.out
[2]+  Done                    ./bin/tikv-server --config=tikv.toml &>tikv.out
[1]+  Done                    ./bin/pd-server --config=pd.toml &>pd.out
すべてのサービスが終了した後にクラスタを再始動する場合は、最初に実行したのと同じコマンドを使用してサービスを開始します。上記のbinlogctlセクションで説明したように、 pumpの前にdrainerを開始し、 tidb-serverの前にpumpを開始する必要があります。
./bin/pd-server --config=pd.toml &>pd.out &
./bin/tikv-server --config=tikv.toml &>tikv.out &
./bin/drainer --config=drainer.toml &>drainer.out &
sleep 3
./bin/pump --config=pump.toml &>pump.out &
sleep 3
./bin/tidb-server --config=tidb.toml &>tidb.out &
コンポーネントのいずれかが起動に失敗した場合は、失敗した個々のコンポーネントを再起動してみてください。
結論
このチュートリアルでは、単一のポンプと単一のドレイナーを備えたクラスタを使用して、TiDBクラスタからダウンストリームのMariaDBサーバーに複製するようにTiDBBinlogを設定しました。これまで見てきたように、TiDB Binlogは、TiDBクラスタへの変更をキャプチャして処理するための包括的なプラットフォームです。
より堅牢な開発、テスト、または本番デプロイメントでは、高可用性とスケーリングの目的で複数のTiDBサーバーを使用し、複数のPumpインスタンスを使用して、TiDBサーバーインスタンスへのアプリケーショントラフィックがPumpの問題の影響を受けないようにします。クラスタ。追加のDrainerインスタンスを使用して、更新をさまざまなダウンストリームプラットフォームにプッシュしたり、増分バックアップを実装したりすることもできます。